 Help Center
Help Center
Help Center
On this page you will learn how to connect various carts and Payment processors with Visiopt™ for better and more accurate tracking. This will also enable you to see and track revenue tin both testing and campaigns.
Please note: Steps 1-3 have been updated and simplified. Simply read this article here to continue.
After you set up your webhook, re-visit tis page to get instructions on how to add the webhook to your cart or processor.
Step 4: Place the webhook in your cart or processor.
This only has to be completed one time. You will get the same details wether you activated your webhook inside of tests or campaigns.
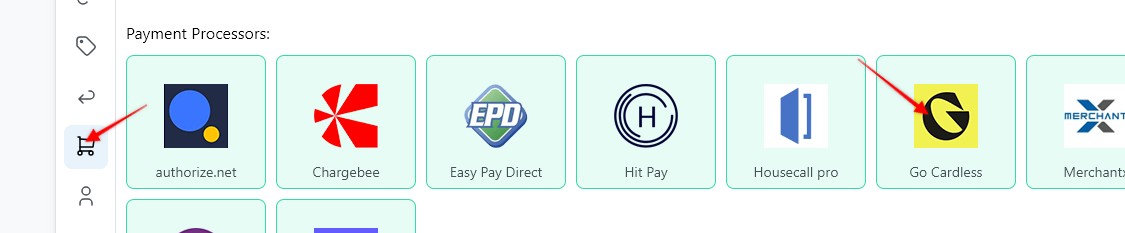
To learn how to get the proper webhook link in Visiopt, and how to connect it to various Carts and Payment Processors please pick on the name of your processor or cart below.
Remember this process can be completed in either testing or campaign. Once you set it up it will be available for use in both tests and campaigns
Note: Visiopt matches the email from your funnel or checkout to match with the details sent back to us by your cart or payment processor.
In order for this process to work properly Visiopt has to collect the email address of your buyer. In most cases this is done simply by adding your checkout page to your funnel as shown in step 1.
This will also work if any page where you collect emails is added to your funnel.
When you click on the list of carts below, we have added step by step instructions for adding VisiSmart Code to your carts checkout page.
Note: A new unique Webhook must be created for each test or campaign created.
When a campaign and test share the same funnel then the same Webhook may be used for both.
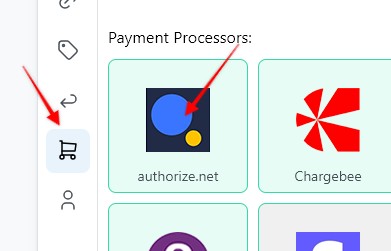
1. To Create a webhook go to Settings page > Payment Processing and Carts > Authorize
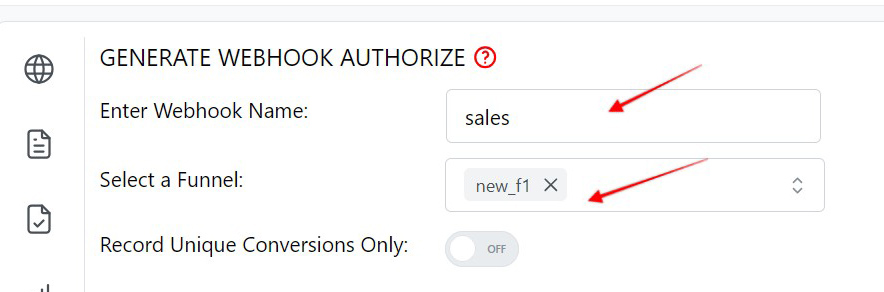
2. Enter a Webhook name, select the Funnel to associate the webhook with.
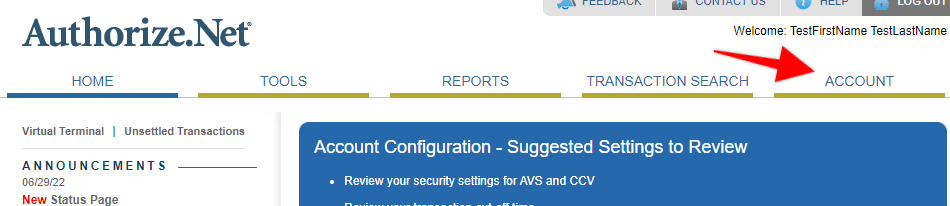
3. Next, connect Authorize.net by entering the Login ID and Authorization Key. Log in to Authorzie.net click on the "Account" link
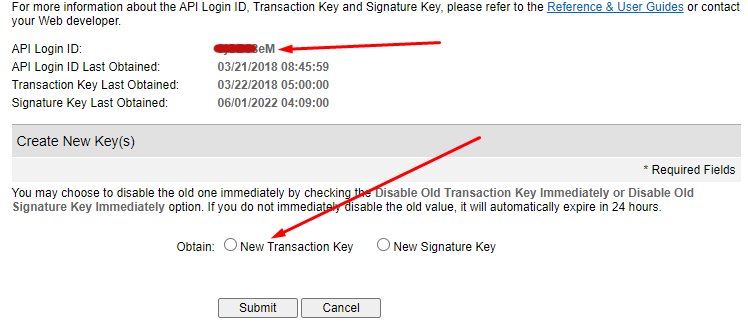
4. Then under the "Security Settings" section click on the "API Credentials & Keys" link
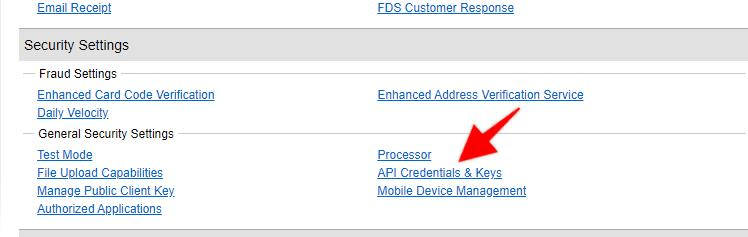
5. Copy the "API login Id" and create a new "Transaction key" copy both
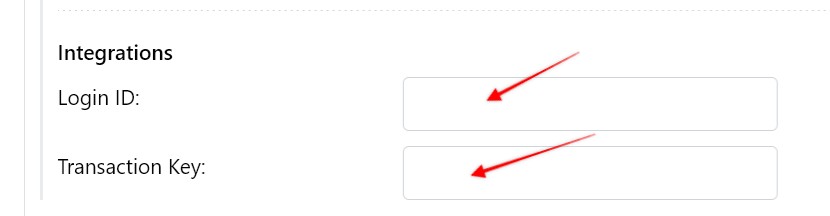
6. Head back to Visiopt and paste the "API login Id" and the "Transaction key"
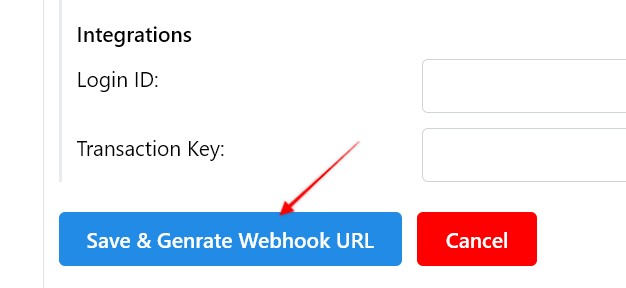
7. Hit Save and Generate Webhook URL
1. In Visiopt hit Save & Generate Webhook URL without entering the API details. Then copy the generated URL.
2. Log in to your Authorize.net account. Go to Account → Business Settings → Webhooks.
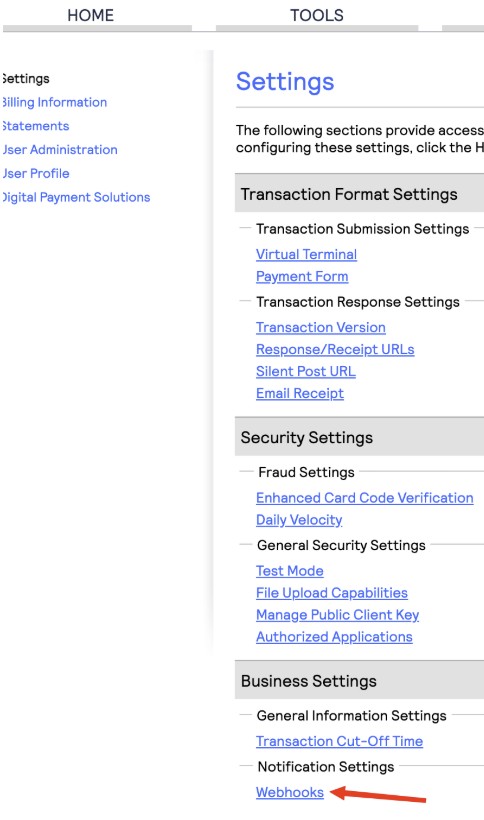
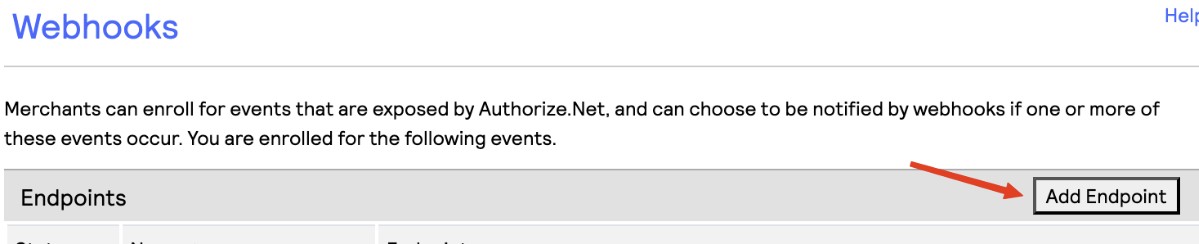
3. Click Add Endpoint.
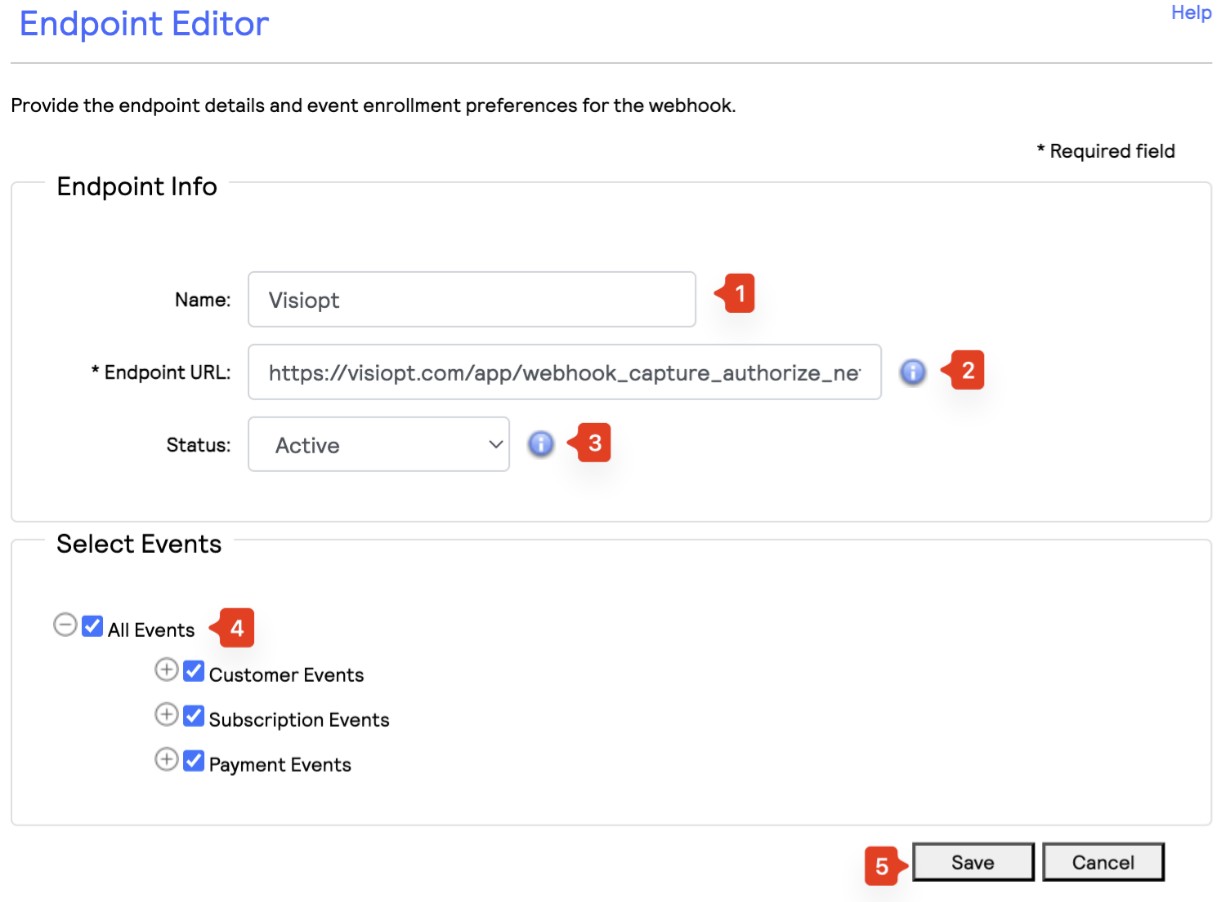
Complete the form with the following information:
- Endpoint Name: Enter any descriptive name (for example, Visiopt Webhook)
- Endpoint URL: Paste the webhook URL generated by VisiOpt.
- Status: Set to Active
- Events: Select All Events
Click Save.
Some carts and processors will send a separate webhook notification for the main sale and each upsell purchased. This will cause multiple conversions to be recorded.
For simple instructions to stop this click HERE.
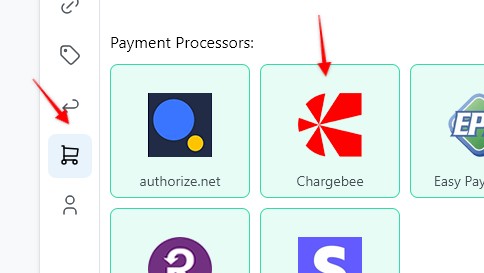
1. To Create a webhook go to Settings page > Payment Processing and Carts > Chargebee
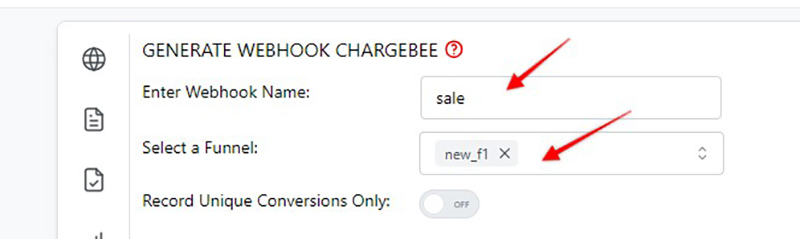
2. Enter a Webhook name, select the Funnel to associate the webhook with.
3. To create the webhook automatically without any manual setup, you need to enter your ChargeBee integration credentials (Site Name and API Key) in VisiOpt before clicking Save & Generate Webhook URL.
Do not click Save yet. First, obtain your API credentials as described below.
Site name - Your site name is the first part of your Chargebee URL.
For example:
Chargebee URL: https://acme-test.chargebee.com
Site Name: acme-test
Copy your Site Name and paste it into the Site Name field in Visiopt.
4. To get your API key, log in to your Chargebee account and navigate to Configure → Chargebee → API Keys.
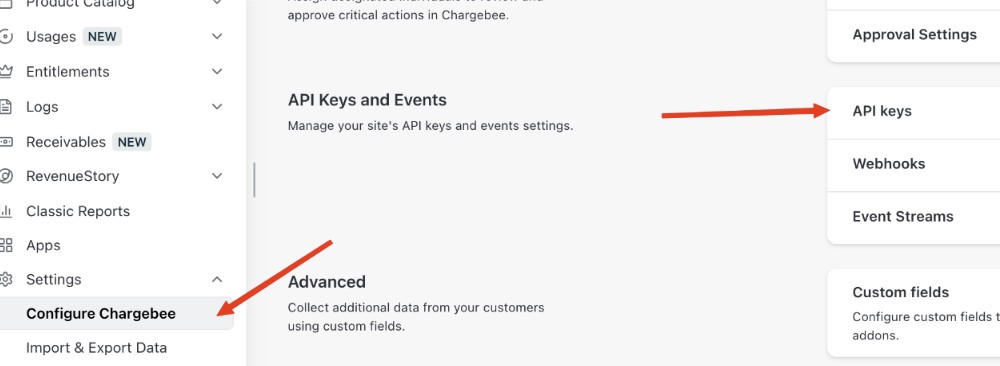
5. If you already have a Full Access API Key with Write permissions, copy it.
6. If you don't have one, click Add API Key.
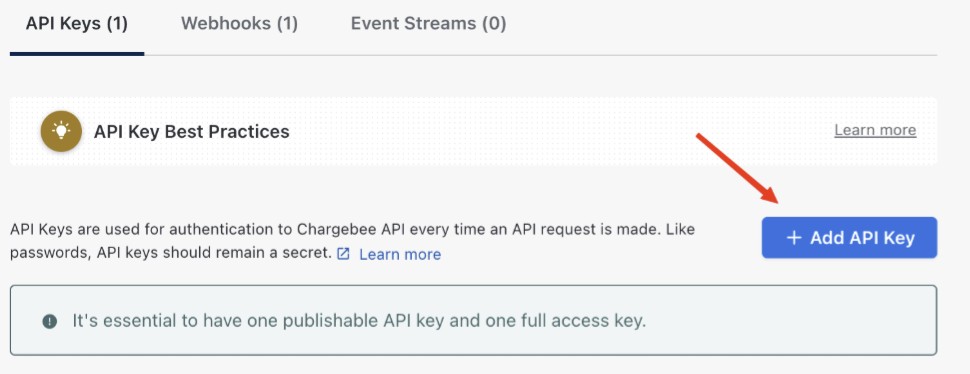
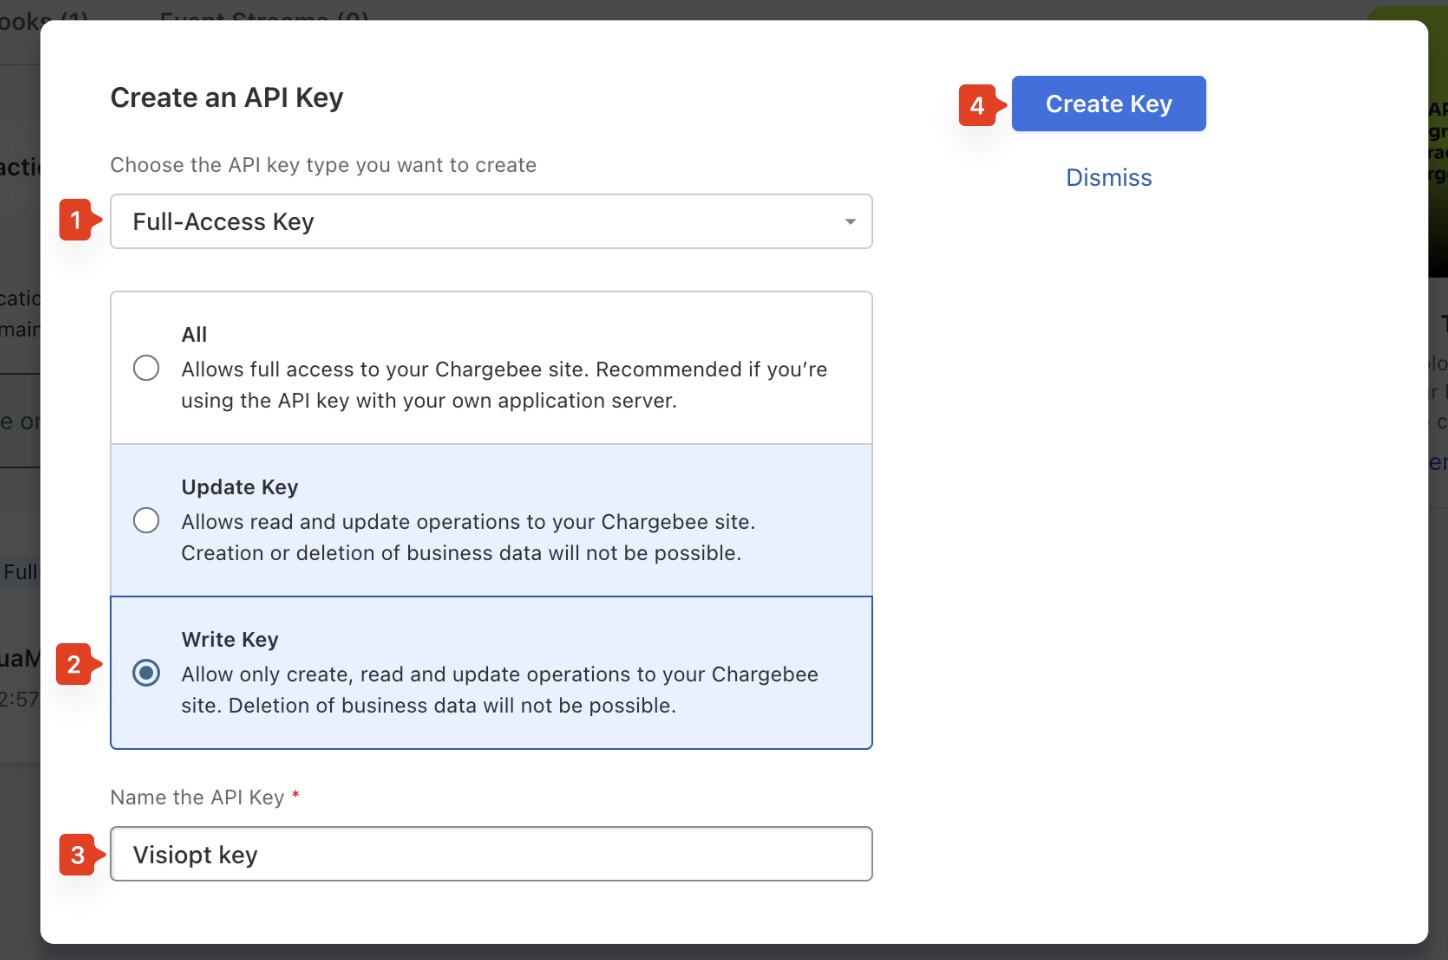
7. Configure the API key as follows:
a. Access Level: Full Access
b. Permissions: Write
c. Key Name: Enter any descriptive name (for example, VisiOpt API Key)
Create the API key.
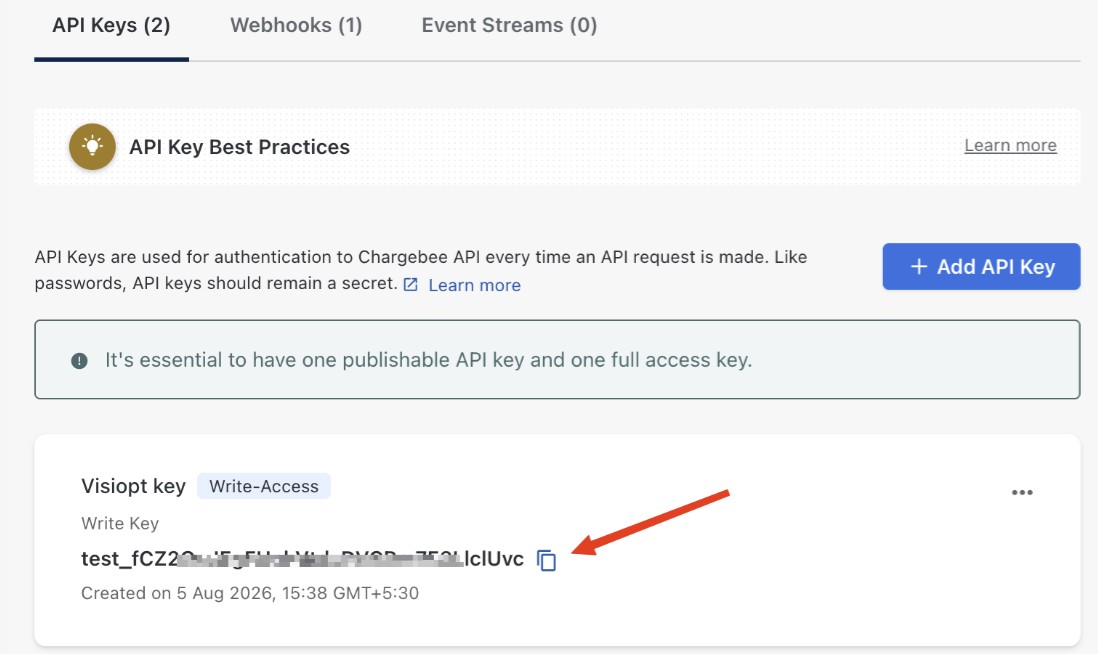
8. Copy the generated API key and paste it into the API Key field in Visiopt.
6. Hit Save & Generate Webhook URL.
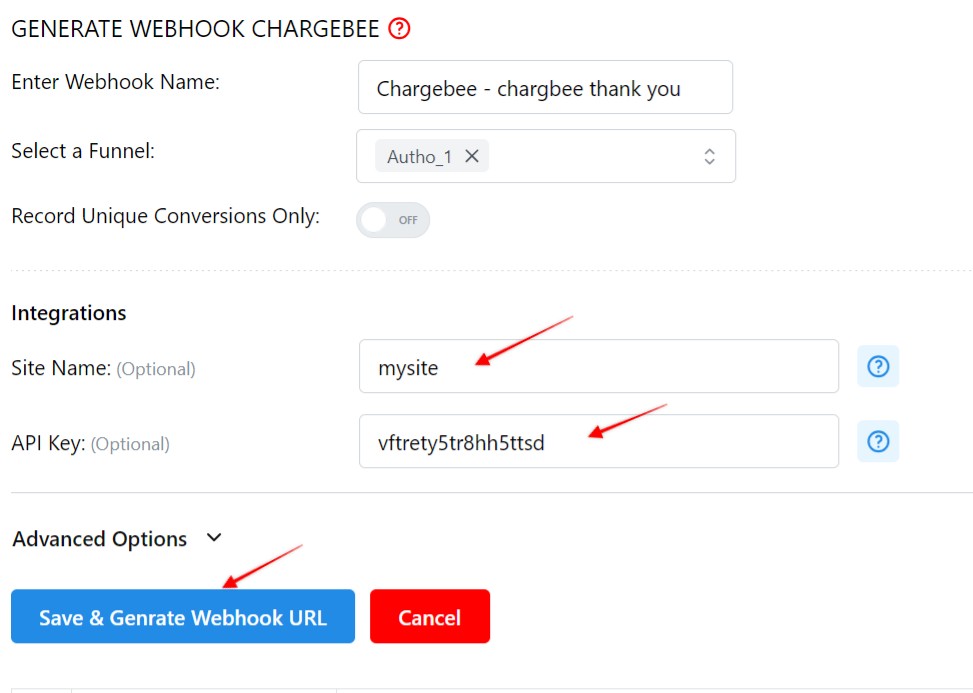
Visiopt will generate a webhook URL and automatically create the webhook in your ChargeBee account.
Verify the Webhook
To confirm that the webhook was created successfully:
1. Log in to your ChargeBee account.
2. Navigate to Configure Chargebee → Webhooks.
3. Look for the webhook endpoint created by Visiopt.
If you can see the VisiOpt webhook URL in the list, your integration is complete and ready to use.
1. In Visiopt hit Save & Generate Webhook URL without entering the API details. Then copy the generated URL.
2. Log in to your ChargeBee account, navigate to Configure Chargebee → Webhooks. Click Add Webhook.
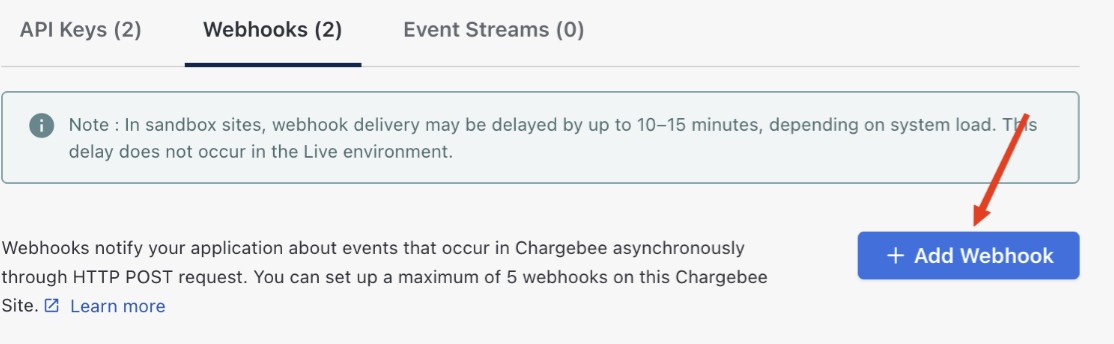
3. Fill in the following details:
Webhook Name: Enter any descriptive name
Webhook URL: Paste the webhook URL generated by Visiopt
Select Latest API version
Select Payment Succeeded as Events to send.
Click Create.
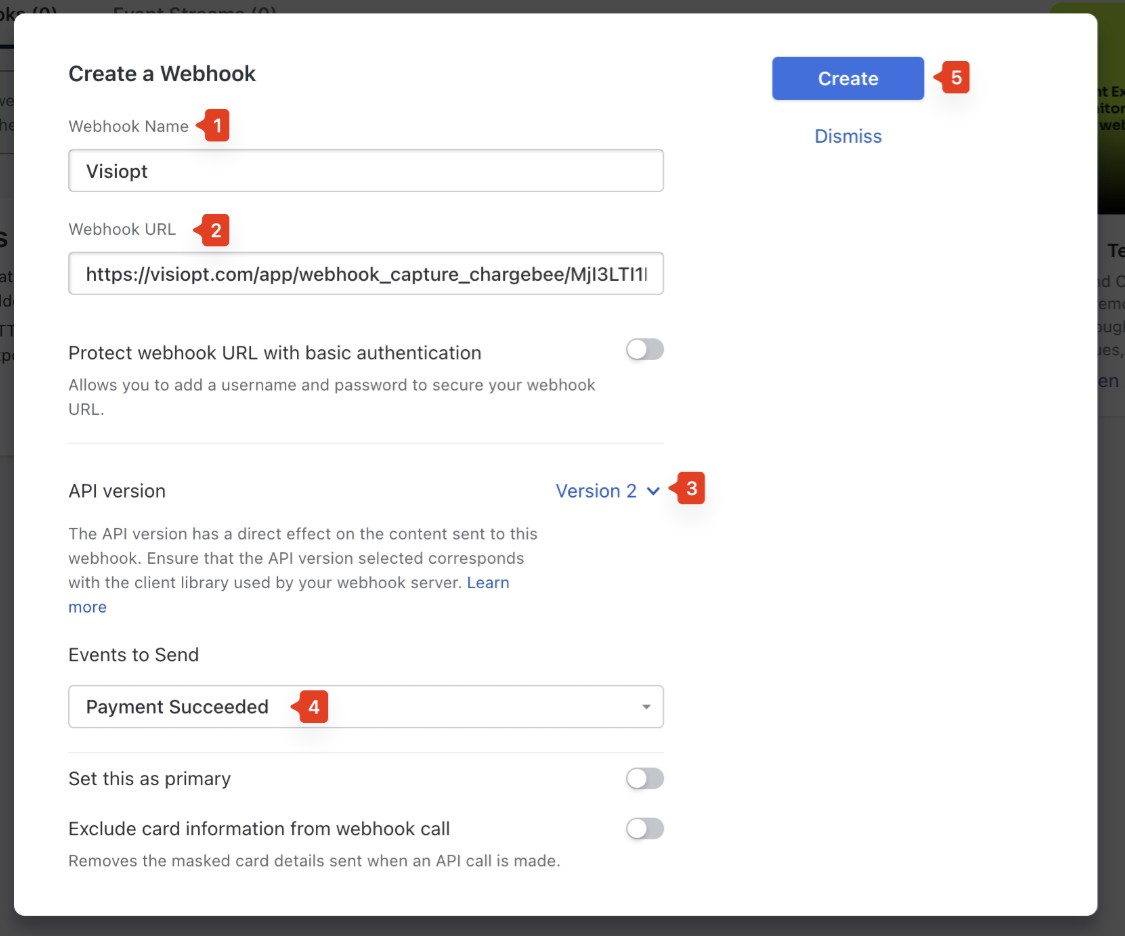
Your Chargebee webhook is now connected to Visiopt and ready to send events.
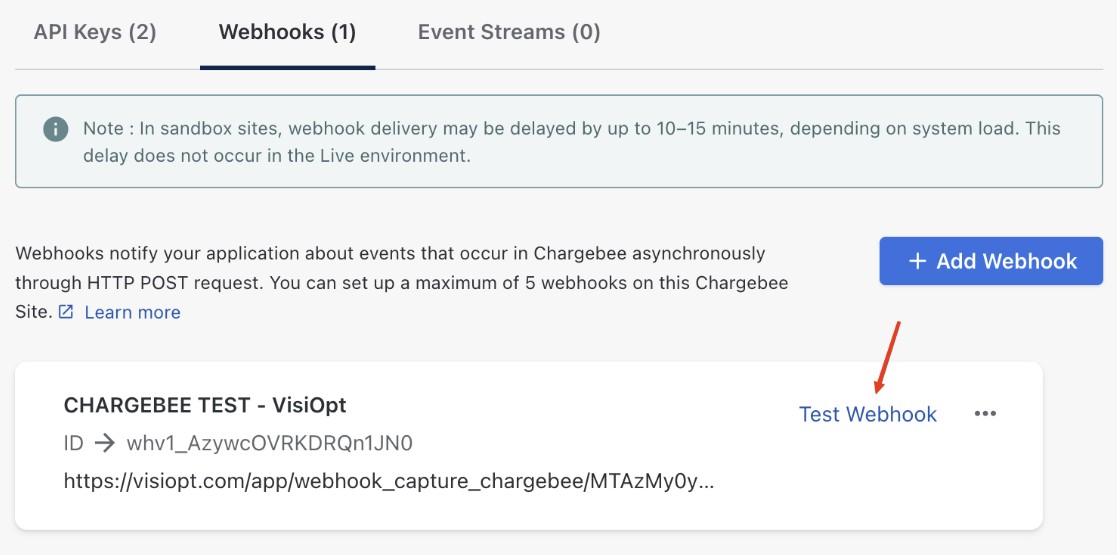
Verify the Webhook
Chargebee provides a Test Webhook feature that lets you verify whether your VisiOpt webhook is configured correctly.
1. After creating the webhook, locate the Visiopt webhook in your Chargebee account.
2. Click the Test Webhook button for that webhook.
Select the Payment Succeeded event. Click Test URL to send a test webhook.
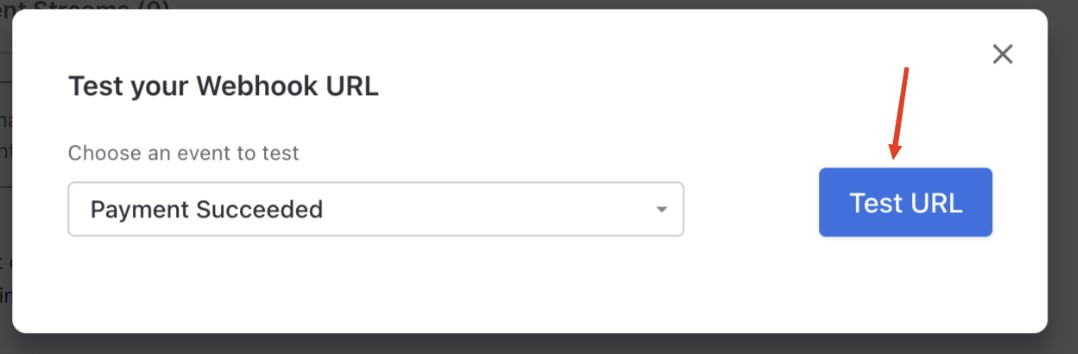
If the webhook is configured correctly, Chargebee will display a Success message.
Some carts and processors will send a separate webhook notification for the main sale and each upsell purchased. This will cause multiple conversions to be recorded.
For simple instructions to stop this click HERE.
1. To Create a webhook go to Settings page > Payment Processing and Carts > Easy Pay Direct
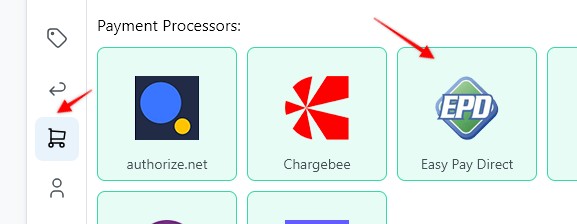
2. Enter a Webhook name, select the Funnel to associate the webhook with, hit Save and Generate Webhook URL
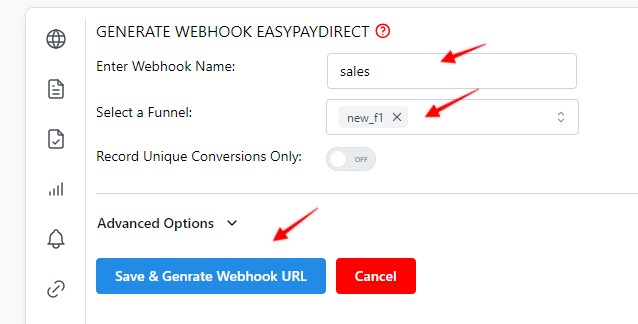
3. Copy the webhook URL

3. Copy the webhook URL, and hit Save
4. Log in to Easy Pay Direct and in the sidebar, Under the Options section click on the Settings
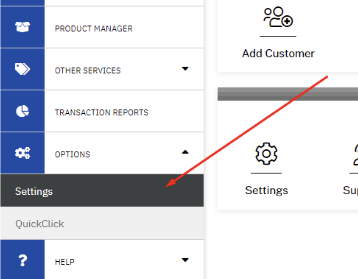
5. In the Transactions Options section click on the "Webhooks" link
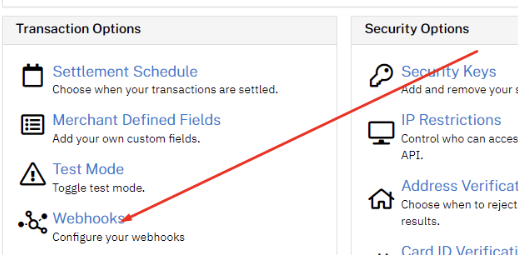
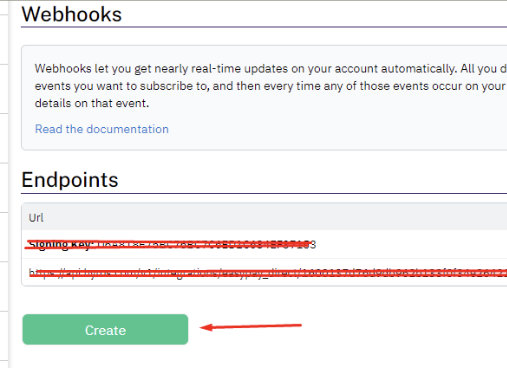
6. Click on the 'Create" button
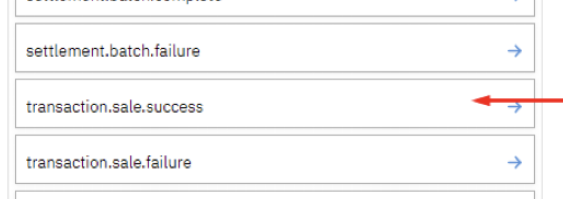
7. Select the "tranaction.sale.success" event and click on the Save changes button
Some carts and processors will send a separate webhook notification for the main sale and each upsell purchased. This will cause multiple conversions to be recorded.
For simple instructions to stop this click HERE.
1. To Create a webhook go to Settings page > Payment Processing and Carts > GoCardless
2. Enter a Webhook name, select the Funnel to associate the webhook with, then. click Advanced Options
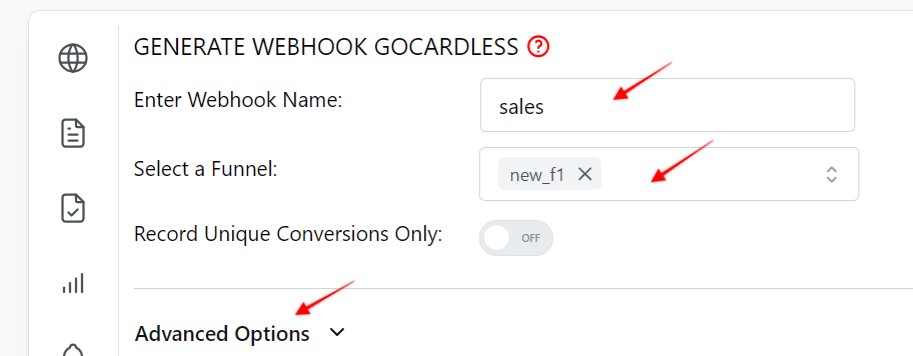
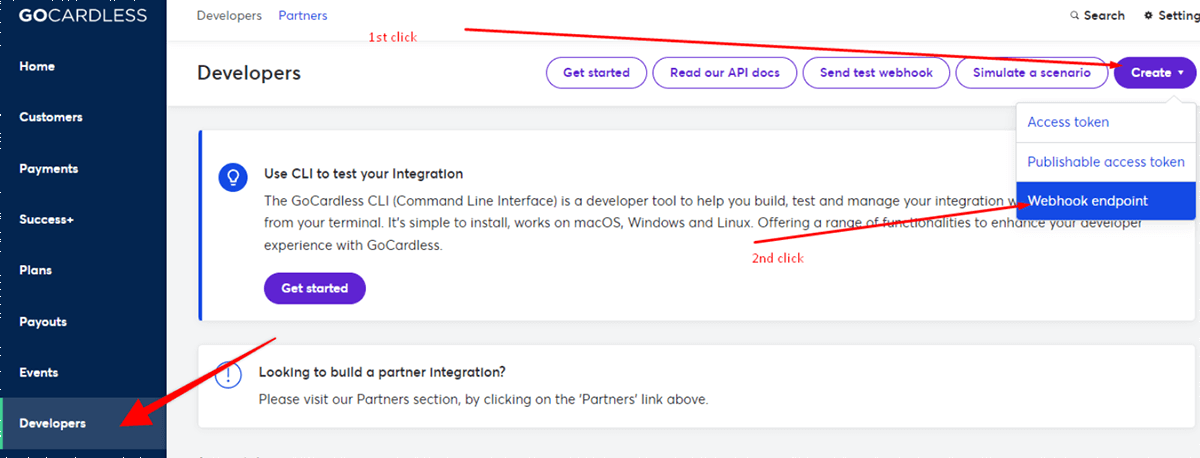
3. Log in to GoCardless and in the left side bar go to Developers > Create > Weebhook
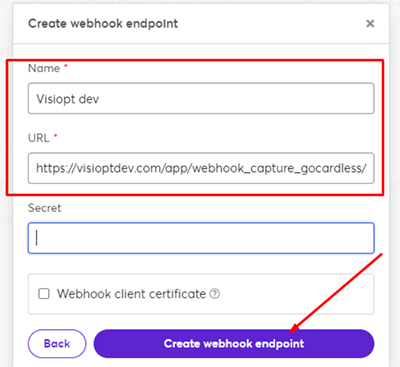
4. Fill out the fields as shown below
5. Then select Create > Access Token
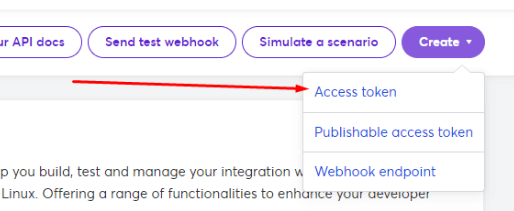
7. Then create the Access token as shown below
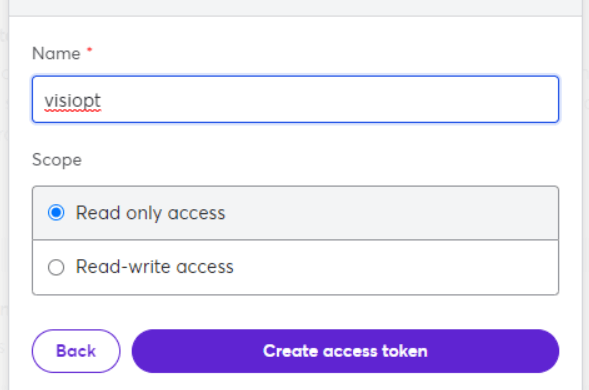
8. Head back to Visiopt and paste in the Acces Token, Select Site, and hit Save and Generate Webhook URL
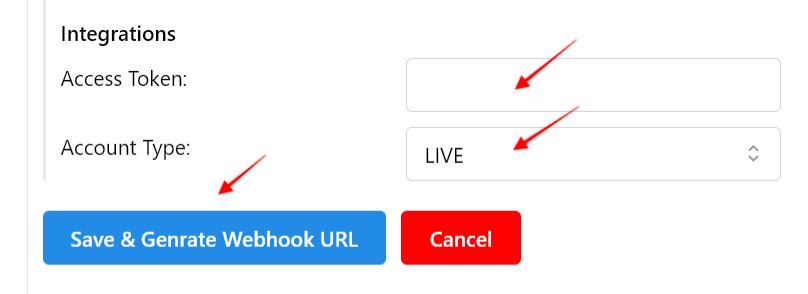
9. Copy the webhook URL
10. Heda back to your GoCardless account and in the left side bar go to Developers > Create > Weebhook
11. Fill out the fields as shown below
12. Then select Create > Access Token
13. Then create the Access token as shown below
Some carts and processors will send a separate webhook notification for the main sale and each upsell purchased. This will cause multiple conversions to be recorded.
For simple instructions to stop this click HERE.
1. To Create a webhook go to Settings → Payment Processing & Carts → HitPay
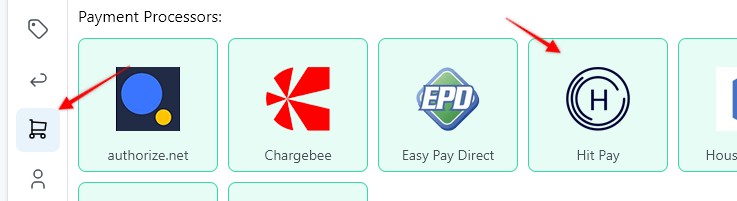
2. Enter a Webhook name, select the Funnel to associate the webhook with.
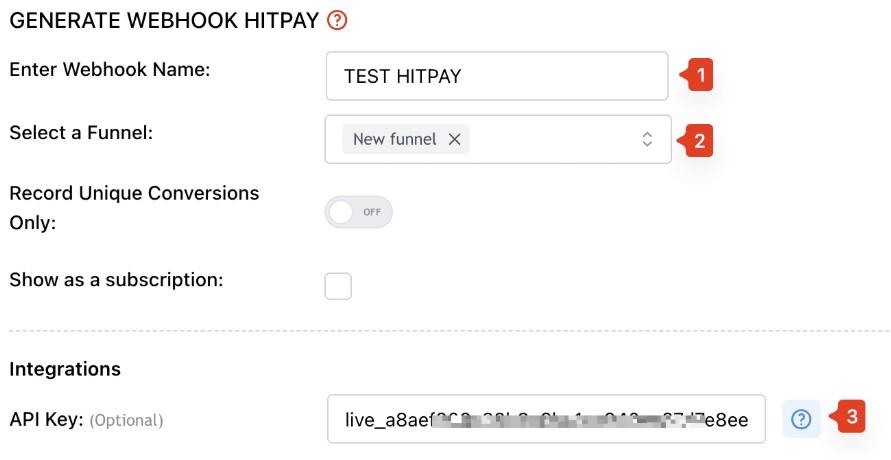
3. Note: To create the webhook automatically without any manual setup, it is recommended to enter your HitPay integration credentials (API Key) in VisiOpt before clicking Save & Generate Webhook URL.
Do not click Save yet. First, obtain your API credentials as described below.
4. To get Your API Key log in to your HitPay account and navigate to Developers → API Keys.
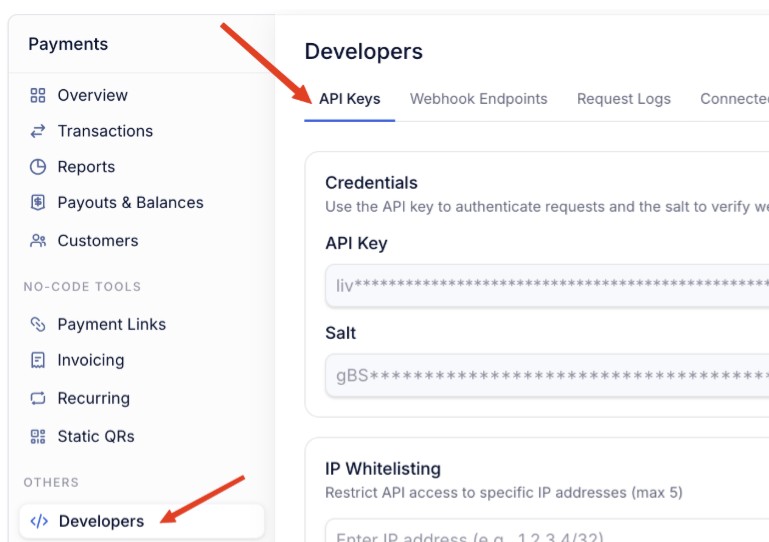
4. Copy the API key and paste it into the API Key field in Visiopt.
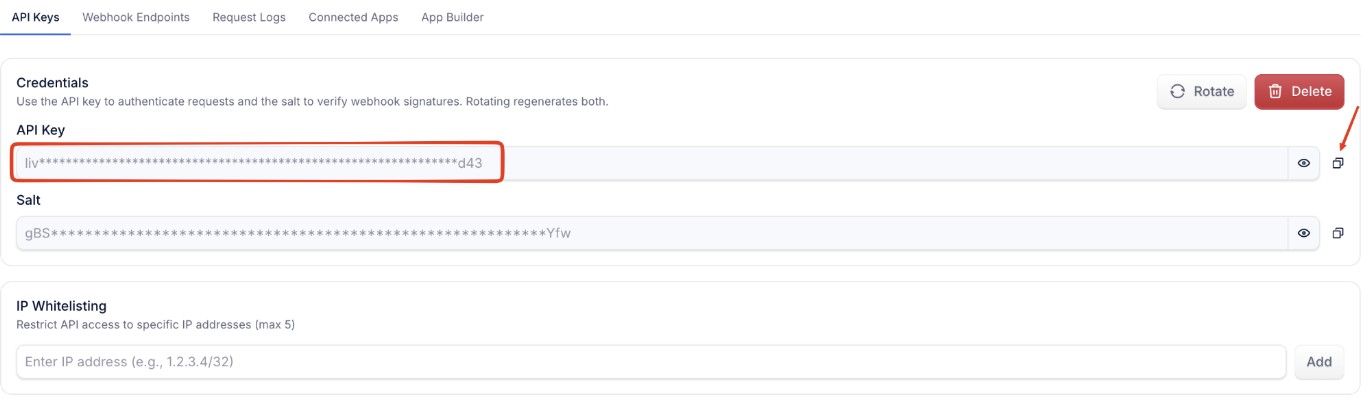
In Visiopt, click Save & Generate Webhook URL. Visiopt will generate a webhook URL and automatically create the webhook in your HitPay account.
Verify the Webhook
To confirm that the webhook was created successfully:
1. Log in to your Hitpay account.
2. Navigate to Developers → Webhooks Endpoints.
3. Look for the webhook endpoint created by Visiopt.
If you can see the VisiOpt webhook URL in the list, your integration is complete and ready to use.
1. In Visiopt hit Save & Generate Webhook URL without entering the API details. Then copy the generated URL.
2. Log in to your HitPay account, navigate to Developers → Webhooks Endpoints. Click New Webhook.
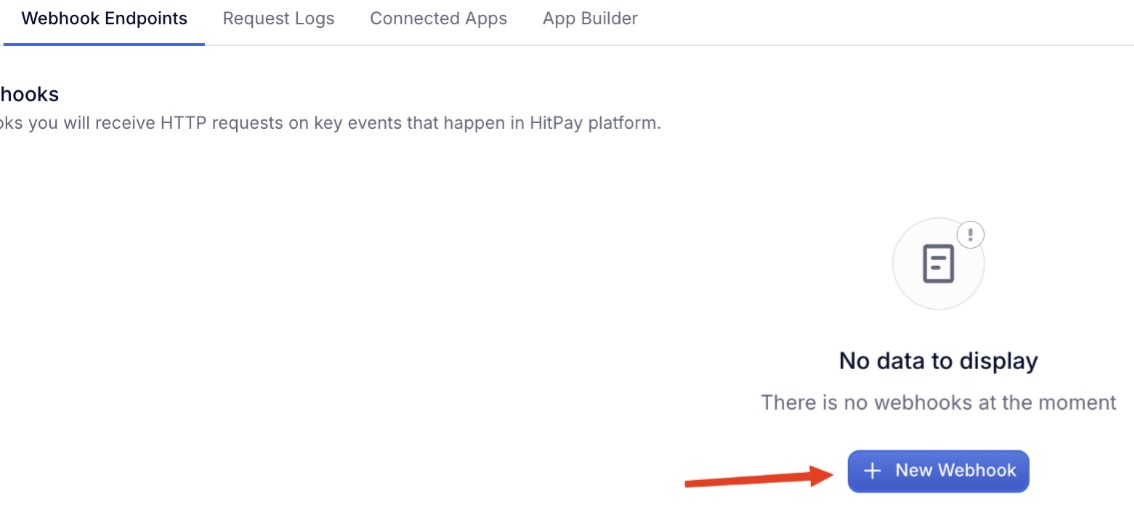
3. Fill in the following details:
Webhook Name: Enter any descriptive name
Webhook URL: Paste the webhook URL generated by Visiopt
Select Charge Created as an Event. Click Save.
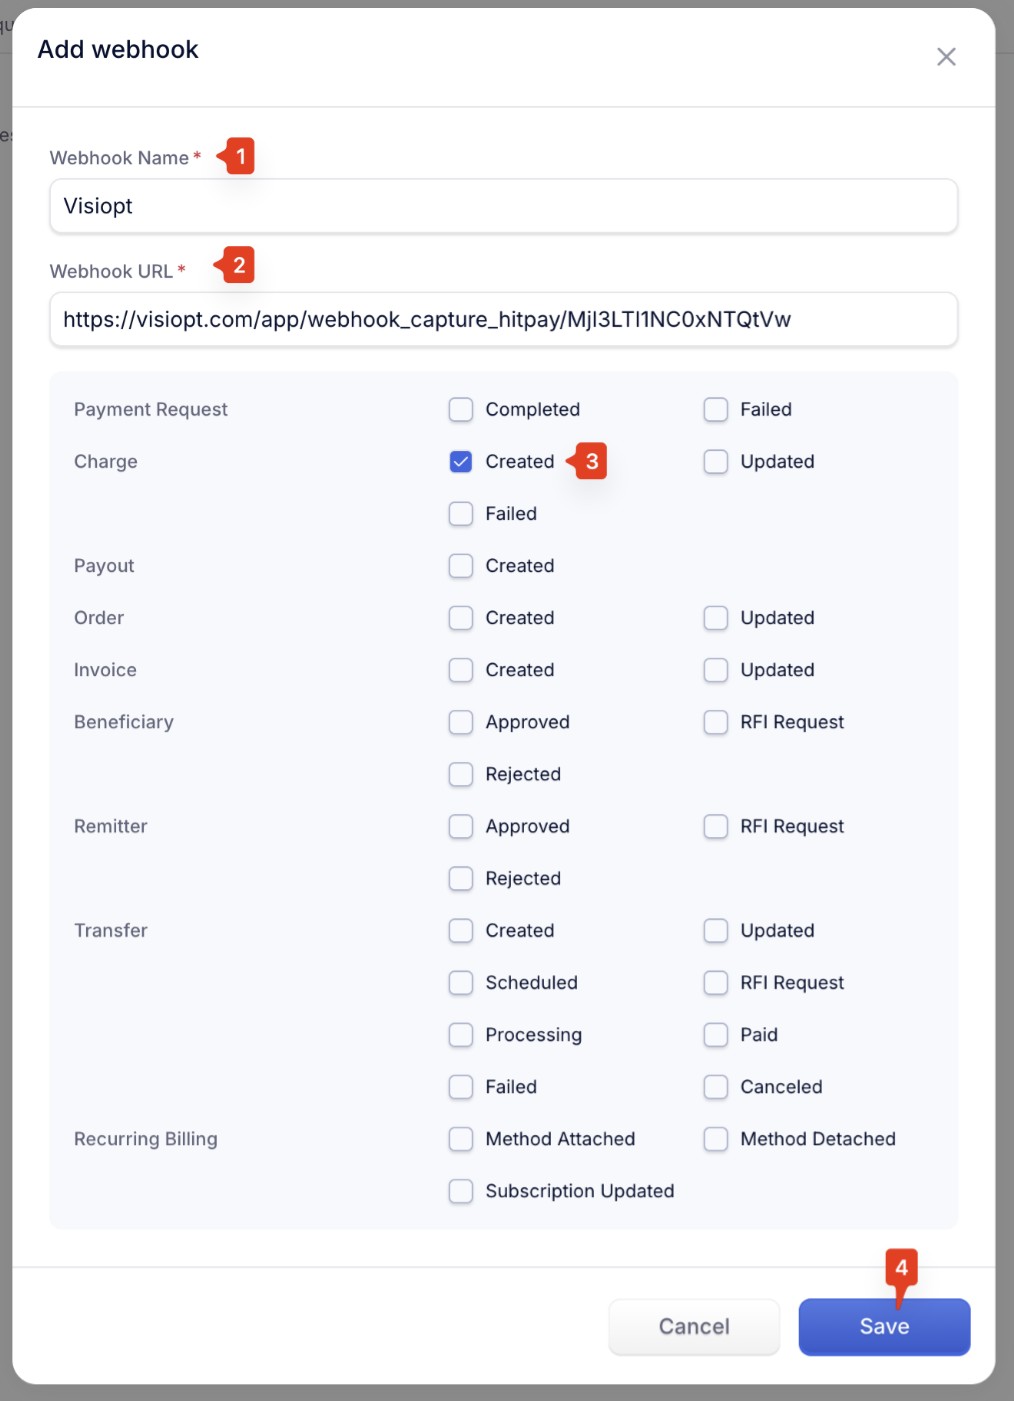
Your HitPay webhook is now connected to Visiopt and ready to send events.
Some carts and processors will send a separate webhook notification for the main sale and each upsell purchased. This will cause multiple conversions to be recorded.
For simple instructions to stop this click HERE.
1. To Create a webhook go to Settings page > Payment Processing and Carts > Housecall Pro

2. Enter a Webhook name, select the Funnel to associate the webhook with, hit Save and Generate Webhook URL

3. Copy the webhook URL
4. Log in to Housecall Pro then go to the "My app menu" then clikc "Go To app store".

5. Then in the Webhooks section click on the "Learn More" button.

6. Then toggle the button to "active" status

7. Then paste in the Visiopt webhook (copyed in step 3) and click Save.

8. After that enable the "job.paid" option (only this one).

Some carts and processors will send a separate webhook notification for the main sale and each upsell purchased. This will cause multiple conversions to be recorded.
For simple instructions to stop this click HERE.
1. To Create a webhook go to Settings page > Payment Processing and Carts > Merchant X
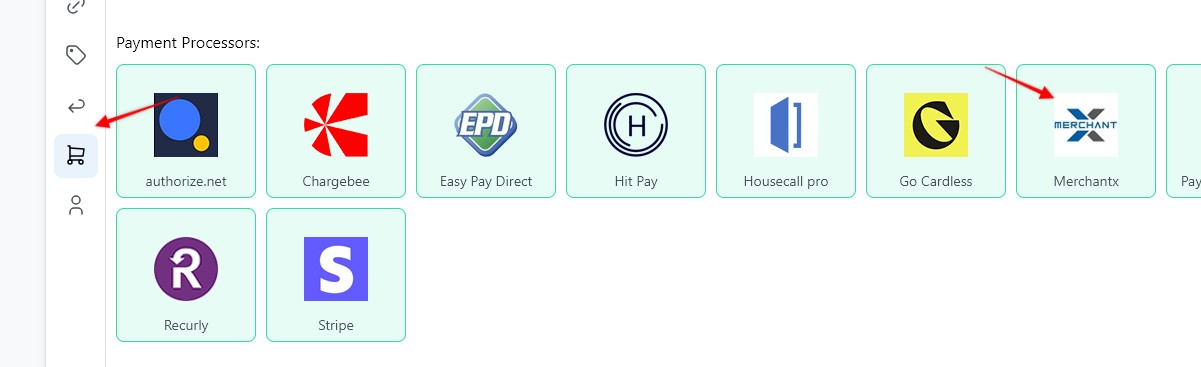
2. Enter a Webhook name, select the Funnel to associate the webhook with, hit Save and Generate Webhook URL
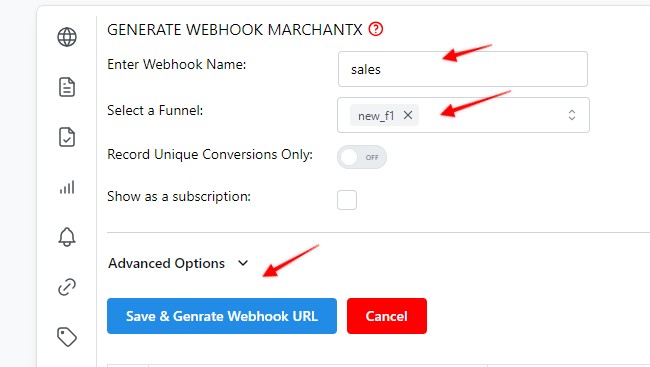
3. Copy the webhook URL
4. Log in to Merchant X and from the Settings > Webhooks page, click the “Add Endpoint” button
5. Paste the URL copied in step 3 and select all event types you would like to be notified of from the list. As soon as the URL is saved, you will start to receive events at the URL specified; there is no further setup required.
Some carts and processors will send a separate webhook notification for the main sale and each upsell purchased. This will cause multiple conversions to be recorded.
For simple instructions to stop this click HERE.
1. To Create a webhook go to Settings page > Payment Processing and Carts > Paypal Classic IPN

2. Enter a Webhook name, select the Funnel to associate the webhook with, hit Save and Generate Webhook URL
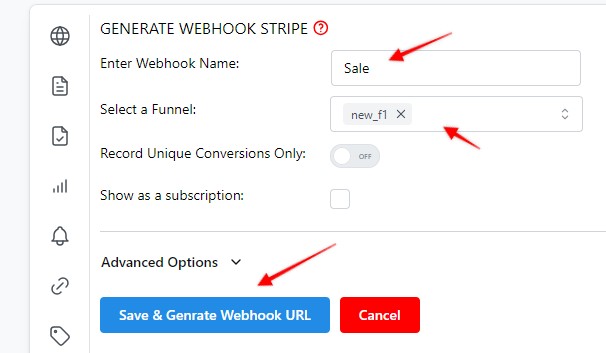
3. Copy the webhook URL
4. Log in to PayPal Dashboard
5. Find the "Edit Instant Payment Noptification (IPN)" settings. Then paste in the URL copied from Visiopt, select "Receive IPN messages (enabled) and hit save
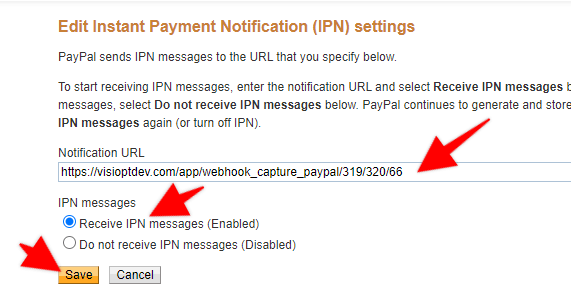
Some carts and processors will send a separate webhook notification for the main sale and each upsell purchased. This will cause multiple conversions to be recorded.
For simple instructions to stop this click HERE.
1. To Create a webhook go to Settings page > Payment Processing and Carts > Recurly
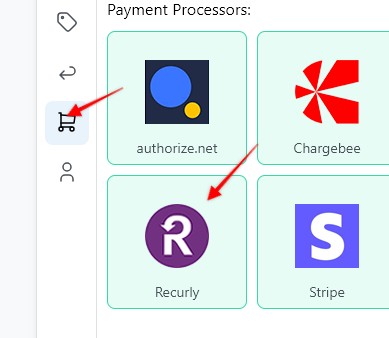
2. Enter a Webhook name, select the Funnel to associate the webhook with, hit Save and Generate Webhook URL
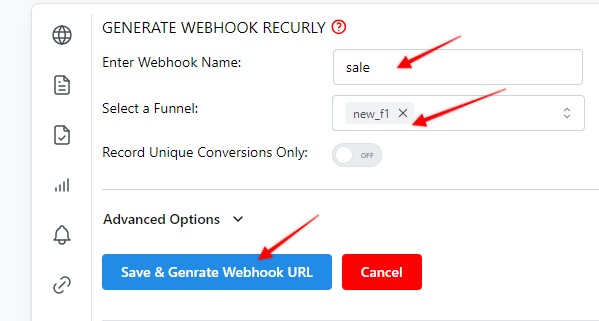
3. Copy the webhook URL
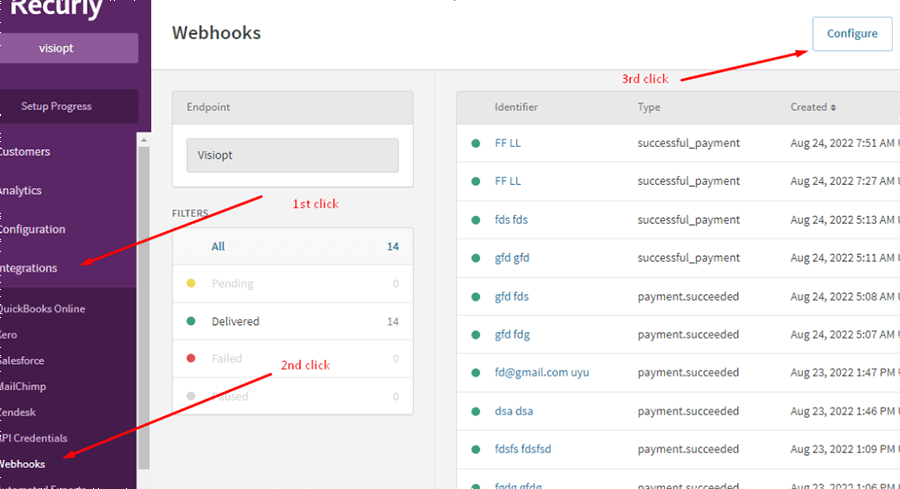
4. Log in to Recurly and in the left side bar go to Integrations > Webhooks > Configure
5. Fill out the fields as shown below
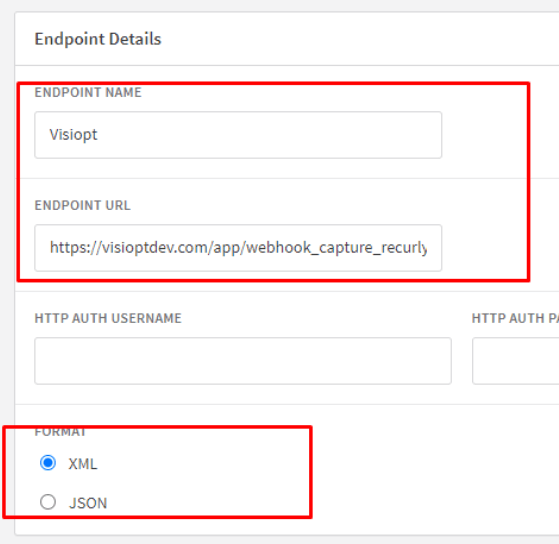
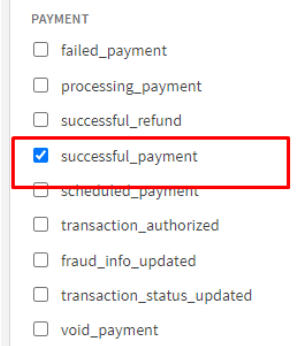
6. Also check the "successfull_payment" option (only this one)
Some carts and processors will send a separate webhook notification for the main sale and each upsell purchased. This will cause multiple conversions to be recorded.
For simple instructions to stop this click HERE.
1. To Create a webhook go to Settings page > Payment Processing and Carts > Stripe
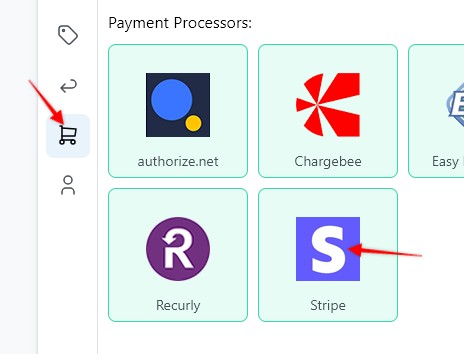
2. Enter a Webhook name, select the Funnel to associate the webhook with, hit Save and Generate Webhook URL
3. Copy the webhook URL
4. Log in to Stripe Dashboard
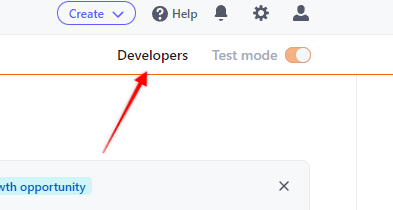
5. Click in the Developers link on the right top section:
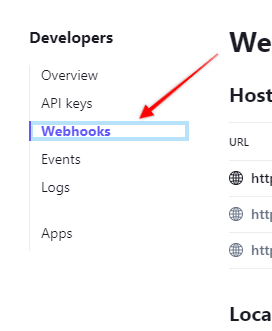
6. In the right side bar click on the Webhooks link
7. Add end point
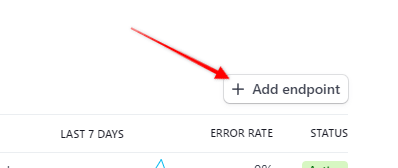
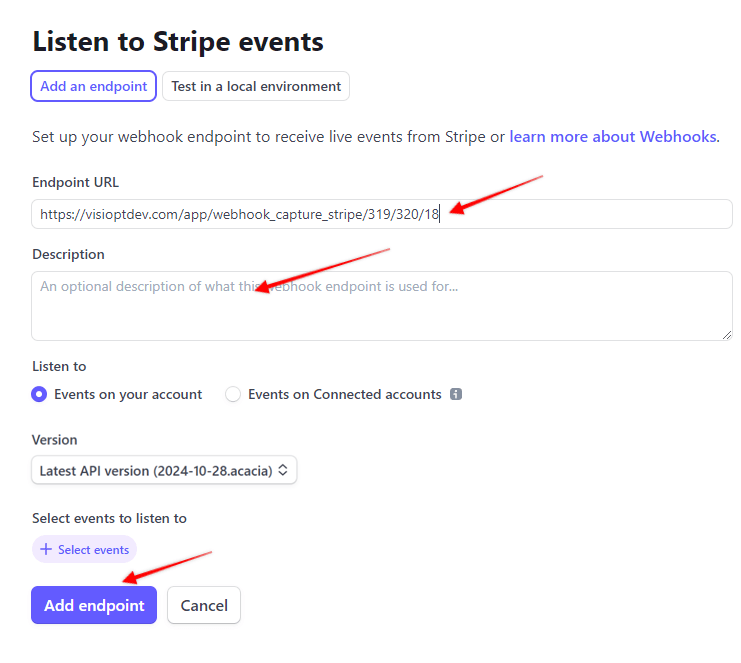
8. Paste in the URL copied from Visiopt. Enter description if desired. Hit "Add endpoint".
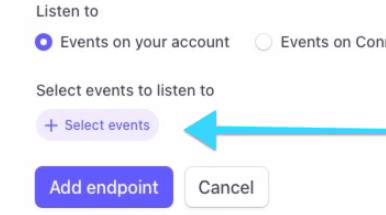
9. Click on "+ Select events":
10. Find where it says "Payment intent" and click on it.
Select only one event:
- If payment_intent.succeeded is available, select only that event.
- If payment_intent.succeeded is not available (typically on older Stripe API versions), select only charge.succeeded instead.
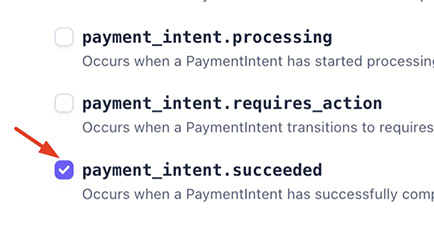
Note: Do not select both payment_intent.succeeded and charge.succeeded, as this can result in duplicate data for the same transaction. We recommend using the latest Stripe API version and selecting payment_intent.succeeded whenever available.
11.Click "Add events".
12. Find where it says "charge.succeeded" and check that option
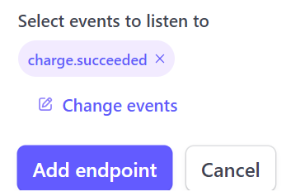
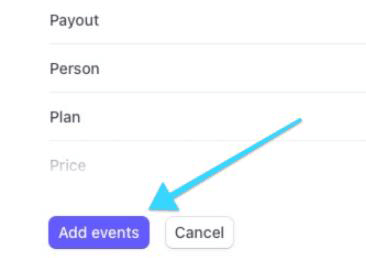
13. Finally, hit "Add events":
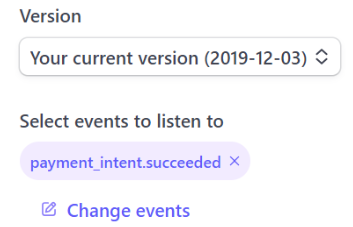
NOTE: If you use an older API version, like "2014-03-28" or "2019-12-03," please use the event "payment_intent.succeeded."
We recommend using the latest API version whenever possible.
Some carts and processors will send a separate webhook notification for the main sale and each upsell purchased. This will cause multiple conversions to be recorded.
For simple instructions to stop this click HERE.
1. To Create a webhook go to Settings page > Payment Processing and Carts > Buy Goods
2. Enter a Webhook name, select the Funnel to associate the webhook with, hit Save and Generate Webhook URL
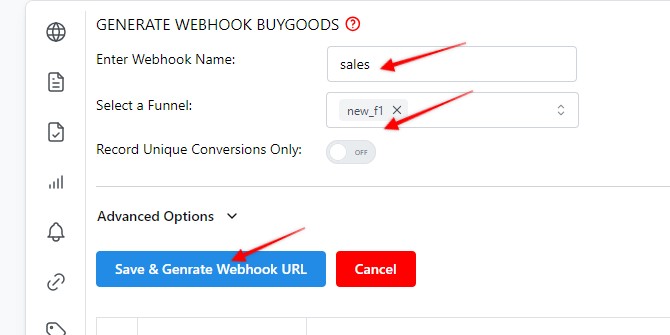
3. Copy the webhook URL
4. Log in to Buy Goods the select Setup > Products
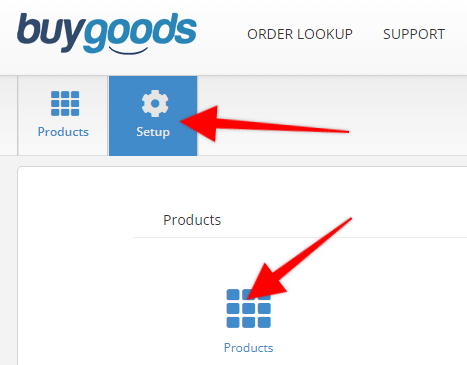
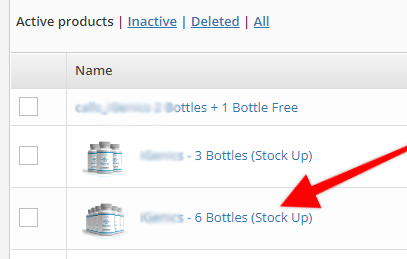
5. To track a specific product, click on the desired product
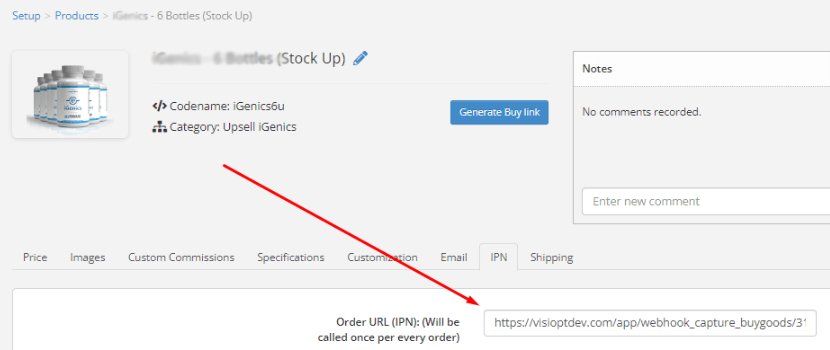
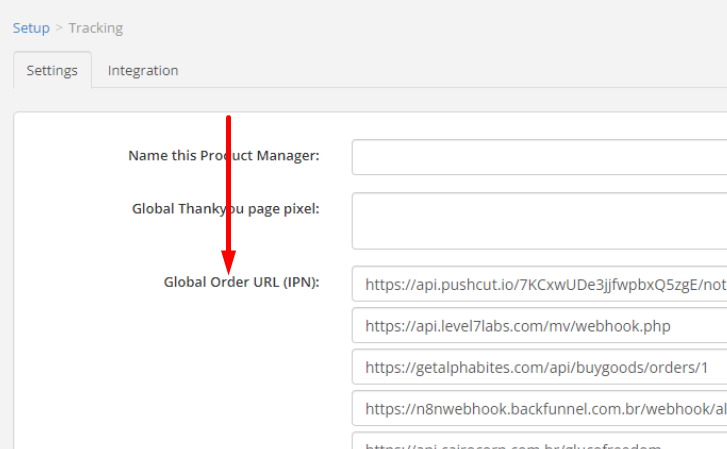
6. Then select the "IPN" tab, and paste in the Visiopt URL to the "Order URL (IPN):" field
7. To track all the products with a single webhook, set up a Global webhook as shown below:
NOTE
Buy Goods will not provide you with access to your checkout page but Visiopt will still work properly. Simply be sure to add any page the customer is redirected after making a purchase to your Visiopt Funnel. This can be an upsell page or a thank you page.
Some carts and processors will send a separate webhook notification for the main sale and each upsell purchased. This will cause multiple conversions to be recorded.
For simple instructions to stop this click HERE.
1. To Create a webhook go to Settings → Payment Processing & Carts → Calendly.
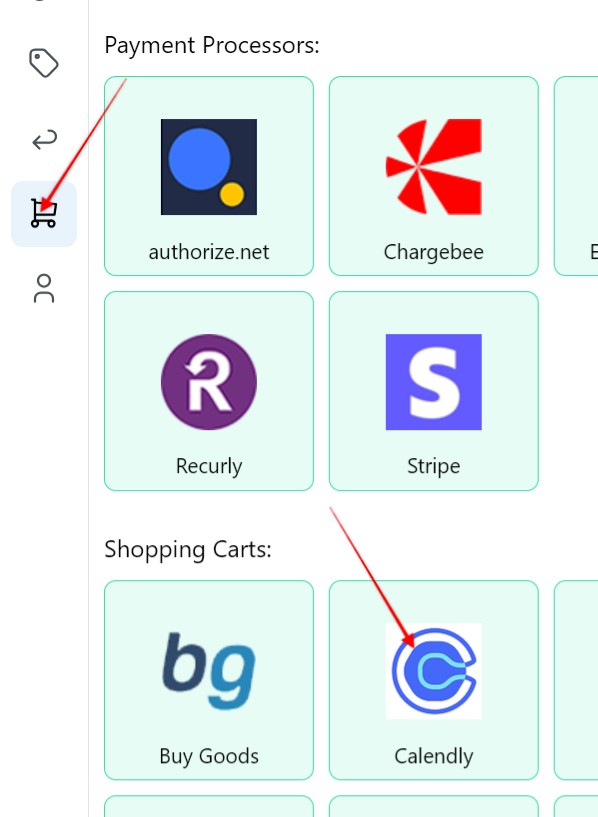
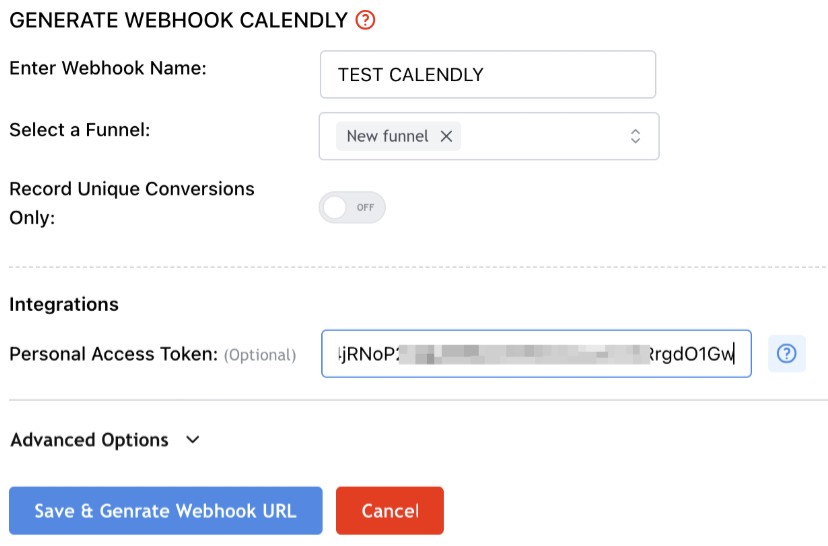
2. Fill in the following details:
A. Webhook Name
B. Funnel
C. Personal Access Token
Note: To create the webhook automatically without any manual setup, enter your WooCommerce integration credentials (Store URL, Consumer Key & Consumer Secret) before clicking Save & Generate Webhook URL.
Do not click Save yet. First, obtain your API credentials as described below.
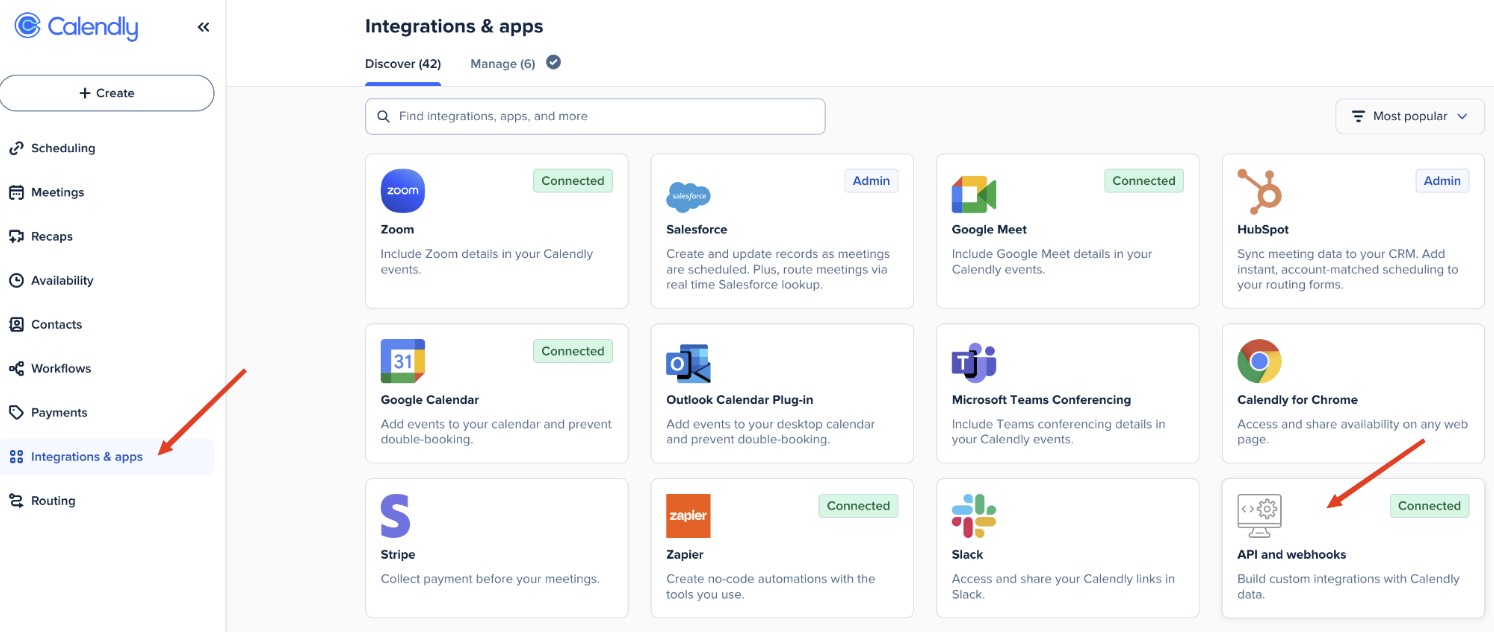
3. To get your Personal Access Token, sign in to Calendly as an Admin user, and go to Integrations & apps → API and webhooks.
4. Click Create a token.
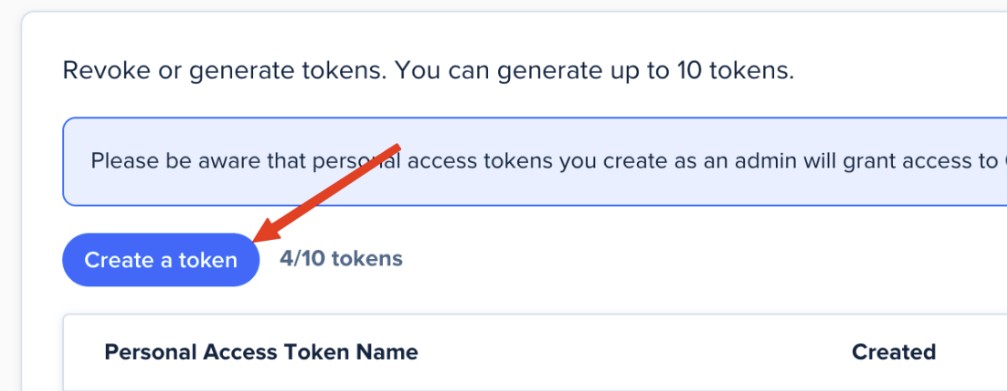
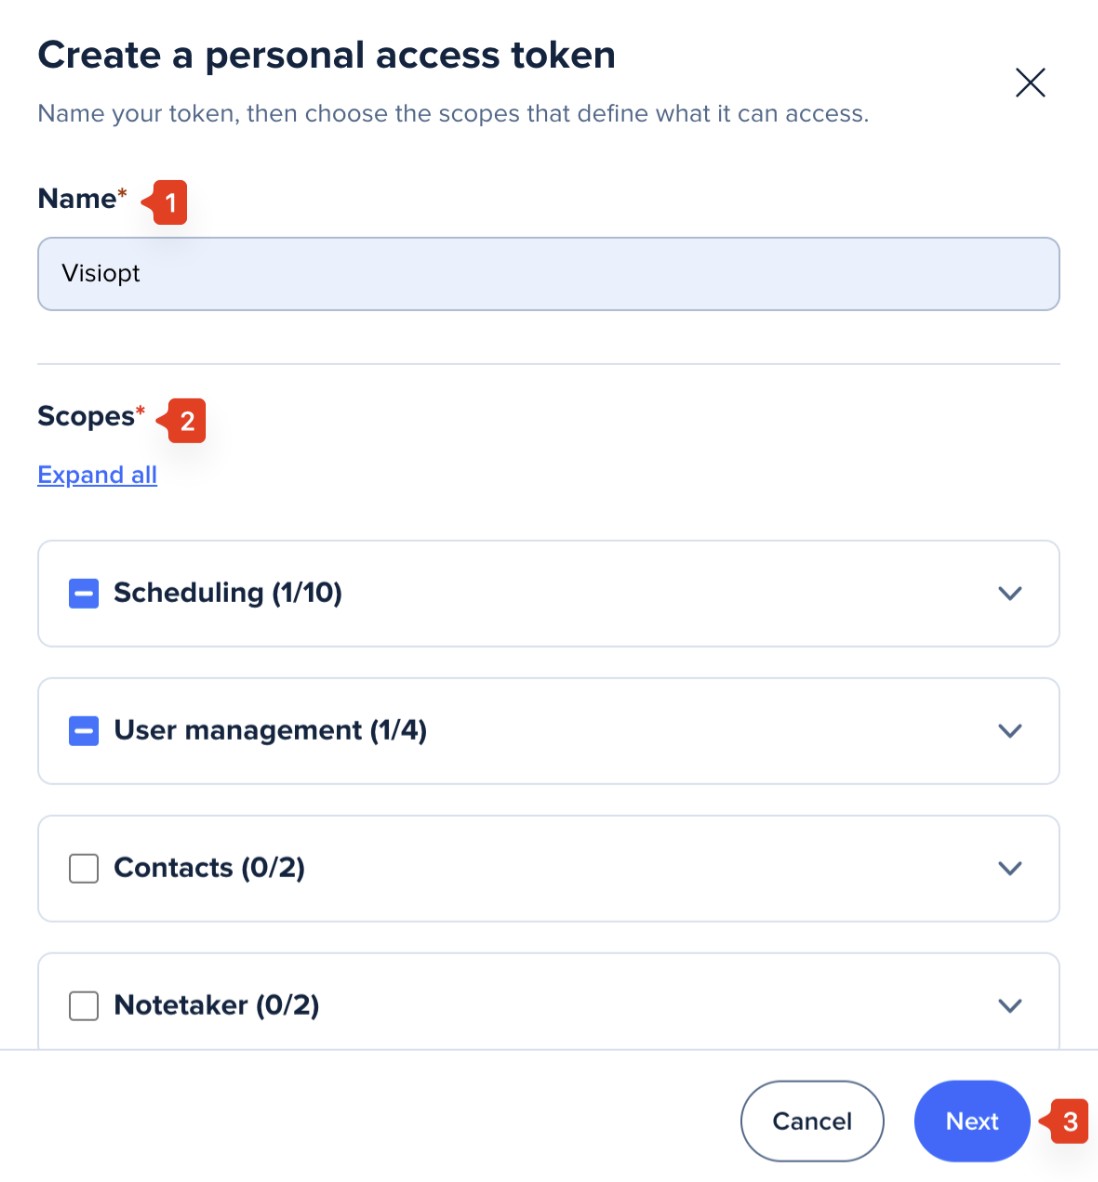
5. Fill in following information:
A. Enter descriptive name
B. Select the following scopes and click Next.
- Users:read
- Scheduled_events:read
- Webhooks:read
- Webhooks:write
6. In Visiopt, click Save & Generate Webhook URL.
Visiopt will generate a webhook URL and automatically create the webhook in your Calendly account.
If no error message is displayed, the webhook was most likely created successfully.
Calendly does not expose webhooks in its dashboard. Webhook subscriptions are created through the Calendly API, using their "Create Webhook Subscription" endpoint.
- When you create the webhook subscription, set the request "url" field to the Visiopt webhook URL - that is where Calendly will send your events.
- Choose the events you want to receive (for example invitee.created) and the scope (user or organization).
- Follow the official Calendly documentation below for the exact request format and authentication.
Some carts and processors will send a separate webhook notification for the main sale and each upsell purchased. This will cause multiple conversions to be recorded.
For simple instructions to stop this click HERE.
1. To Create a webhook go to Settings page > Payment Processing and Carts > Click Bank
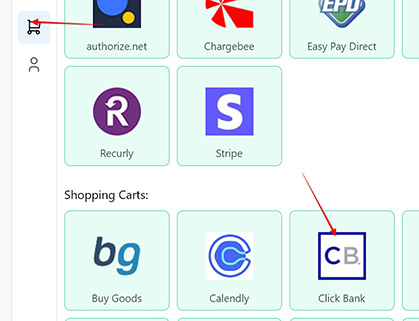
2. Enter a Webhook name, select the Funnel to associate the webhook with, then click on Advanced Options
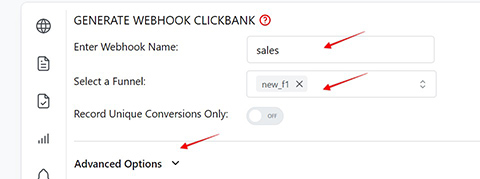
3. Log in to Click Bank and click on the Accounts menu from the sidebar.
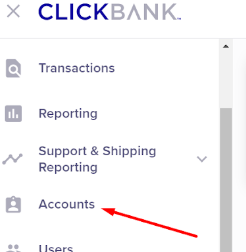
4. Click on the Seller account

5. Click on the Vendor Settings link

6. Click My Site

7. In the Advanced Tools section, click on Edit

8. Enter a secret key (it can be any alpha-numaric combination, you will use the secret key in the following step). Do not save yet as in step 13 you will be pasting in the webhook you create.
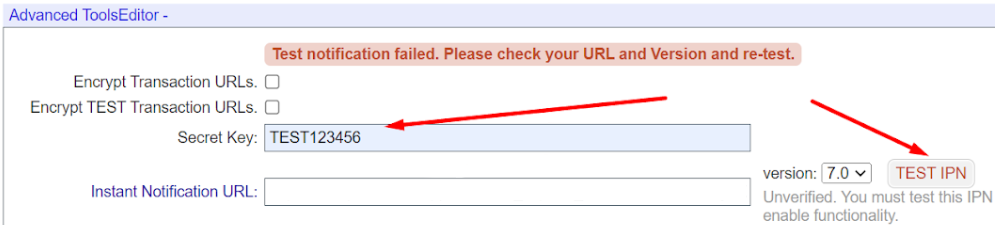
9. Head back to Visiopt webhook set up. Paste the secret key, and hit Save and Generate Webhook URL
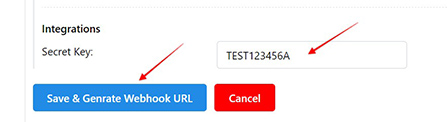
10. Copy the webhook URL
11. If you are using Clickbank’s shopping cart system you must make sure the Access Members Download page/members area page is added to your Visiopt funnel.
Because Clickbank does not allow code on their checkout or thank you pages this is where Visiopt will capture the customers email address to match the webhook with the proper test visit.
If the customer does not click on any of the buttons then email will not be captured, and conversion will not show. This will be very rare and you will still have conversions recorded from other pages within your funnel.
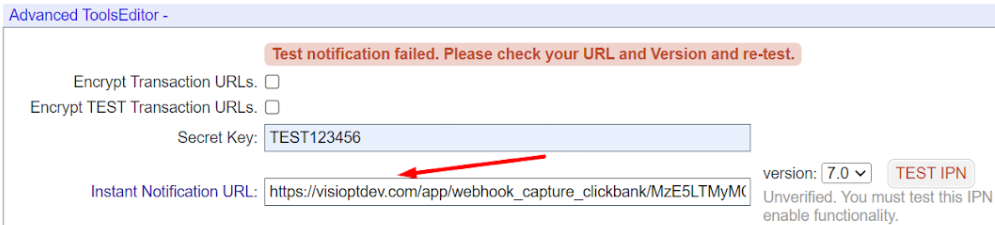
12. Copy the webhook URL, and hit Save
13. Go back to ClickBank. You will go to the exact location where you set up your secret key and paste in the webhook and save.
Some carts and processors will send a separate webhook notification for the main sale and each upsell purchased. This will cause multiple conversions to be recorded.
For simple instructions to stop this click HERE.
1. To Create a webhook go to Settings → Payment Processing & Carts → ClickFunnels
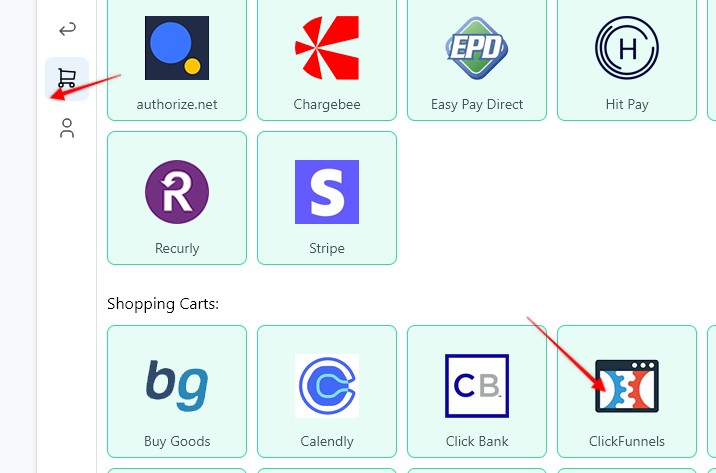
2. Enter a Webhook name, select the Funnel to associate the webhook with.
Note: API credentials are only required for ClickFunnels 2.0 if you want Visiopt to create the webhook automatically. If you're using ClickFunnels Classic, leave these fields blank and follow the manual webhook setup instructions below.
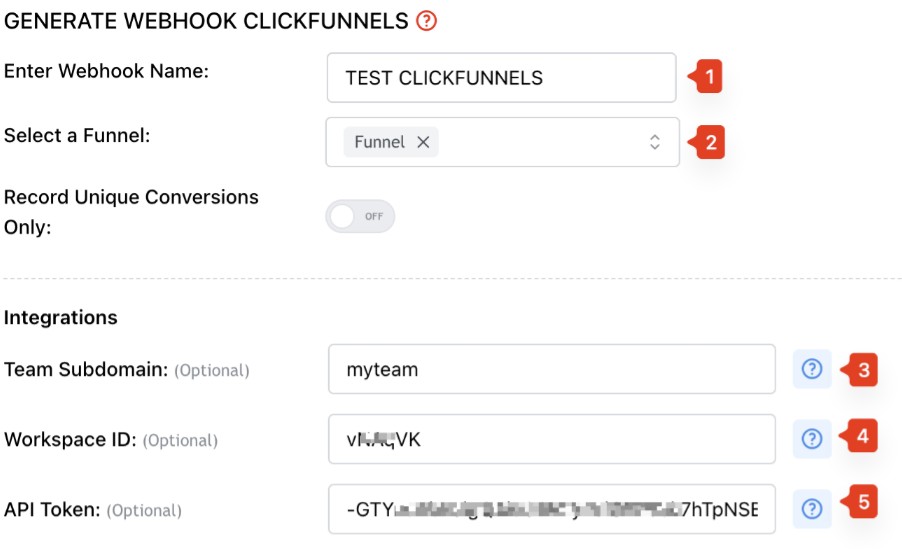
3. Do not click Save yet. First, obtain your API credentials as described below.
Your Team Subdomain is the first part of your ClickFunnels URL.
For example:
ClickFunnels URL: https://myteam.myclickfunnels.com
Team Subdomain: myteam
4. Get the Workspace ID
Open the workspace in ClickFunnels.
For example:
Workspace URL: https://myteam.myclickfunnels.com/account/workspaces/vNBqVQ/edit
Workspace ID: vNBqVQ
The value immediately after /workspaces/ is your Workspace ID (an alphanumeric value like vNBqVQ, not a number).
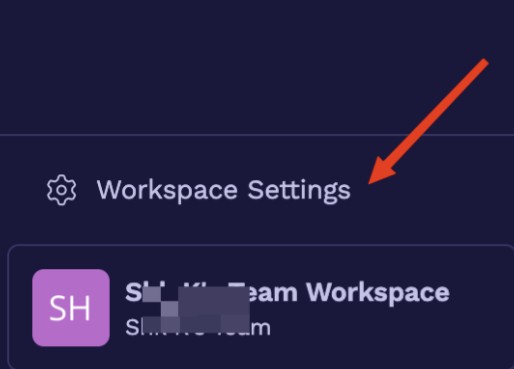
5. Log in to your ClickFunnels account and open Workspace Settings.
6. Navigate to General → Edit Team Settings.
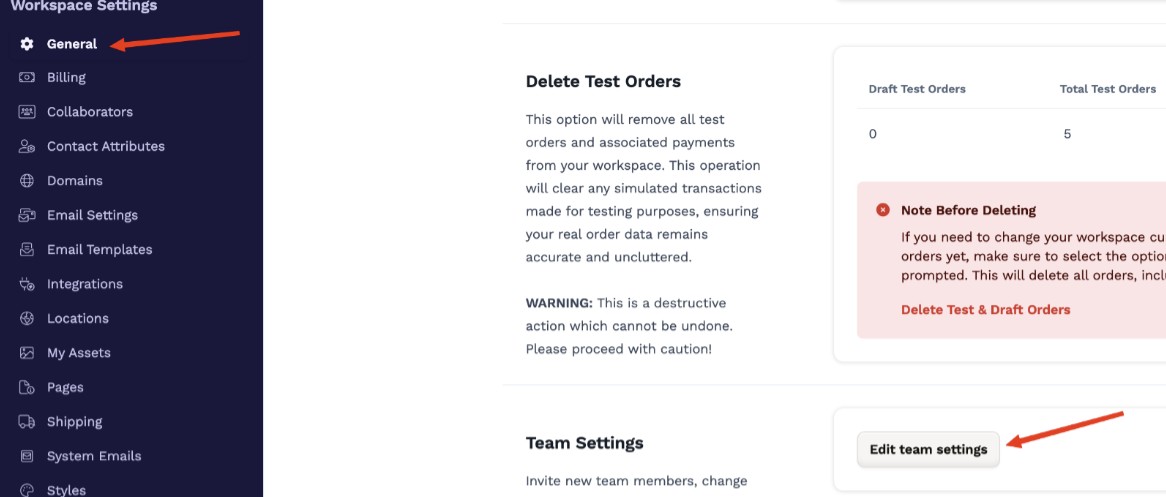
7. Then go to Developer Portal → Add new platform application.
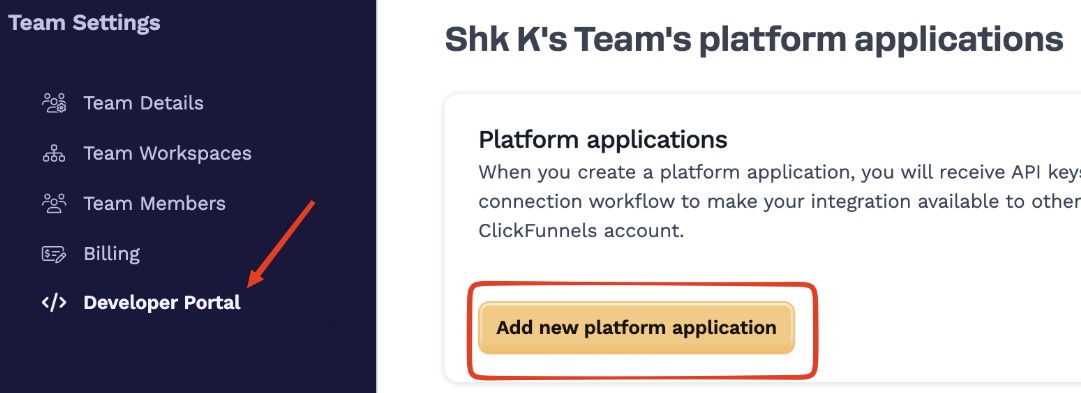
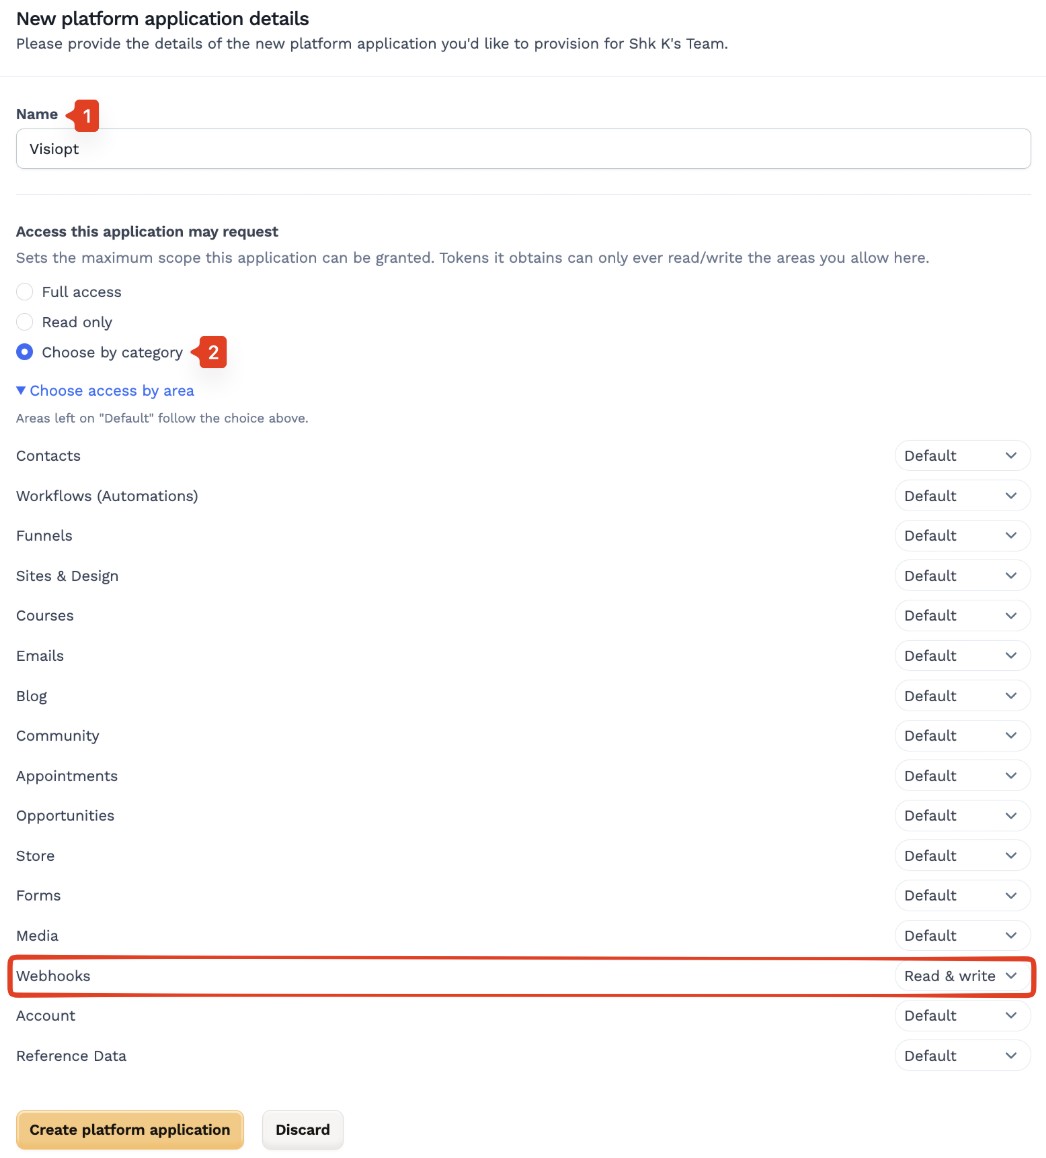
8. Fill in the following details:
a. Name: Enter any descriptive name
b. Under Choose by category, select Access, then grant Read & Write permission for Webhooks.
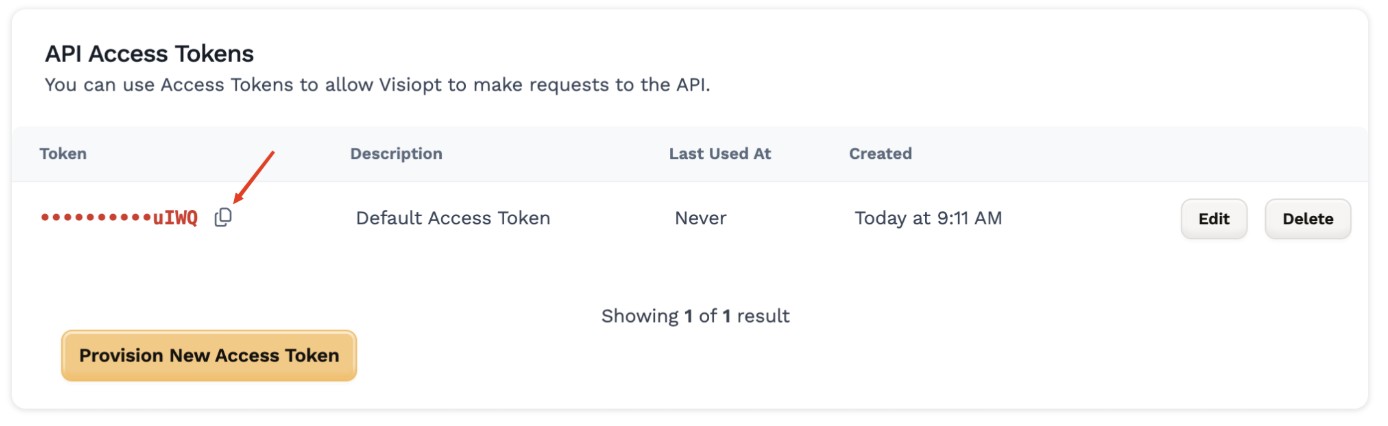
9. ClickFunnels will generate an API Token. Copy it and paste it into Visiopt.
10. In Visiopt, click Save & Generate Webhook URL. Visiopt will generate a webhook URL and automatically create the webhook in your ClickFunnels account.
Verify the Webhook
To confirm that the webhook was created successfully:
1. Log in to your ClickFunnels account and open Workspace Settings.
2. Navigate to Webhooks.
3. Look for the webhook endpoint created by Visiopt.
If you can see the VisiOpt webhook URL in the list, your integration is complete and ready to use.
1. In Visiopt hit Save & Generate Webhook URL without entering the API details. Then copy the generated URL.
2. Log in to your ClickFunnels account and open Workspace Settings.
3. Navigate to Webhooks.
4. Click Add new endpoint.
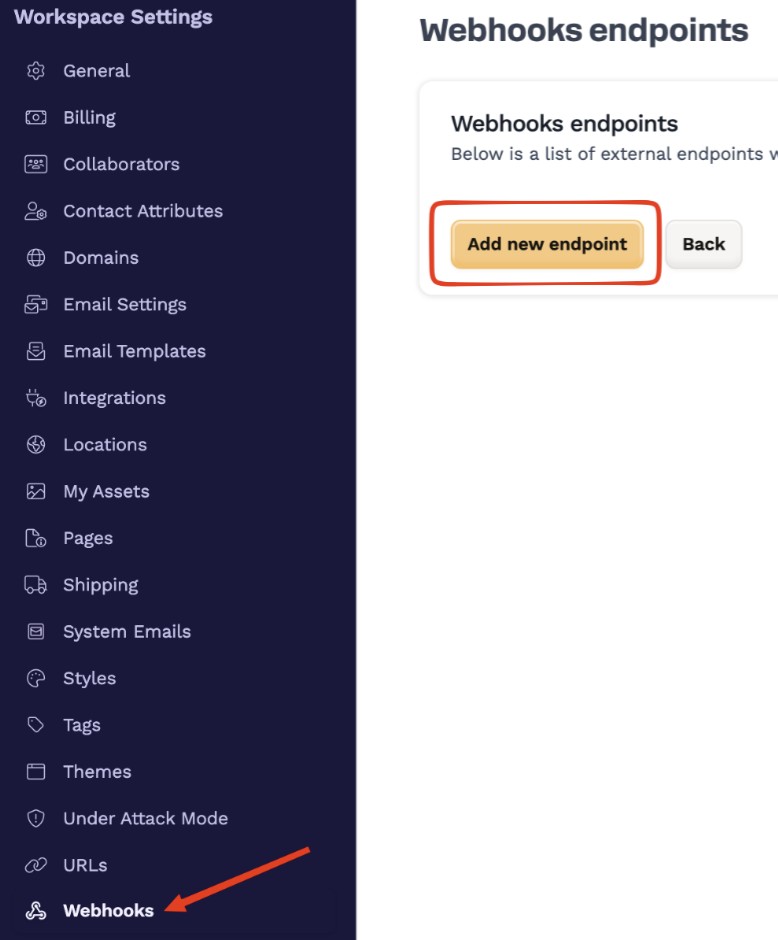
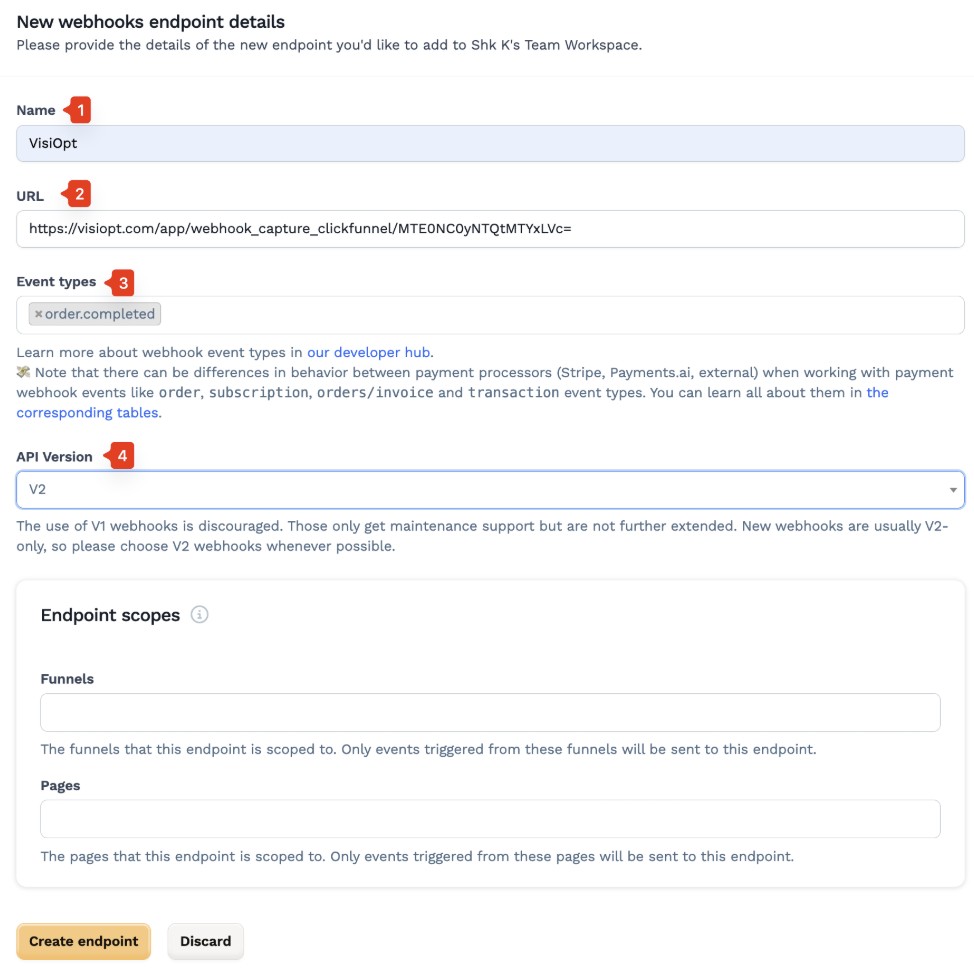
5. Fill in the following details:
Webhook Name: Enter any descriptive name.
Webhook URL: Paste the webhook URL generated by Visiopt.
Event Types: If you want to set up a webhook for Optins then select contact.created or if you want to setup webhook for purchase then select order.completed.
Select V2 as API version.
Click Save.
Your ClickFunnels webhook is now connected to Visiopt and ready to send events.
Platform-Specific Guides
Need help configuring additional webhooks for ClickFunnels?
Optin Instructions
Sale Instructions
Some carts and processors will send a separate webhook notification for the main sale and each upsell purchased. This will cause multiple conversions to be recorded.
For simple instructions to stop this click HERE.
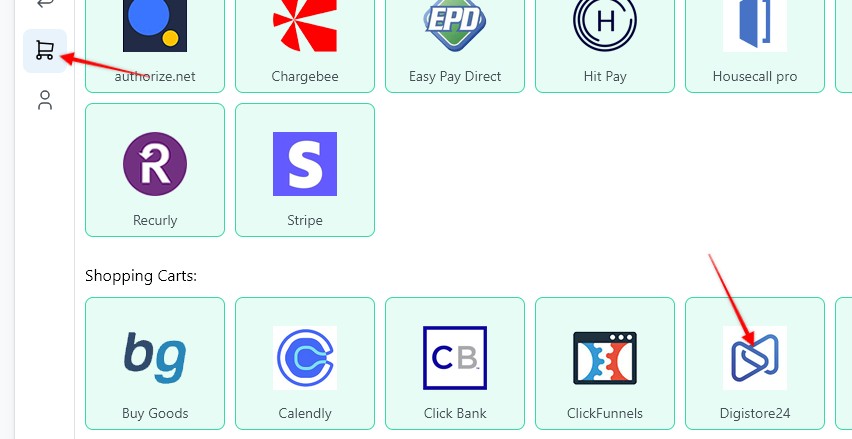
1. To Create a webhook go to Settings page > Payment Processing and Carts > Digistore24
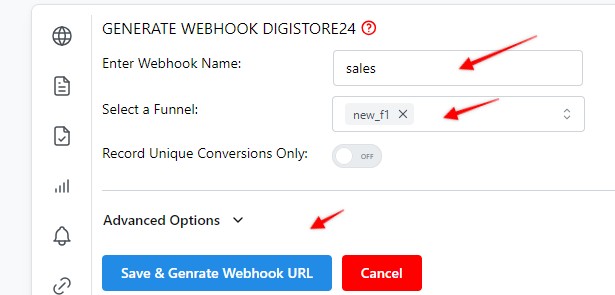
2. Enter a Webhook name, select the Funnel to associate the webhook with, hit Save and Generate Webhook URL
3. Copy the webhook URL
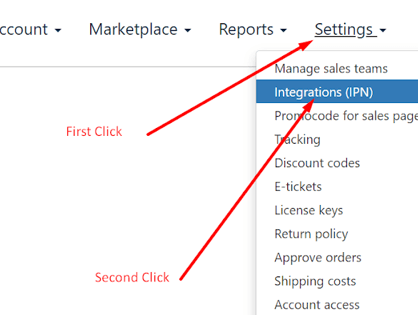
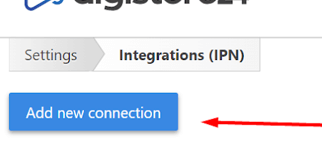
4. Log in to digistore24 account then click the Settings link and select the Intergations (IPN) option.
5. Then click the "Add new connection" button.
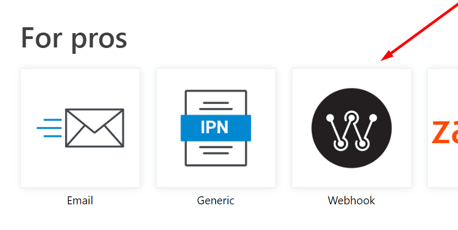
6. Then click the "Webhook" thumnail.
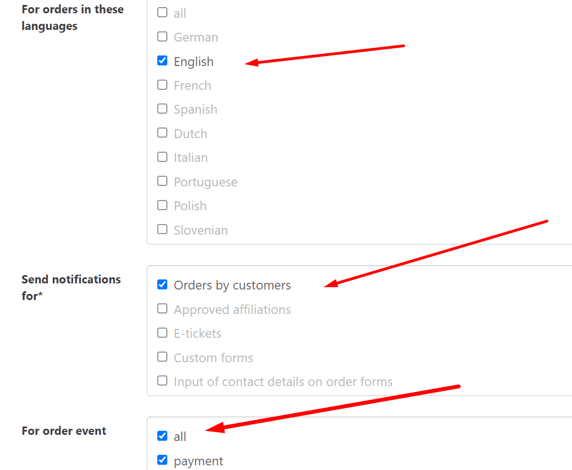
7. Select the options shown below
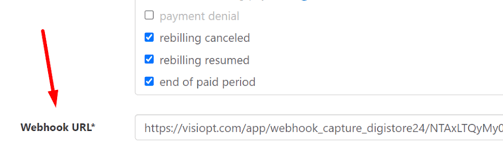
8. Then paste in the Visiopt webhook URL (copyed in step 3) and click Save.
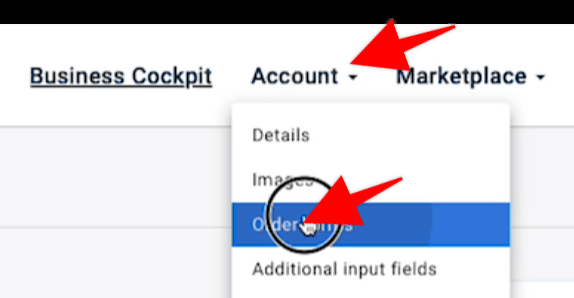
1. Log in to Digistore24, select the proper Vendor. Then from the Account menu select the "Order forms" option:
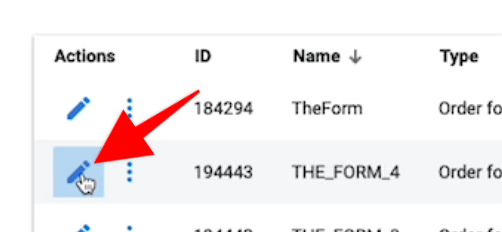
2. Click to edot the proper orderform
3. Add a "Custom HTML / CSS" element to the very top of the page:

4. Open the Custom HTML element and paste in the VisiSmart code, then hit Save:
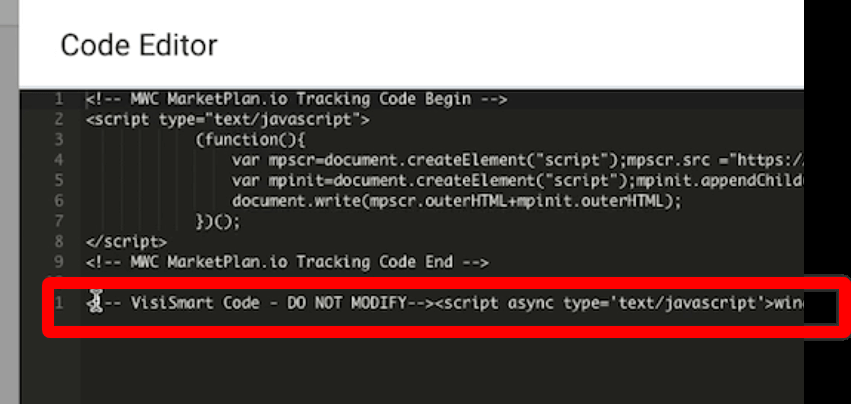
5. Republish the page.
Some carts and processors will send a separate webhook notification for the main sale and each upsell purchased. This will cause multiple conversions to be recorded.
For simple instructions to stop this click HERE.
1. Set up your Webhook on the Settings page > Payment Processing and Carts > Go High Level
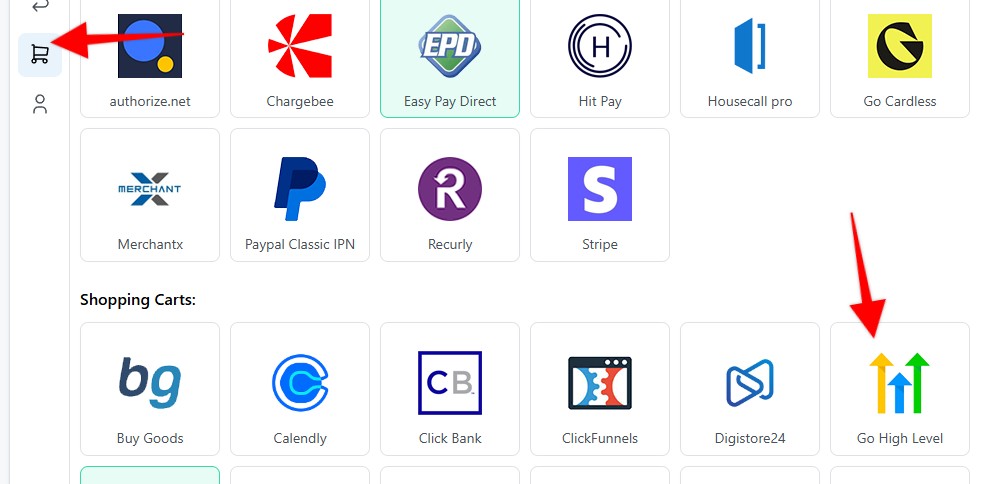
2.Enter a name for your Webhook > Select funnel to apply the webhook to > Hit Save & generate Webhook URL
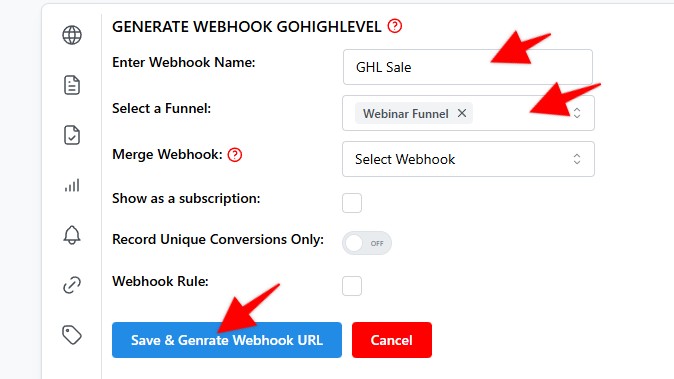
3. Copy the webhook URL, and hit Save
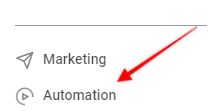
4. Log in to Go High Level and click on the Automation link in the left sidebar.
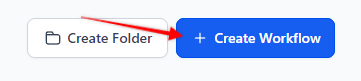
5. Click on + Create Workflow button.
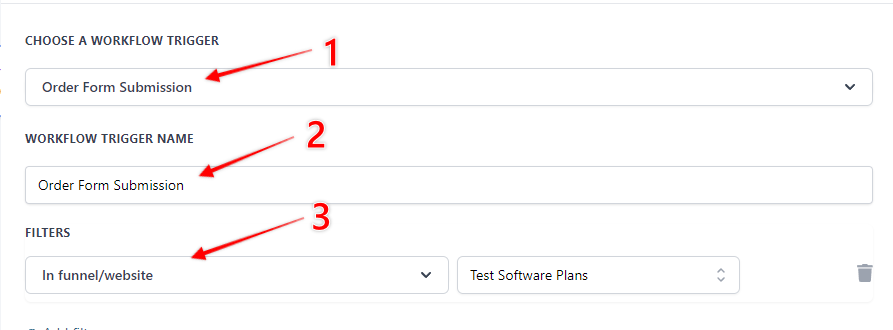
6. For the Trigger:
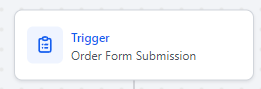
7. As the trigger set Order Form Submission (1), Enter a name for your workflow (2), and finally select funnel and page (3).
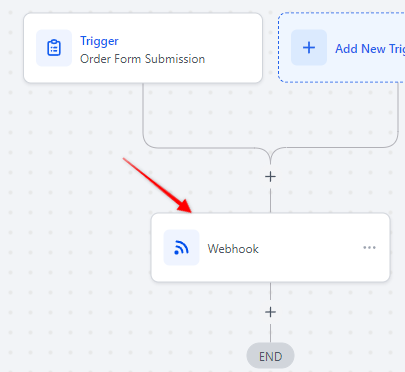
8. As an action set up the Webhook.
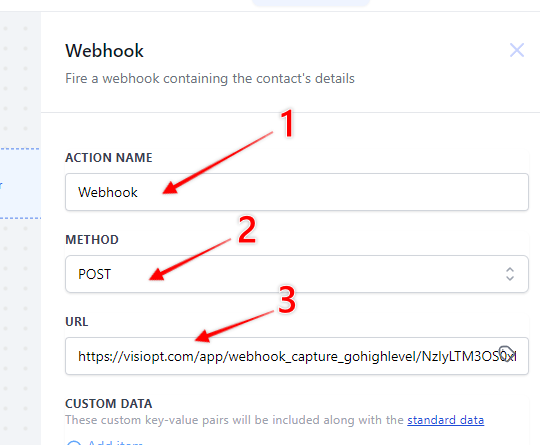
9. Enter action name (1), as a method select Post (2), in the URL field paste the url generated in step 2.
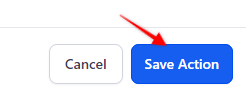
10. Click on the Save action button.
If you have upsells you must create a separate web hook to pass that revenue through.
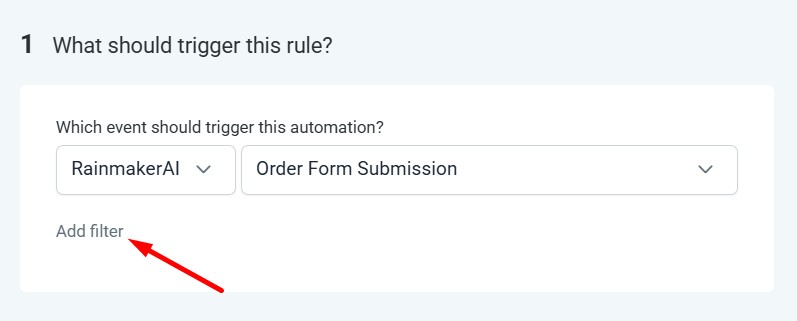
1.Go to the Trigger where you have already configured the webhook. Click on “Add Filter” under the trigger.
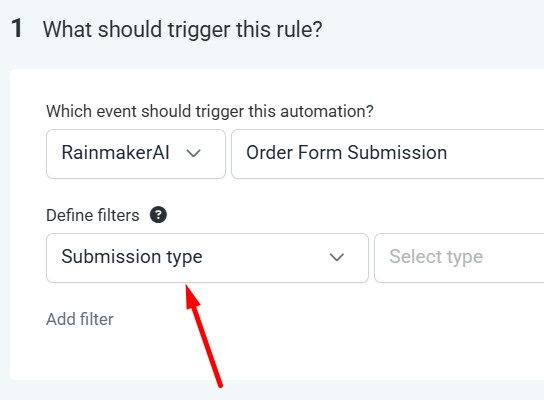
2.After clicking "Add Filter", you will see a "Define Filter" dropdown. From this dropdown, select "Submission Type".
3.In the "Select Type" dropdown next to it, select "Sale".
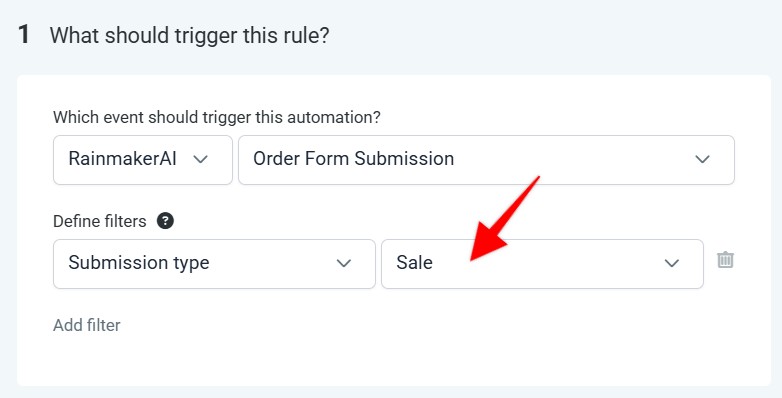
This trigger will now fire only for the Main Sale transactions, and the webhook attached to this trigger will receive main sale data only.
4.To create a webhook for Upsell, duplicate this same trigger.
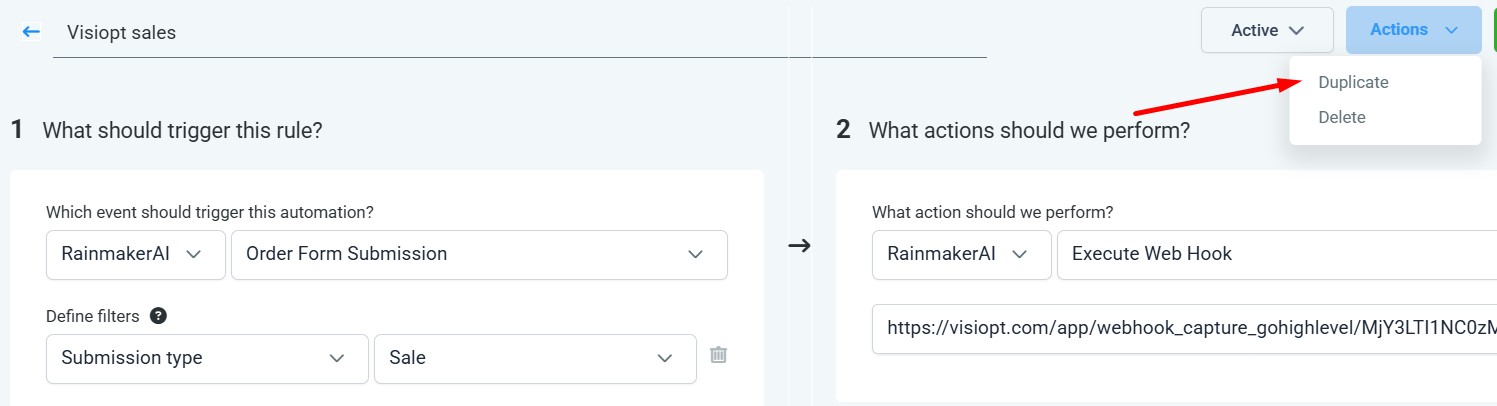
5. In the duplicated trigger change "Submission Type" to "Upsell". Replace the existing webhook URL with the new Upsell webhook URL generated in VisiOpt
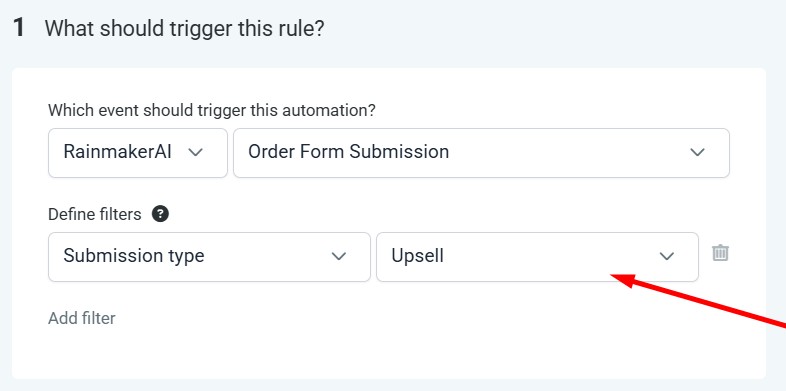
Now you have two webhooks, one for the Main sale, and one for the Upsell.
Some carts and processors will send a separate webhook notification for the main sale and each upsell purchased. This will cause multiple conversions to be recorded.
For simple instructions to stop this click HERE.
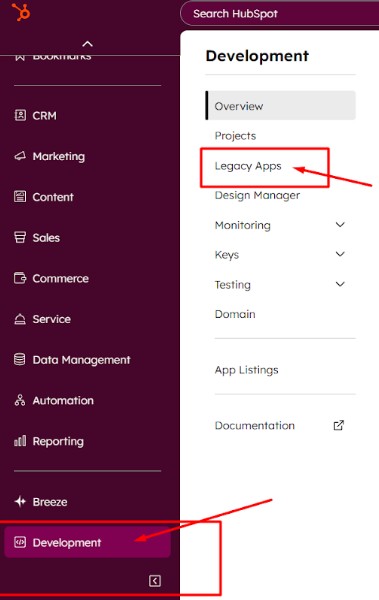
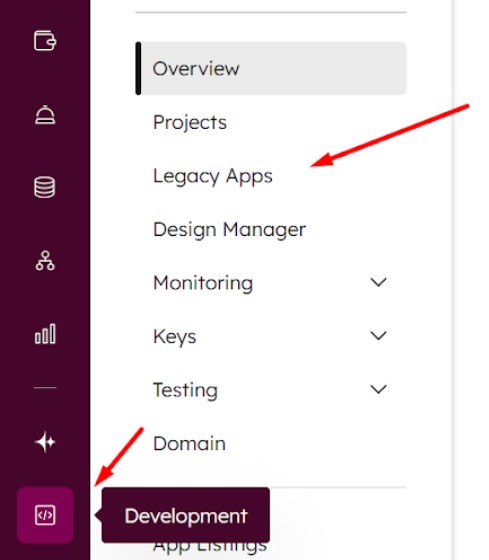
1. Log in to your HubSpot account, click the Developer icon, and select Legacy Apps from the menu.
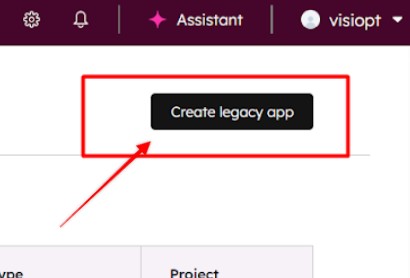
2. Click on Create Legacy App.
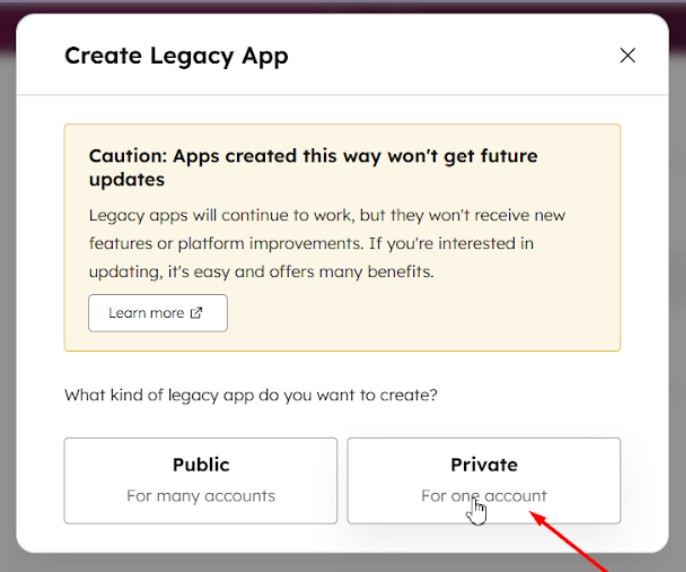
3. After clicking the button, a popup will appear — select "Private" as shown in the screenshot.
4. Enter the basic information such as App Name, Scopes, and Webhook URL to configure your legacy app. You can choose any name for the app.
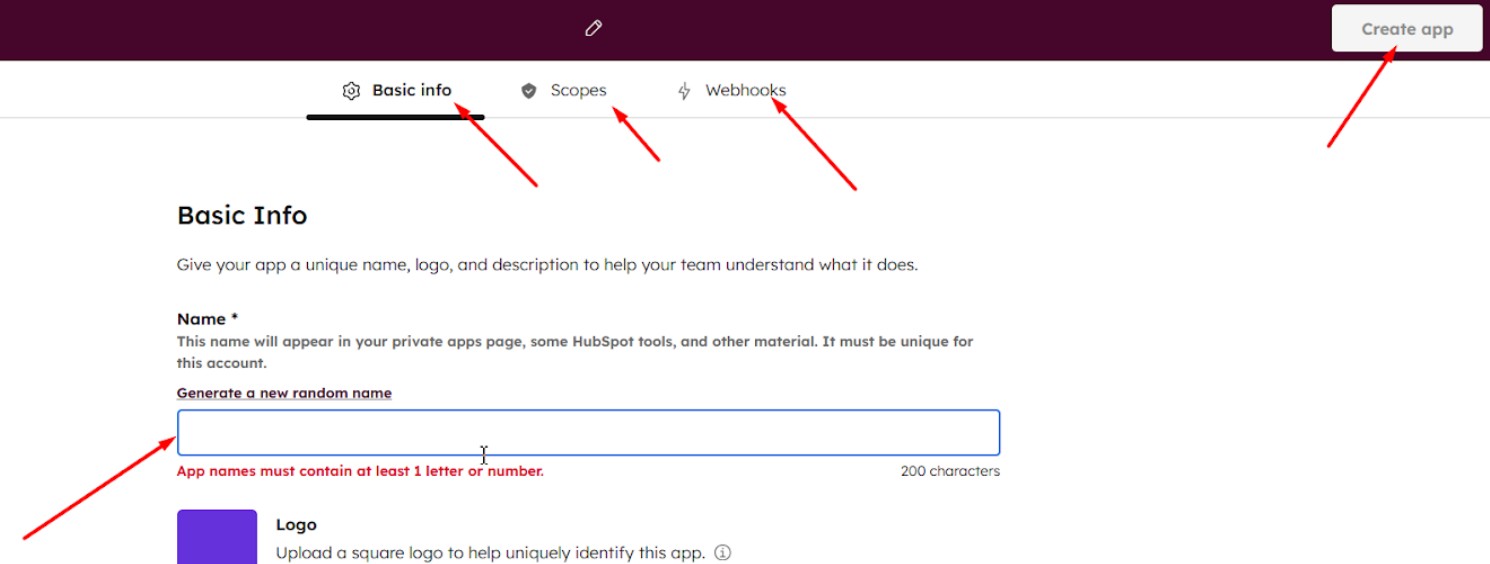
5. For scopes, select the following four options:
crm.objects.deals.read
crm.objects.deals.write
crm.objects.contacts.read
crm.objects.contacts.write
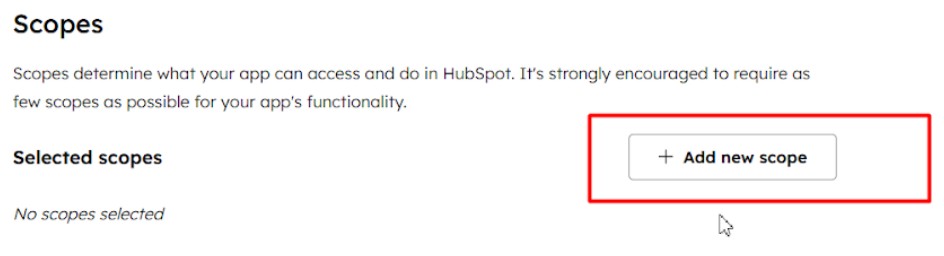
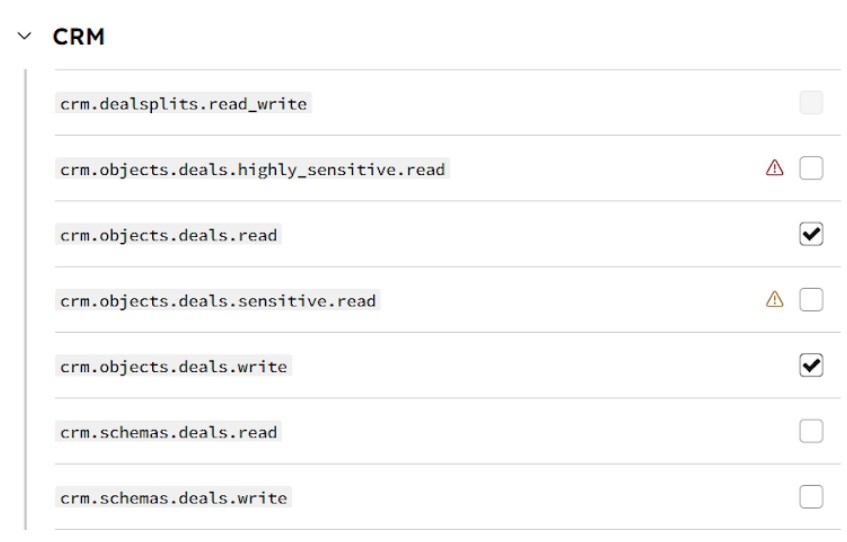
6. Create a new webhook for hubspot in Visiopt. Go to the Settings page > Payment processing and carts > HubSpot.
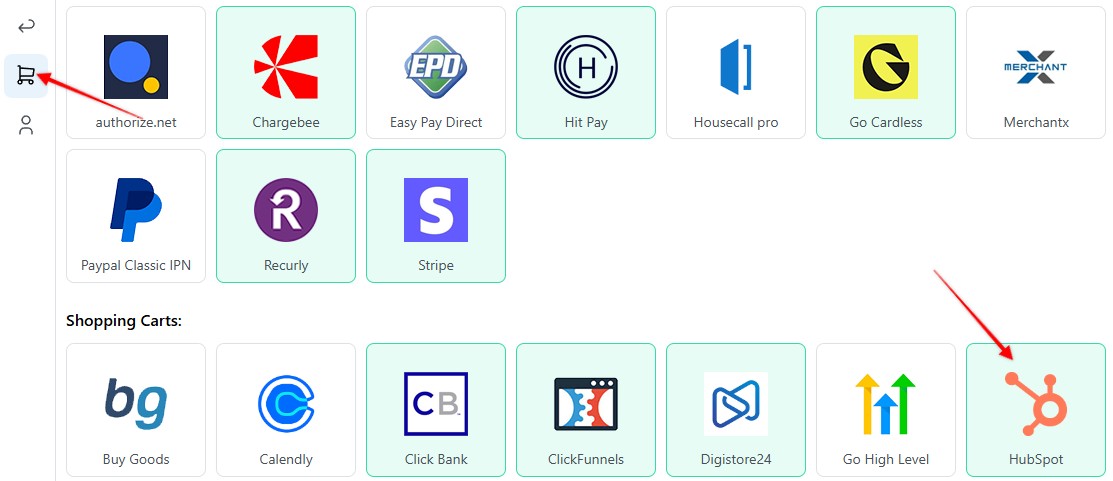
7. After clicking the "Save & generate webhook URL", copy the generated URL.
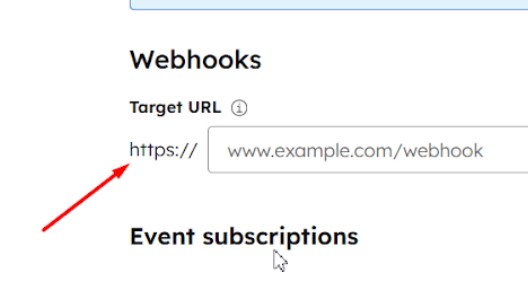
8. In HubSpot, in the Webhook tab, paste your webhook URL (the one you copied from Visiopt) then click Commit Changes. After committing, click Continue Creating.
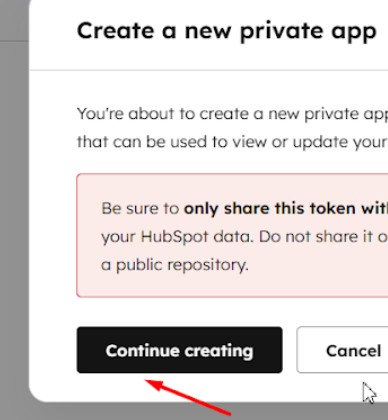
9. Click “Continue Creating”.
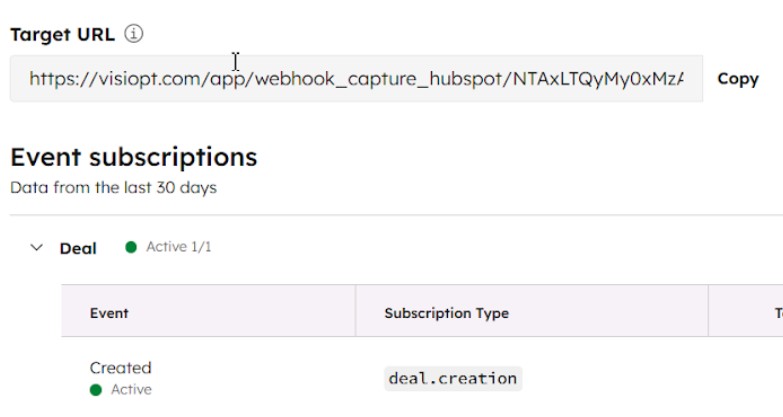
10. The webhook setup is now complete — you can see it successfully configured.
11. To get the HubSpot webhook access token, navigate to Development, then select Legacy apps. Under Legacy apps, select your app and click on Auth, then copy the access token.
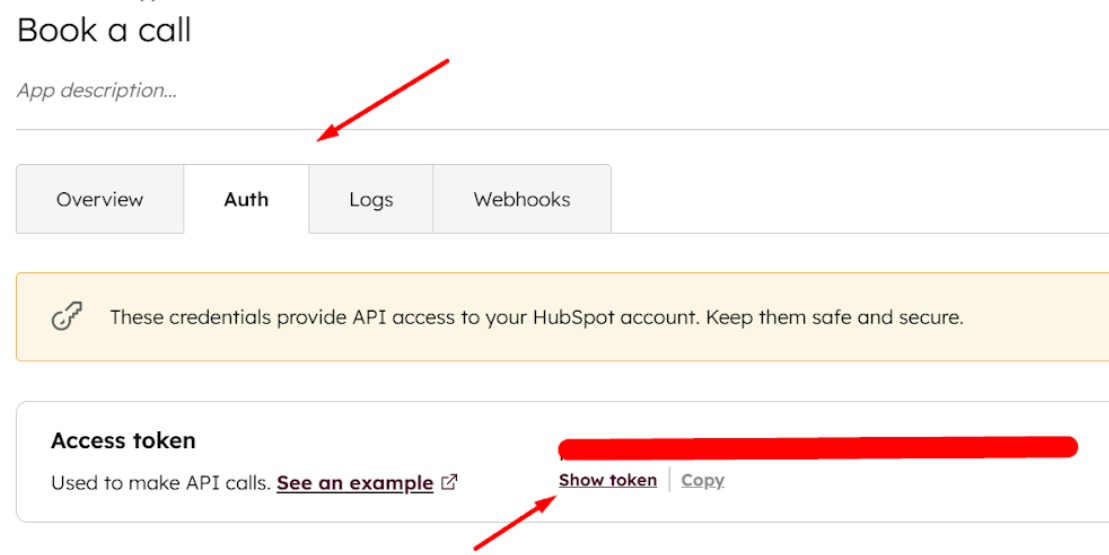
12. Navigate back to Visiopt webhook setup, paste the access token and save.
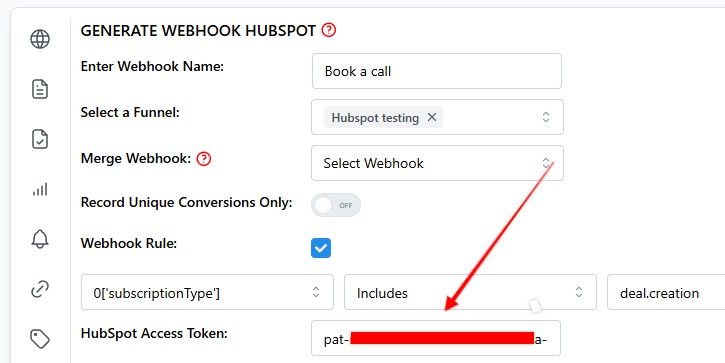
Setting Up Multiple Webhooks for HubSpot Actions
You can track any HubSpot actions you want from a booked call to a completed sale directly inside Visiopt.
To keep your data clean and accurate, follow these simple setup rules:
Step 1: Create a Separate Webhook for Each Action
Each unique action (e.g., Book a Call, Purchase, Lead Moved to Closed Won) requires its own webhook.
This ensures each event is tracked independently.
Example:
Step 2: Add Webhook Rules to Filter the Right Events
Inside each webhook, define Webhook Rules that tell Visiopt when to trigger the webhook.
Rules let you capture only the specific HubSpot event or property change you care about.
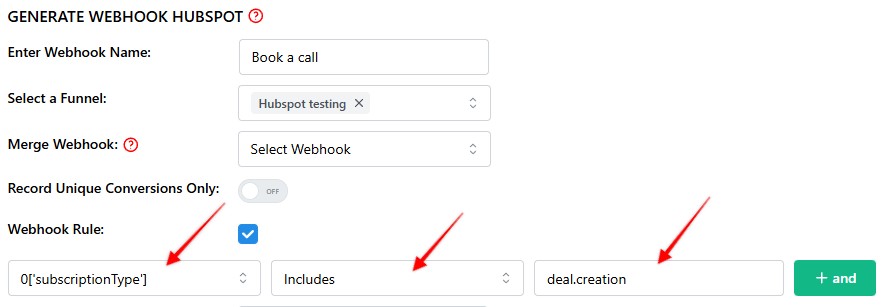
Example: Book a Call:
subscriptionTypeIncludesdeal.creationFires when a new deal is created — for example, after a call is booked.
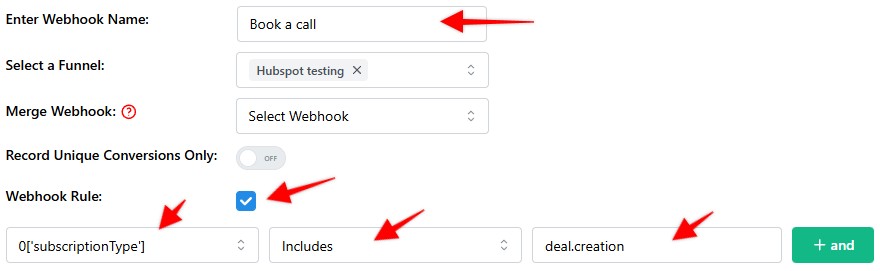
Note: this is for demonstration purposes only. Yu must set webhook rules that match your account setup.
Example: Sale Customer:
propertyNameIncludesclosed_won_reasonFires when a deal moves to Closed Won, tracking confirmed customers.
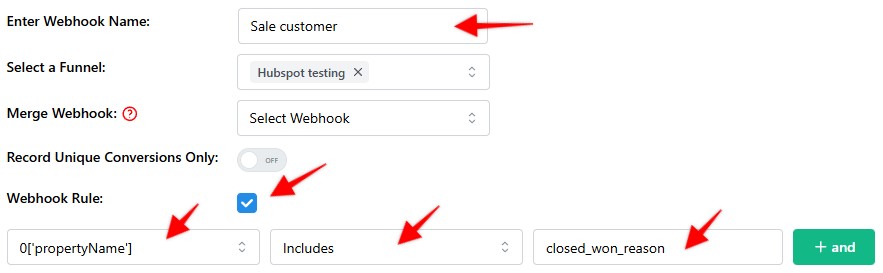
Note: this is for demonstration purposes only. You must set webhook rules that match your account setup.
Some carts and processors will send a separate webhook notification for the main sale and each upsell purchased. This will cause multiple conversions to be recorded.
For simple instructions to stop this click HERE.
1. Set up your Webhook on the Settings page > Payment Processing and Carts > Kajabi
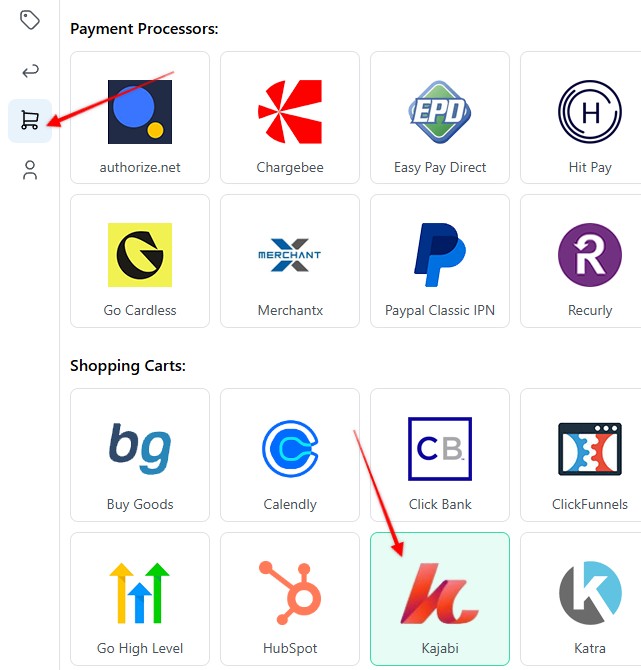
2. Enter a name for your Webhook > Select funnel to apply the webhook to > Hit Save & generate Webhook URL
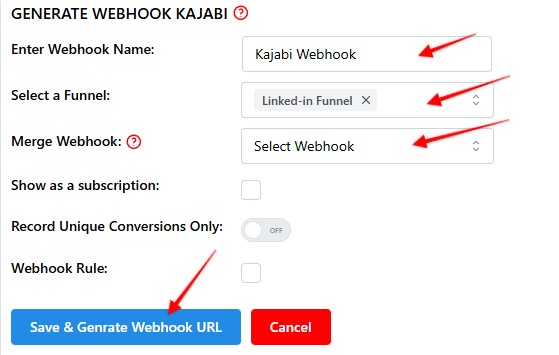
4. Copy the webhook URL, and hit Save
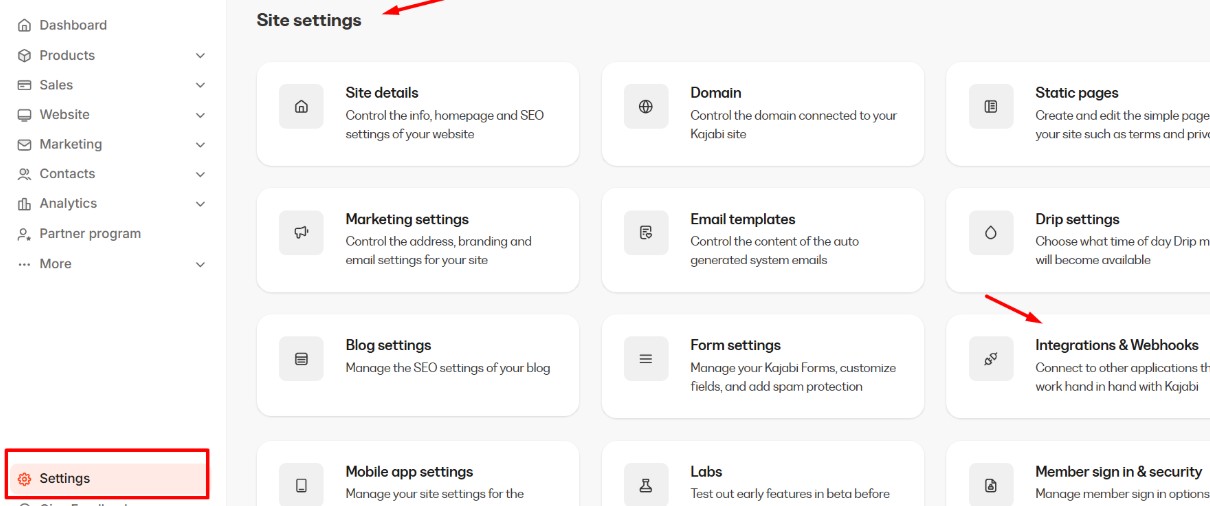
5. Log in to your Kajabi dashboard, Settings > Site Settings > Integrations & Webhooks
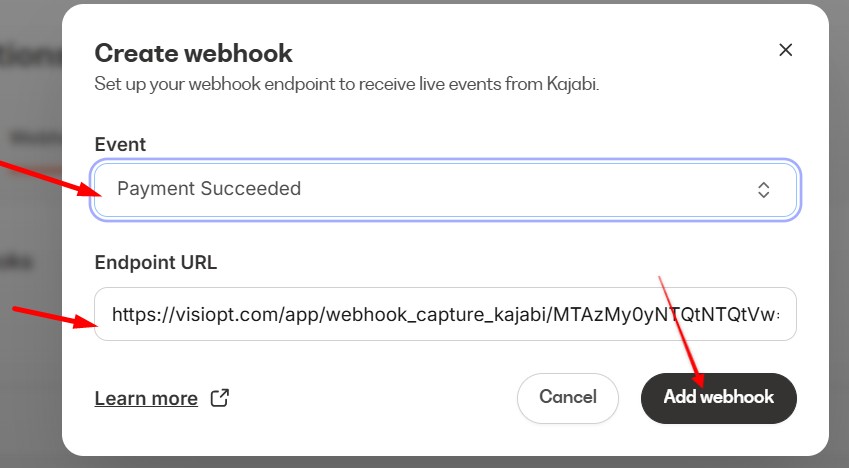
6. Open the "webhook" tab, and click "+ Create webhook":

7. In the webhook form, select "Payment Succeeded" as the event type. Paste the webhook URL copied from VisiOpt into the Endpoint URL field. And click Add Webhook.
Some carts and processors will send a separate webhook notification for the main sale and each upsell purchased. This will cause multiple conversions to be recorded.
For simple instructions to stop this click HERE.
1. To Create a webhook go to Settings page > Payment Processing and Carts > Kartra
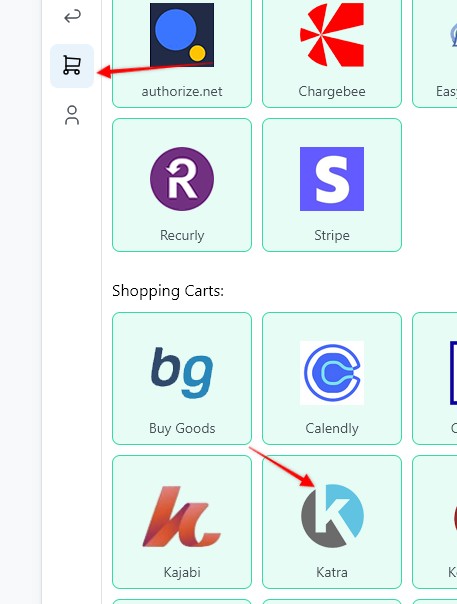
2. Enter a Webhook name, select the Funnel to associate the webhook with, hit Save and Generate Webhook URL

3. Copy the webhook URL
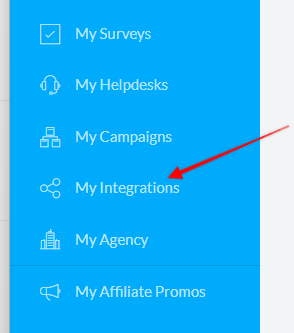
4. Log in to Kartra, then in the left side bar click "My integrations"
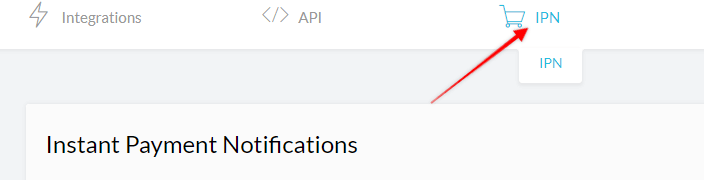
5. Click "IPN"
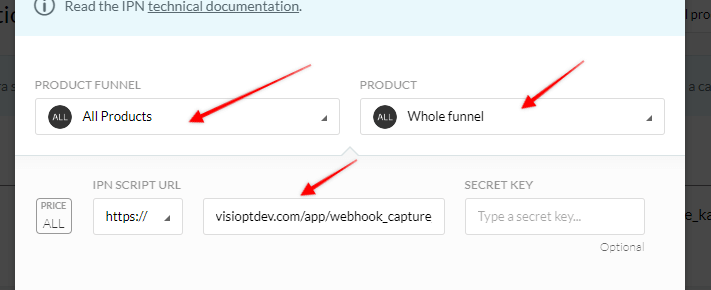
6. Select "All products" and "Whole funnel", then paste in the url from Visiopt
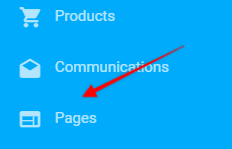
1. Log in to Kartra, then in the left side bar click "Pages"
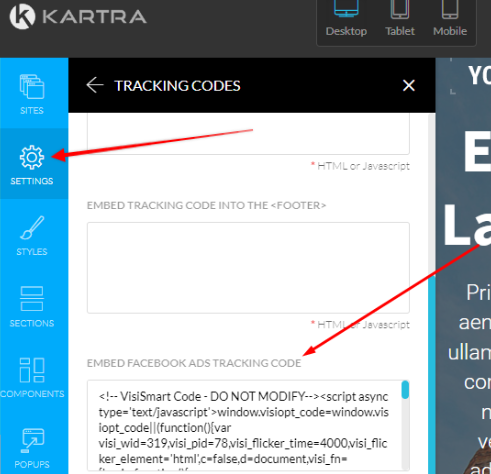
2. Find your checkout page, an hit edit
3. Then hit "Settings" in the left sidebar, and paste in the VisiSmart code in the "Embed facebook ads tracking code" textbox
4. If tracking doesn't work when set up as shown above, then try to add the VisiSmart script to the body of the page.
Some carts and processors will send a separate webhook notification for the main sale and each upsell purchased. This will cause multiple conversions to be recorded.
For simple instructions to stop this click HERE.
1. To Create a webhook go to Settings page > Payment Processing and Carts > Konnektive / Checkout Champ
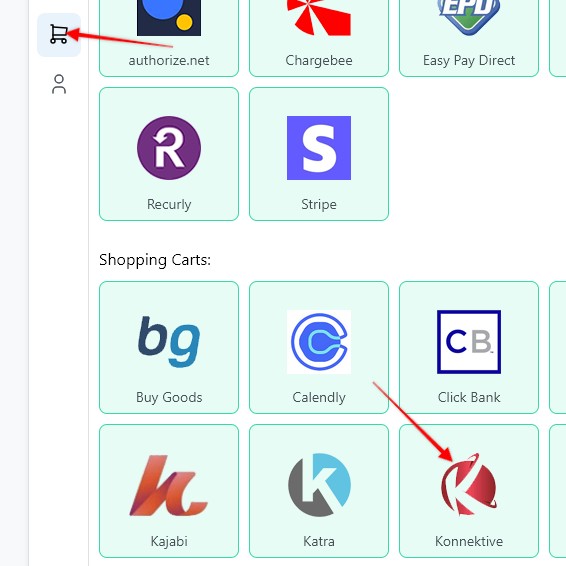
2. Enter a Webhook name, select the Funnel to associate the webhook with, hit Save and Generate Webhook URL
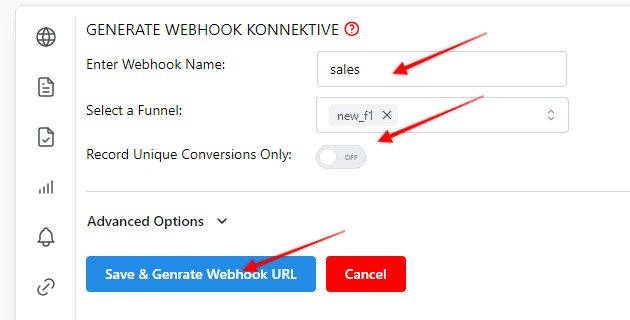
3. Copy the webhook URL
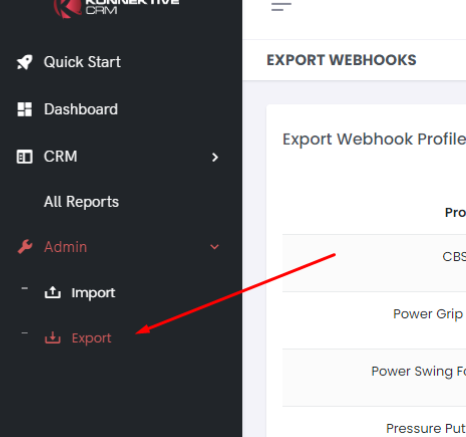
4. Log in to Konnektive and in Sidebar under the "Admin" section click on the Export link
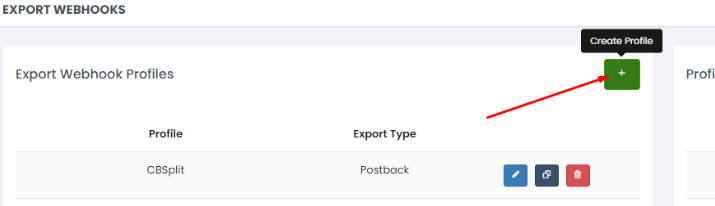
5. Click on The + button (Create Profile):
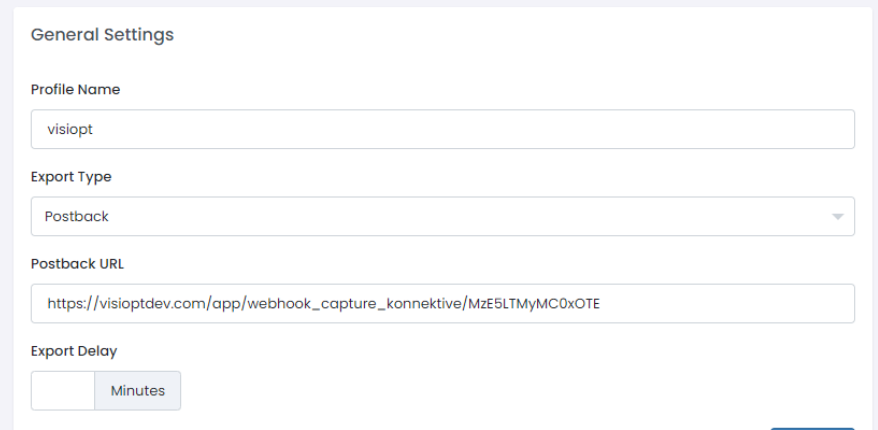
6.
- After the 'create profile' button is clicked, a new screen will open.
- There enter the name of the first profile
- Then select the option in export type, then Postback
- After that paste the URL which you copied in Step 3 into the Postback URL
7. Click on The + Add Field Mapping button:
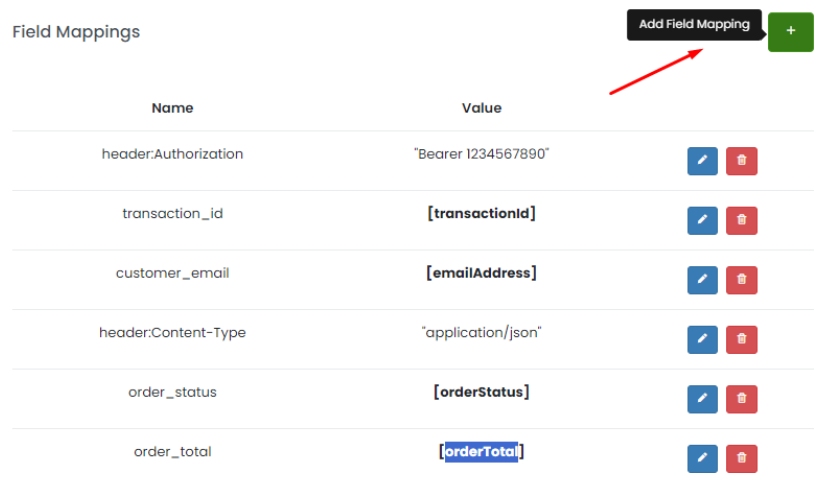
8. A popup will open as shown below
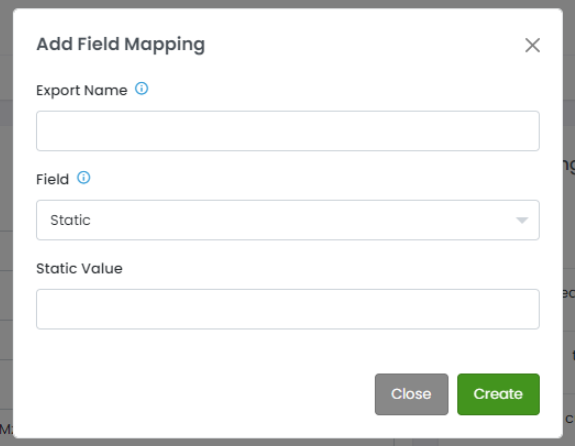
9. In the pop up shown above, please add values as shwon in the table below
| Export Name | Field | Field |
|---|---|---|
| header:Authorization | Static | Bearer 1234567890 |
| header:Content-Type | Static | application/json |
| transaction_id | transactionId | - |
| customer_email | emailAddress | - |
| order_status | orderStatus | - |
| order_total | TotalPrice | - |
| customer_first_name | firstName | - |
| customer_last_name | lastName | - |
| customer_postalcod | postalCode | - |
| customer_country | country | - |
| customer_state | state | - |
| customer_city | city | - |
10. Fill Up the data fields as below and add mappings as follows
11. Click in + (Create Route):
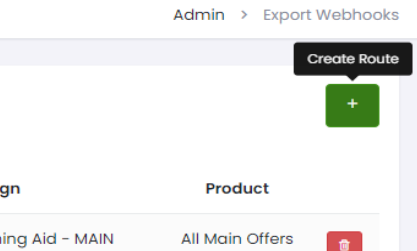
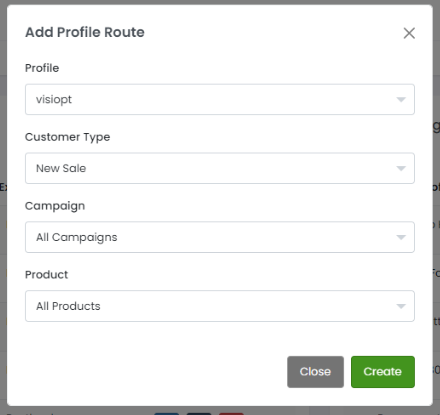
Create Profile Routing
- Here you can set the multiple routes.
- First, select the profile you have created.
- Here is the option to select which type of customers are in your funnel.
- Select New Sales if your funnel only contains new sales.
- If you have upsell and new sales in your funnel then you need to add 1 more route for upsell and a different one for main sales, same applies to recurring billing as well.
- If your funnel is for a specific campaign, select that option otherwise keep All.
- If your funnel is for a specific product, select that option.
- Here I set the route for Only New Sales and All Campaigns and All Products.
Some carts and processors will send a separate webhook notification for the main sale and each upsell purchased. This will cause multiple conversions to be recorded.
For simple instructions to stop this click HERE.
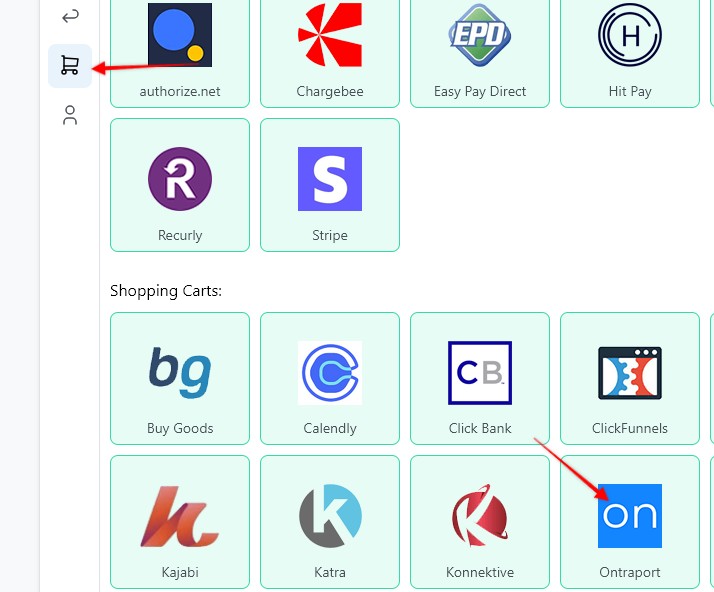
1. To Create a webhook go to Settings page > Payment Processing and Carts > Ontraport
2. Enter a Webhook name, select the Funnel to associate the webhook with, hit Save and Generate Webhook URL
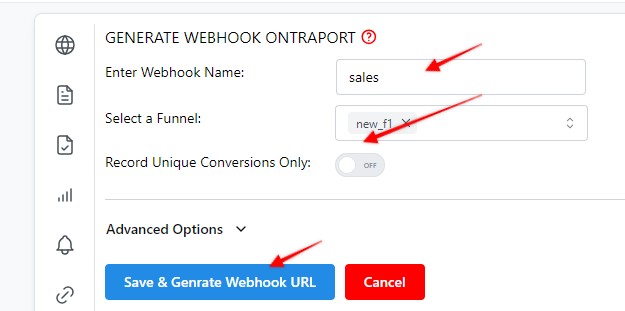
3. Copy the webhook URL
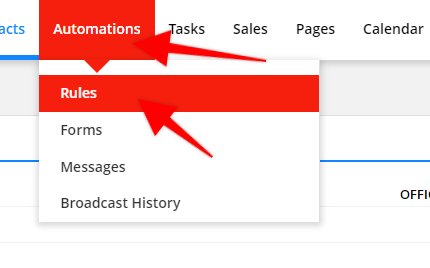
4. Log in to Ontraport, then in the top menu select "Automations" and then click on the "Rules" option
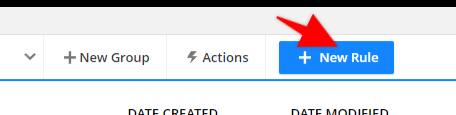
5. Click on "+ New Rule"
6. Then click on the "+ Add Trigger" button
6a. Each test and / or each unique campaign will use a different webhook.
If you have multiple products in a single test or campaign that you want to track and trigger a webhook for then choose "All Products".
This will trigger the same webhook regardless of which product is purchased.
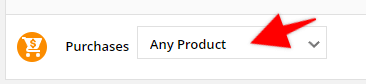
6b. If you are tracking different tests and campaigns and are creating more than 1 webhook inside of Visiopt than you can create a new webhook rule for each product as shown here.
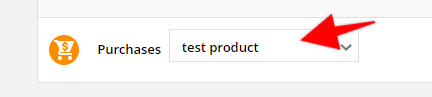
6c. If you ever require multiple webhooks for the same product because the same product is in use for different tests or campaigns it is possible to create multiple rules all using "All Products" and use a different webhook for each.
This is the least desired option because each product will send Visiopt multiple webhooks BUT Visiopt is able to apply the proper webhook to the proper test or campaign.
Again, use this option only if absolutely required.
7. Then under the "Sales" section, select on the "Puchase Product" option
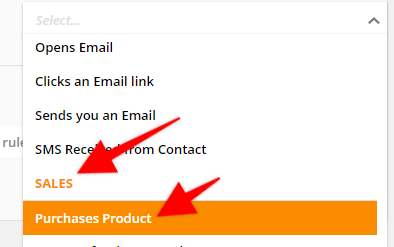
8. Cklick on the "+ Add Action" button
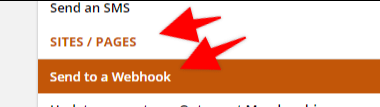
9. Then under the "Sites / Pages" section, select on the "Send to a Webhook" option
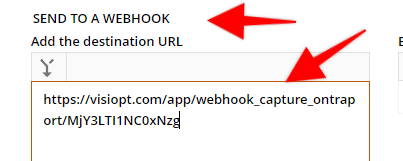
10. In the "Send to a Webhook" section paste in the webhook url copied from Visiopt (Step 3)
11. In the "Select webhook method" section select "post"
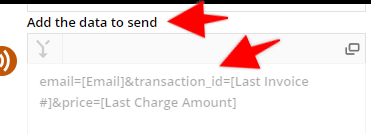
12. In the "Add the data to send" paste in the following (without the quotation marks): "email=[Email]&transaction_id=[Last Invoice #]&price=[Last Charge Amount]"
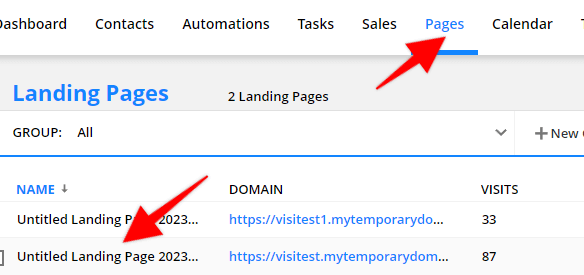
3. In the left side bar click on the "Settings" tab then select "Custom Code"
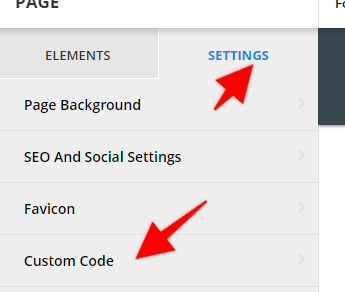
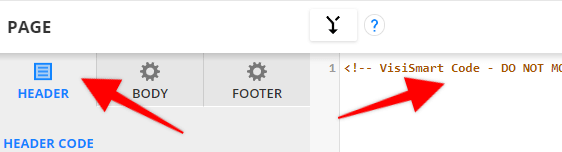
3. Then select the "Header" tab and paste in the VisiSmart code
Some carts and processors will send a separate webhook notification for the main sale and each upsell purchased. This will cause multiple conversions to be recorded.
For simple instructions to stop this click HERE.
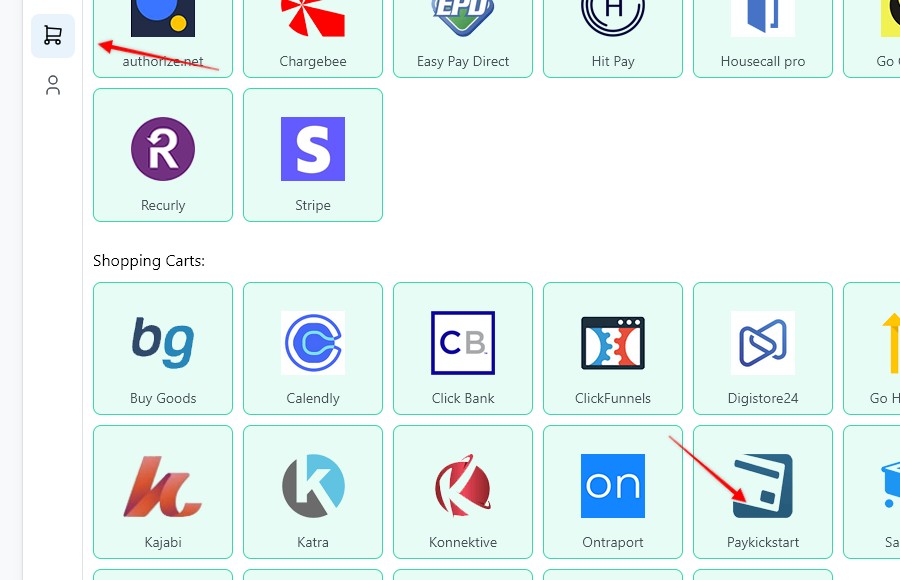
1. To Create a webhook go to Settings page > Payment Processing and Carts > PayKickStart
2. Enter a Webhook name, select the Funnel to associate the webhook with, hit Save and Generate Webhook URL
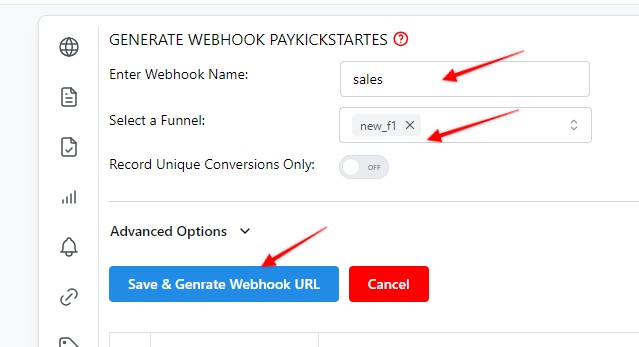
3. Copy the webhook URL
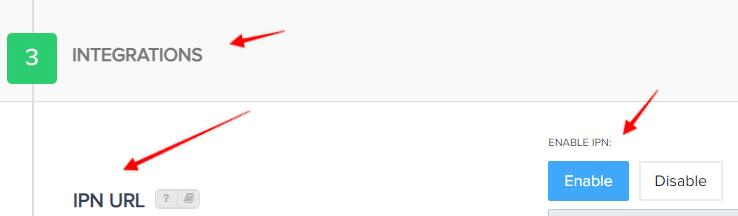
4. Go to product edit > Integrations > enable the IPN URL
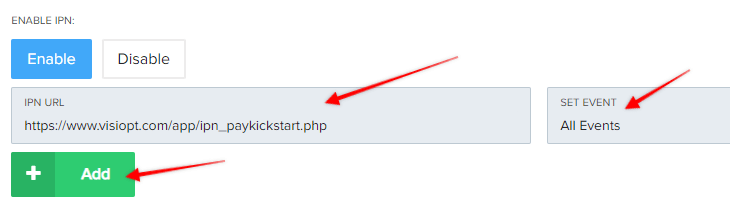
5. Hit the "+ Add" button, then paste in the Visiopt url as shown below. Also select "All Events"
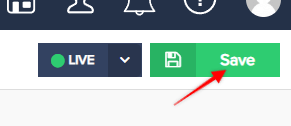
6. Save the changes on the product and that is it
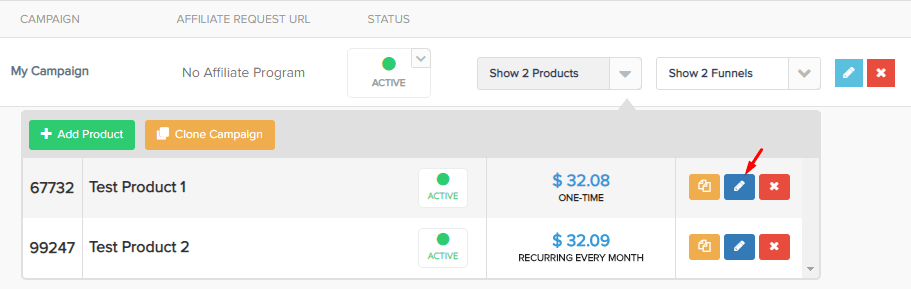
1. Log in to PayKickStart, then in the "Campaigns" > "Products" click on the "edit" icon
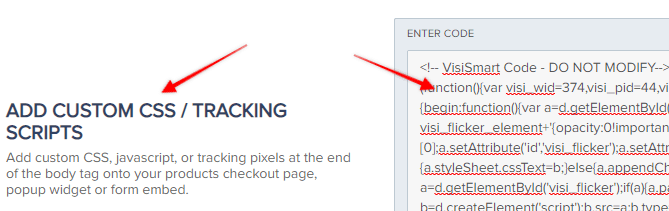
2. Go to step 2 (Checkout Settings) and you will see a spot that says “Add Custom CSS / Tracking Scripts“, paste in the VisiSmart code there
Some carts and processors will send a separate webhook notification for the main sale and each upsell purchased. This will cause multiple conversions to be recorded.
For simple instructions to stop this click HERE.
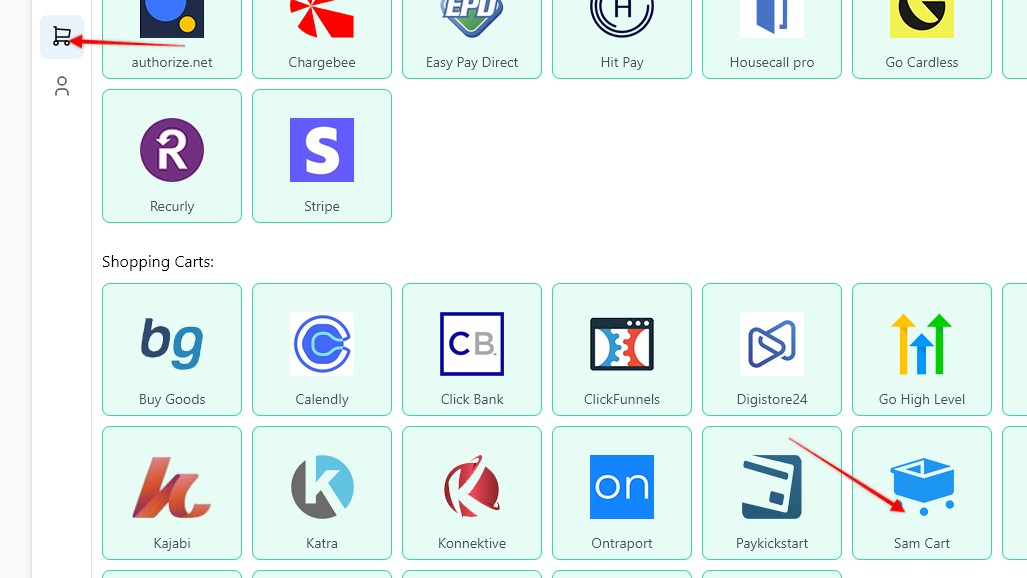
1. To Create a webhook go to Settings page > Payment Processing and Carts > Sam Cart
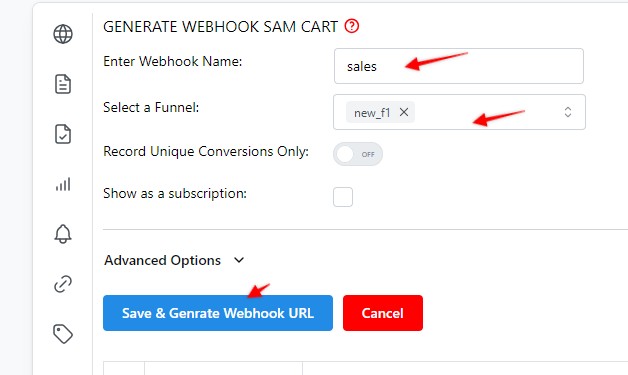
2. Enter a Webhook name, select the Funnel to associate the webhook with, hit Save and Generate Webhook URL
3. Copy the webhook URL
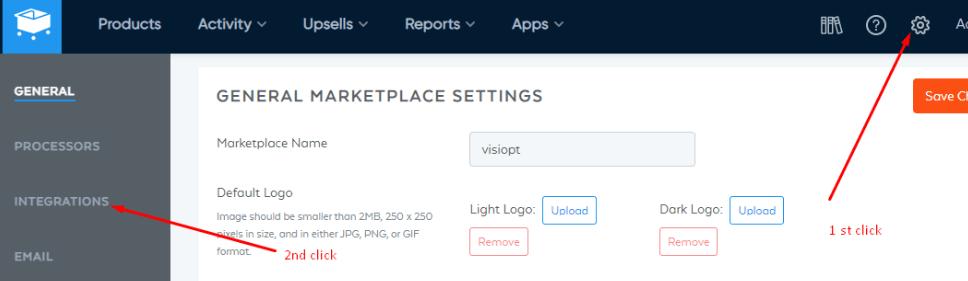
4. Log in to Samcart then in the top right click the "Settings" icon > the click "Integrations"
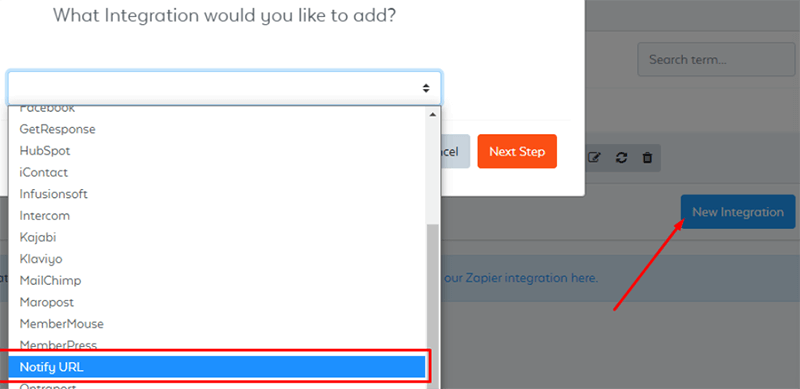
5. Click the "New Integration" button, then from the dropdown select "Notify URL"
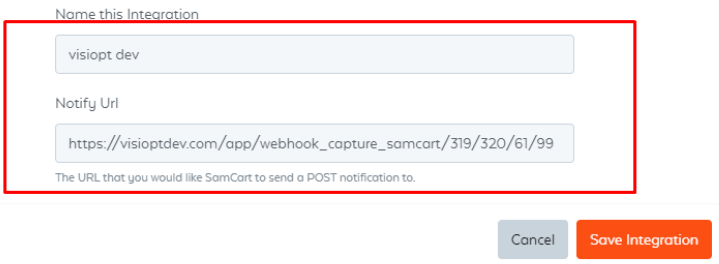
6. Fill out the fields as shown below, then hit "Save integration"
7. Then click the "New Rule" button, select "eCommerce" and "Product Purchased"
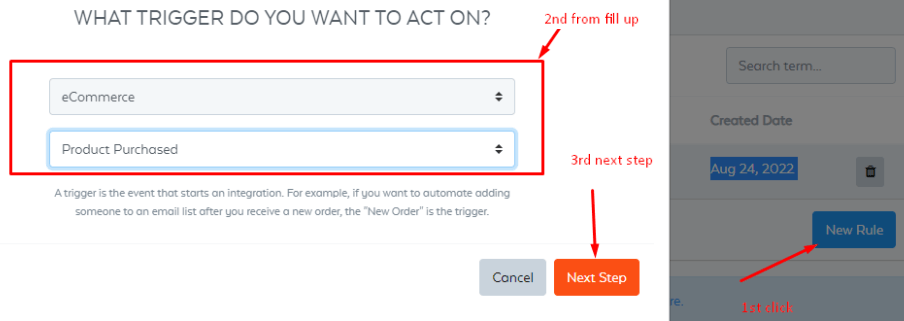
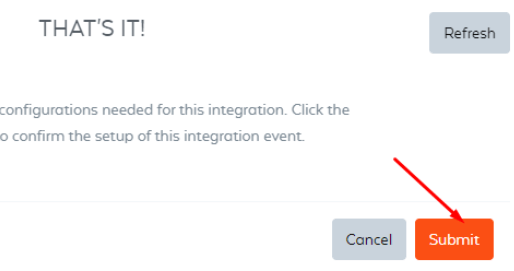
8. When done hit "Submit"
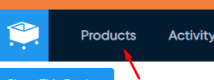
1. Log in to Sam Cart, then click on the "Products" link
2. Click on the product edit button
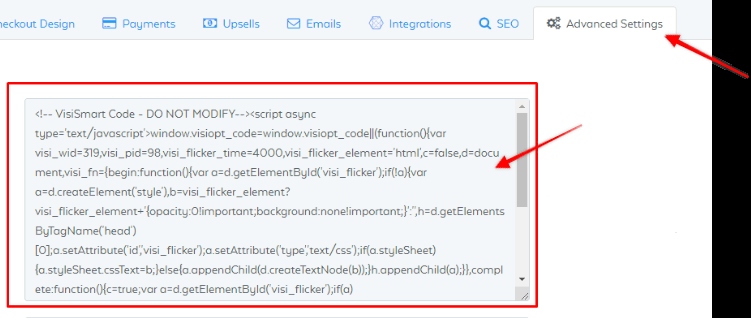
3. Click on the "Advanced Settings" tab, paste in the Visiopt Tracking Script where it says "Scripts/pixels"
Some carts and processors will send a separate webhook notification for the main sale and each upsell purchased. This will cause multiple conversions to be recorded.
For simple instructions to stop this click HERE.
1. Set up your Webhook on the Settings page > Payment Processing and Carts > Shopify
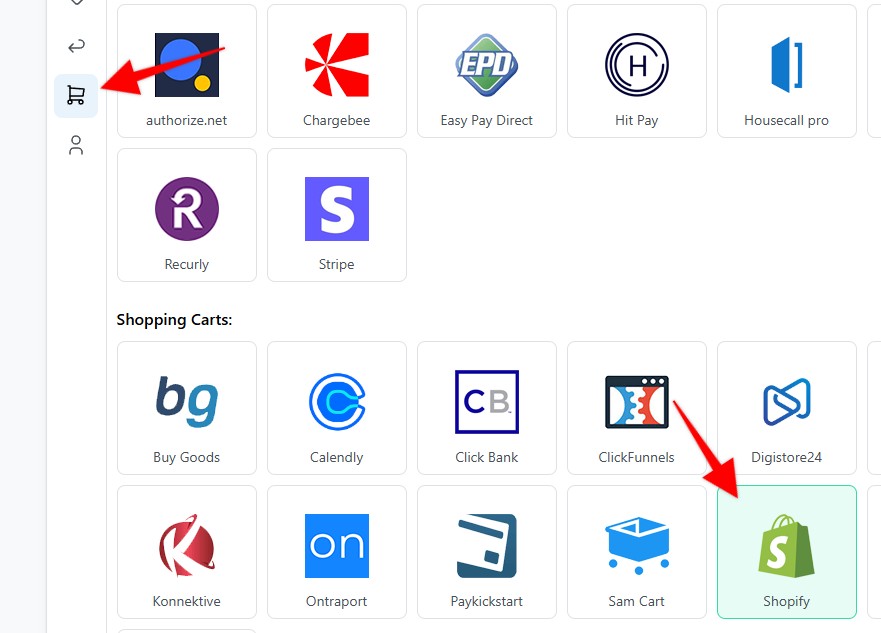
2. Enter a name for your Webhook > Select funnel to apply the webhook to > Hit Save & generate Webhook URL
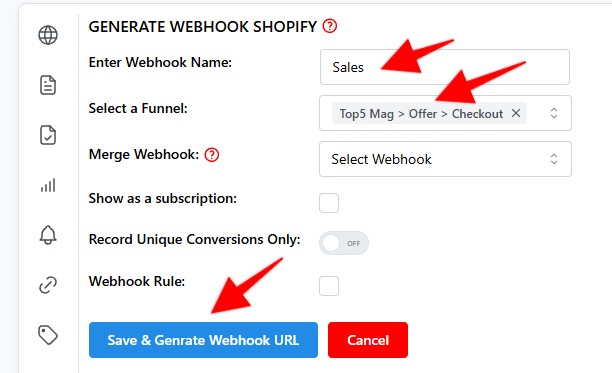
3. Additionaly, you can mark the webhook as subscription by clicking on the Show as a subscription checkbox > Select the desired Recurring duration
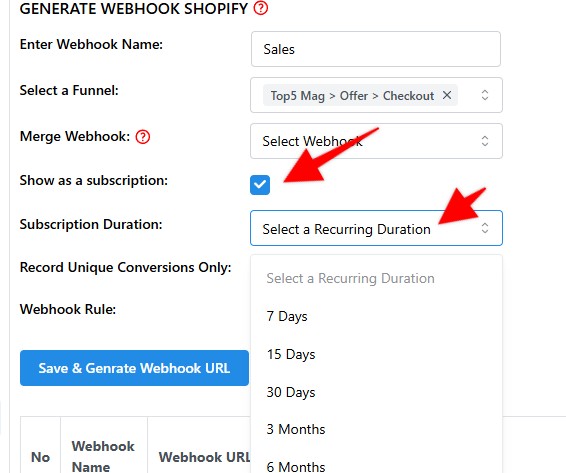
4. Copy the webhook URL, and hit Save
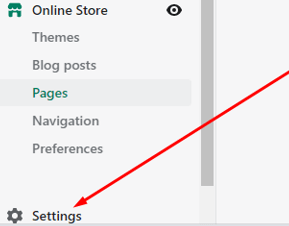
5. Log in top Shopify, and click on the settings link in the bottom of the left sidebar
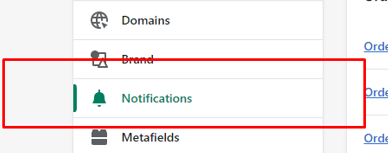
6. Click on "Notifications"
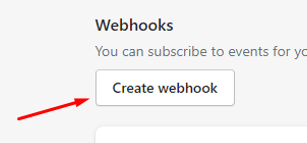
7. Click on the "Create webhook" button
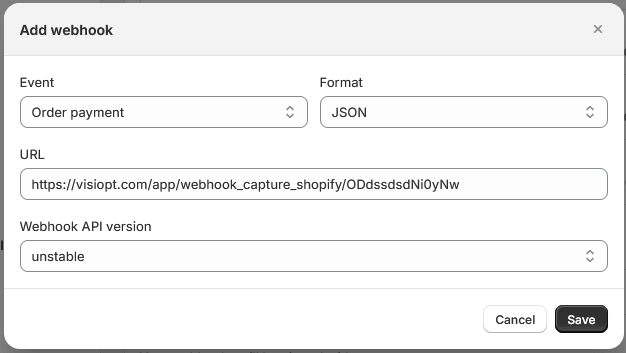
8. As Event select the "Order Payment". Then paste in the URL copied from Visiopt, and hit "Save"
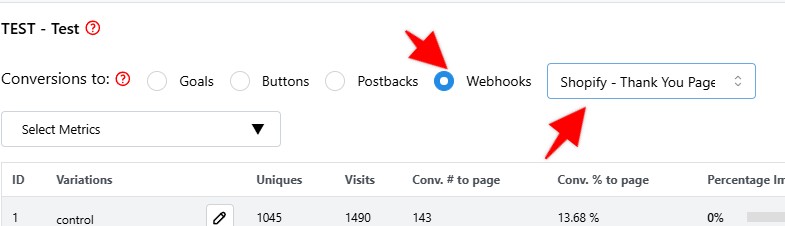
9. To see the webhook stats in your test, on the test result page choose the webhooks option > Then select your webhook from the dropdown
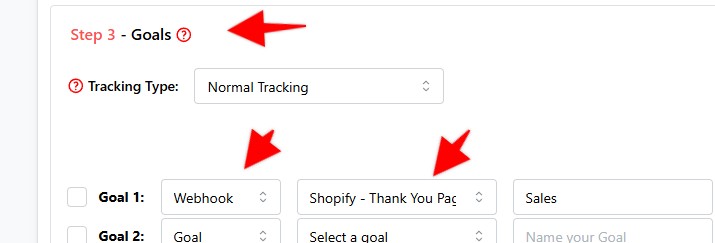
10. To see the webhook stats in your campaign, in step 3 of the campaign setup, set Webhook as the goal type > Then select your webhook from the dropdown
Some carts and processors will send a separate webhook notification for the main sale and each upsell purchased. This will cause multiple conversions to be recorded.
For simple instructions to stop this click HERE.
1. Set up your Webhook on the Settings page > Payment Processing and Carts > Shopify
To track Registration:
2. Enter a name for your Webhook > Select funnel to apply the webhook to > Hit Save & generate Webhook URL. Set up the foloowing rule to track registrations:
3. Copy the webhook URL, and hit Save
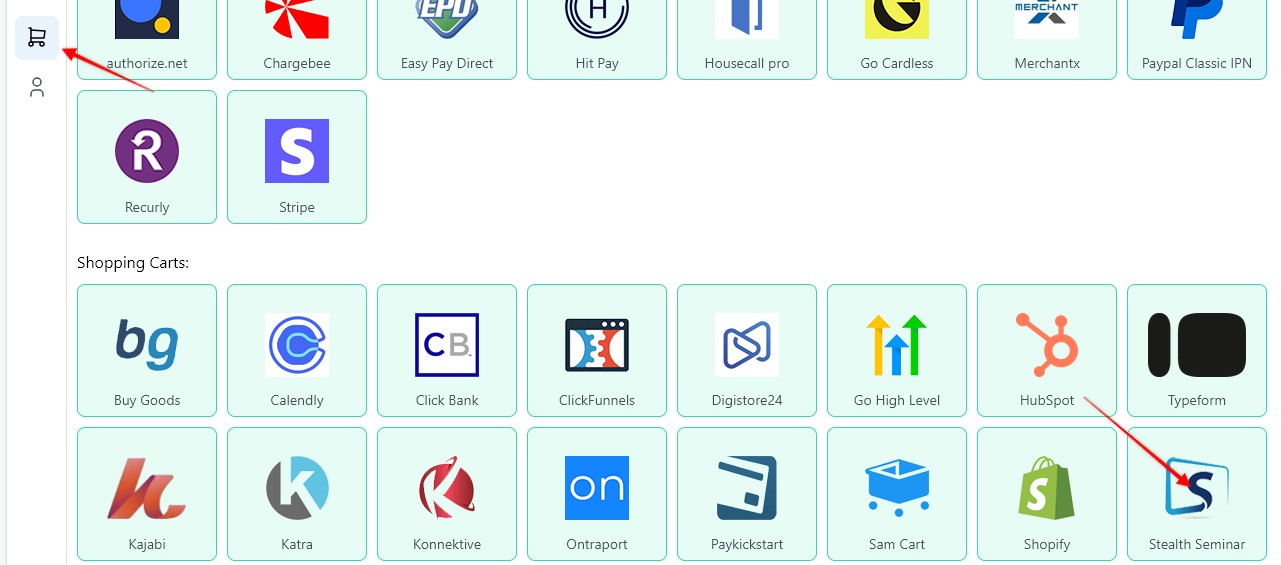
1. To Create a webhook go to Settings page > Payment Processing and Carts > Stealth Seminar
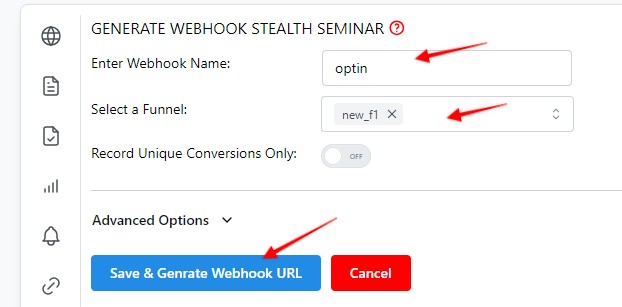
2. Enter a Webhook name, select the Funnel to associate the webhook with, hit Save and Generate Webhook URL
3. Copy the webhook URL
4. Go to your StealthSeminar account, open the webinar where you want to set up the webhook, and click the Edit button.
5. Navigate to the Plugins tab → Click on Stealth Power Webhook → Click Add Connection.
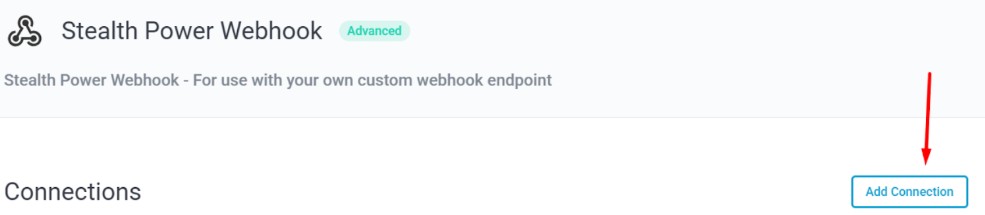
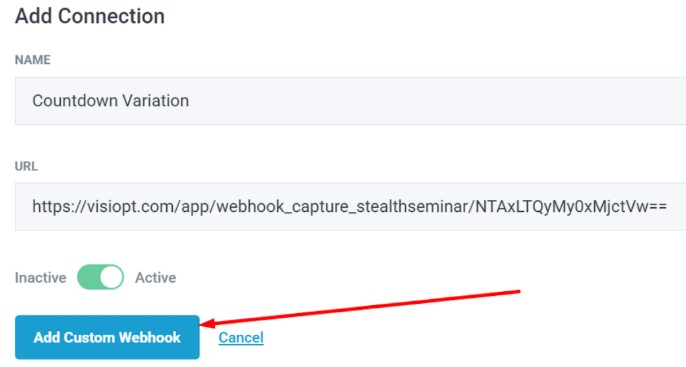
6. Add the copied webhook URL as shown here:
7. You’ll see the following screen. Click Toggle All and then click Save and Apply.
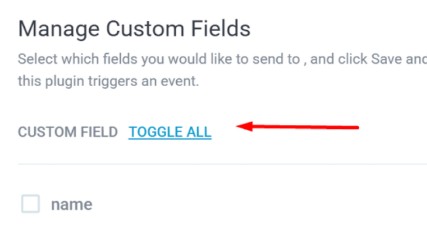
8. After saving, go back to the Webinar List page → Click Edit again → Go to the Plugins tab. You’ll now see the webhook setup as shown here:

9. Click View, and while updating the Countdown Variation webhook, select Event = They Register, then click Add Condition.
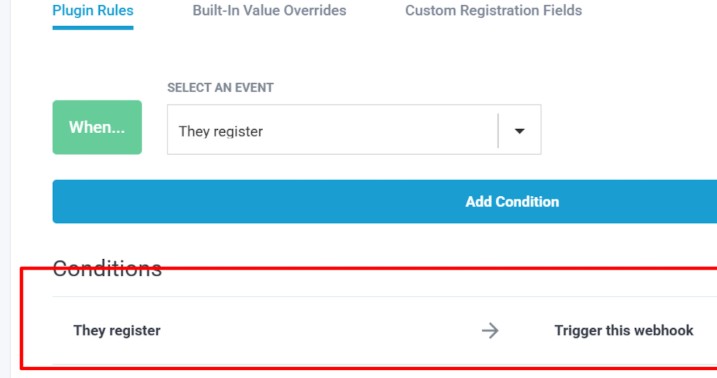
To track Attendance:
10. Enter a name for your Webhook > Select funnel to apply the webhook to > Hit Save & generate Webhook URL. Set up the foloowing rule to track registrations:
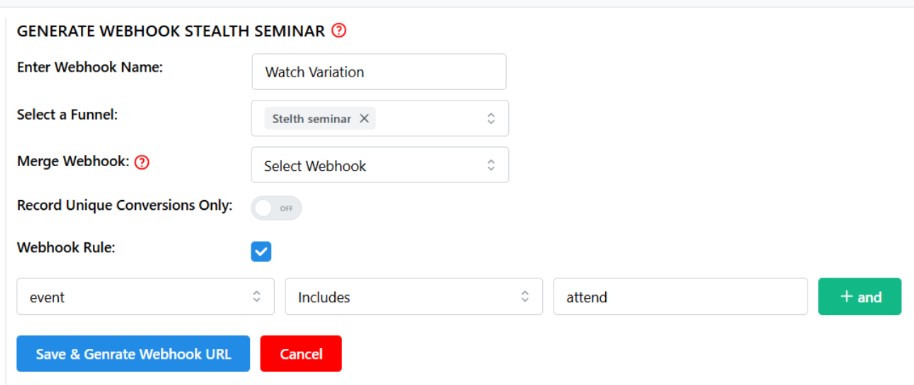
11. Copy the webhook URL and repeat the same process in StealthSeminar > Edit the desired webinar > Go to the Plugins tab > Click Stealth Power Webhook > Add Connection
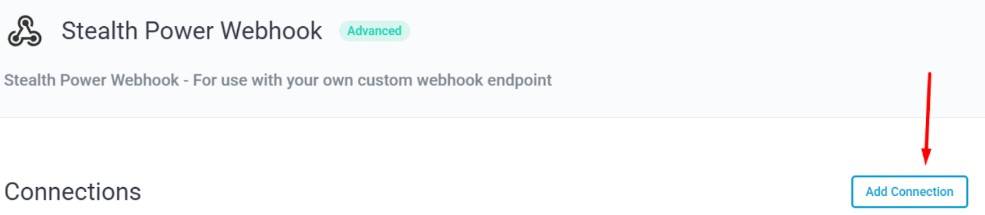
12. Add the webhook as shown here:
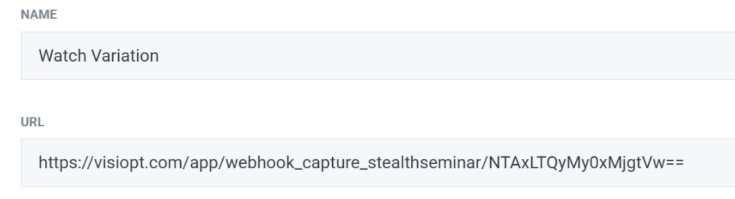
13. Then click Toggle All > Save and Apply.
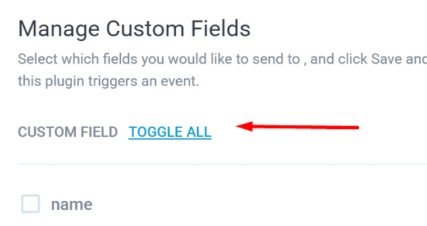
14. To verify, go back to the webinar list and check the Plugin tab again.

15. While updating the Watch Variation webhook, select Event = They Attend the Webinar, then click Add Condition.
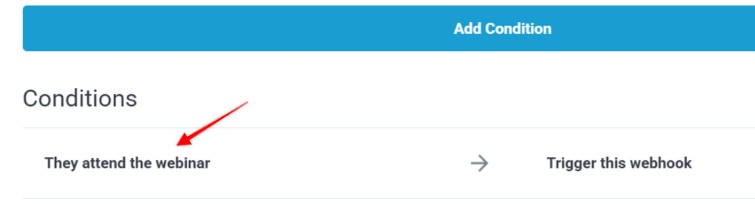
Some carts and processors will send a separate webhook notification for the main sale and each upsell purchased. This will cause multiple conversions to be recorded.
For simple instructions to stop this click HERE.
1. To Create a webhook go to Settings → Payment Processing & Carts → ThriveCart
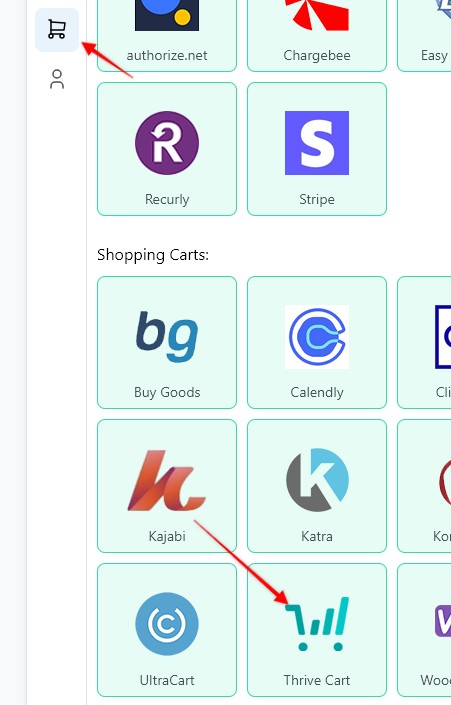
2. Fill in the following details:
Webhook Name
Funnel
API Key
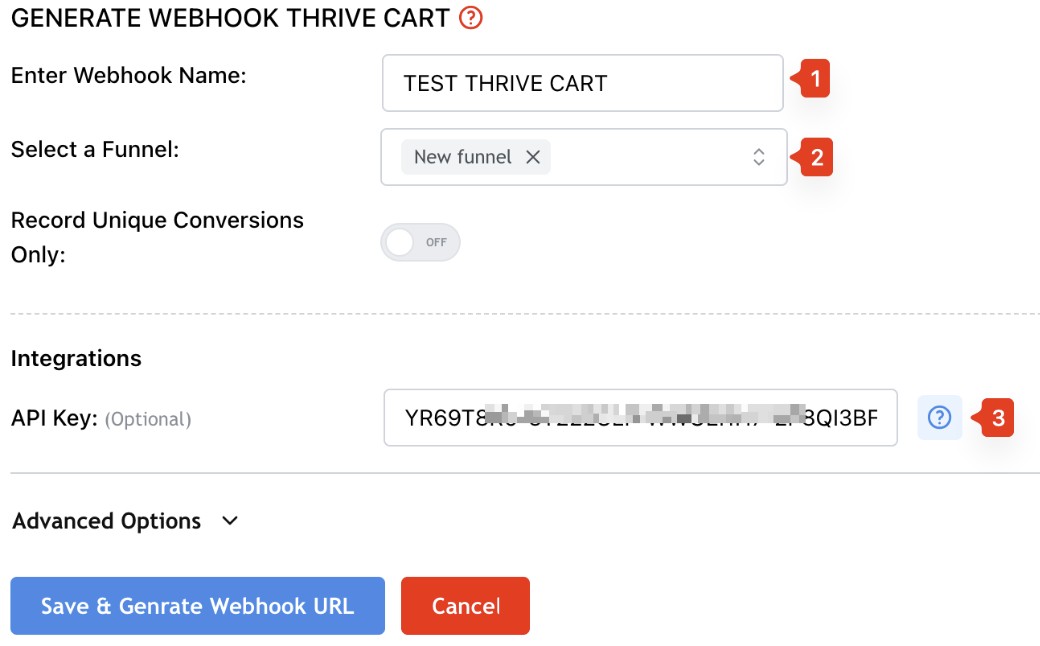
3. Note: To create the webhook automatically without any manual setup, it is recommended to enter your ThriveCart integration credentials (API Key) in VisiOpt before clicking Save & Generate Webhook URL.
Do not click Save yet. First, obtain your API credentials as described below.
4. To get your API Key, Log in to your ThriveCart account. Navigate to Account → Settings → API & Webhooks.
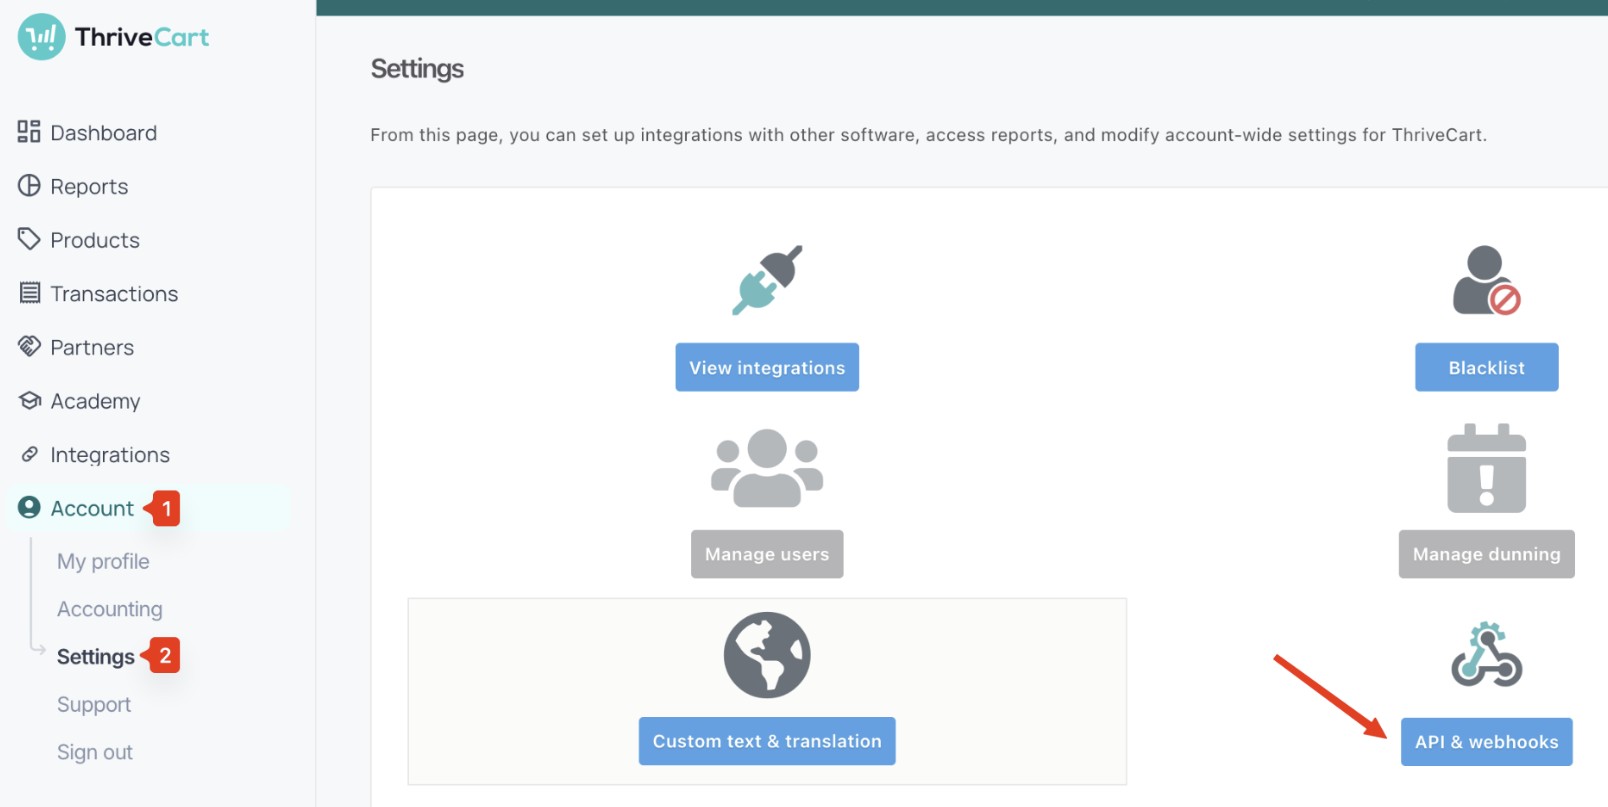
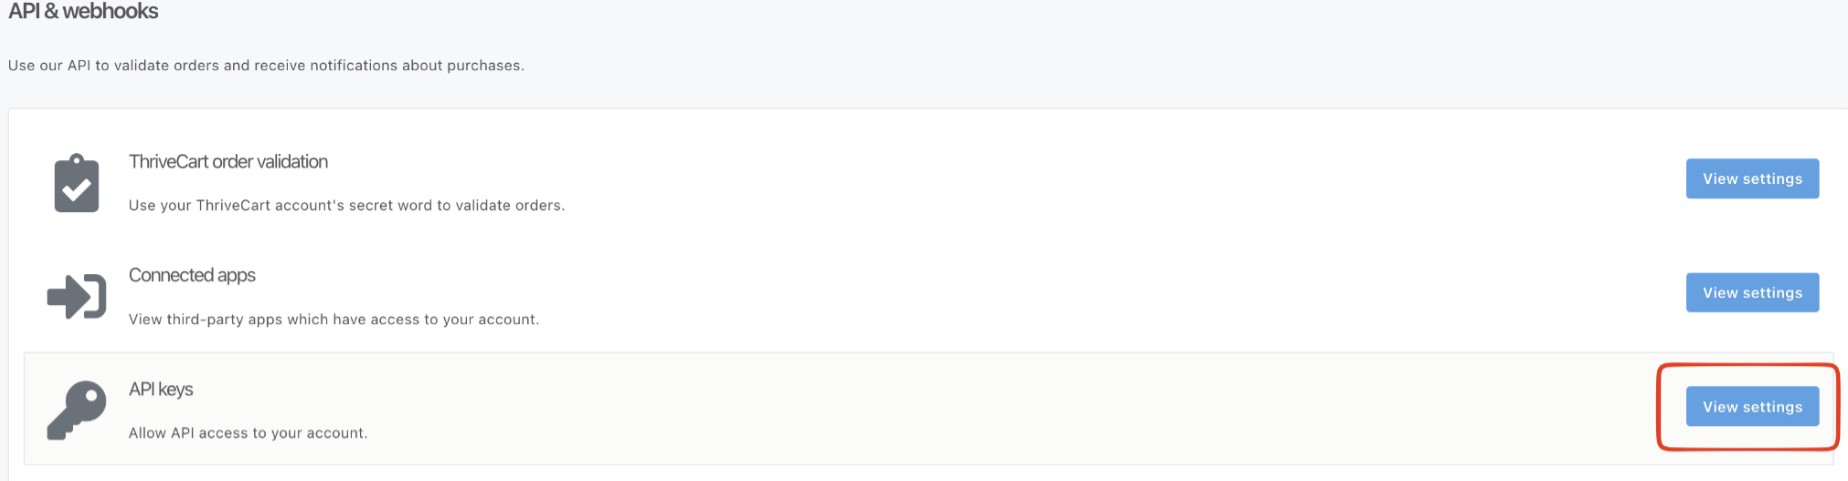
5. Click on the View Settings button next to API Keys.
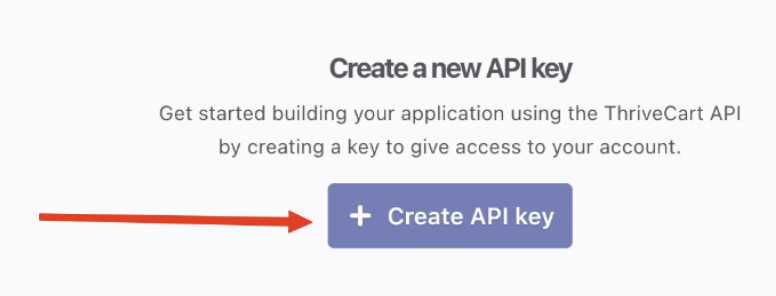
6. Click Create API Key.
7. Enter key name and click Create API Key.
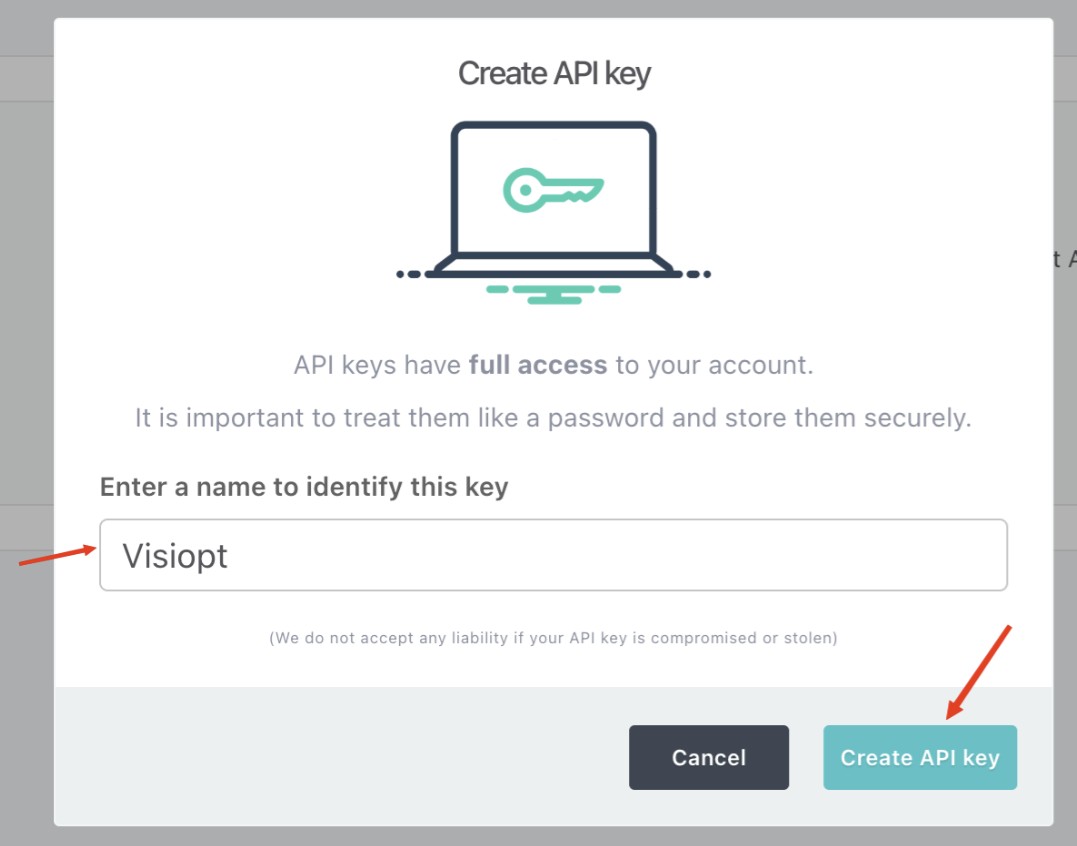
8. This will give you an API Key. Copy it and paste it in visiopt.
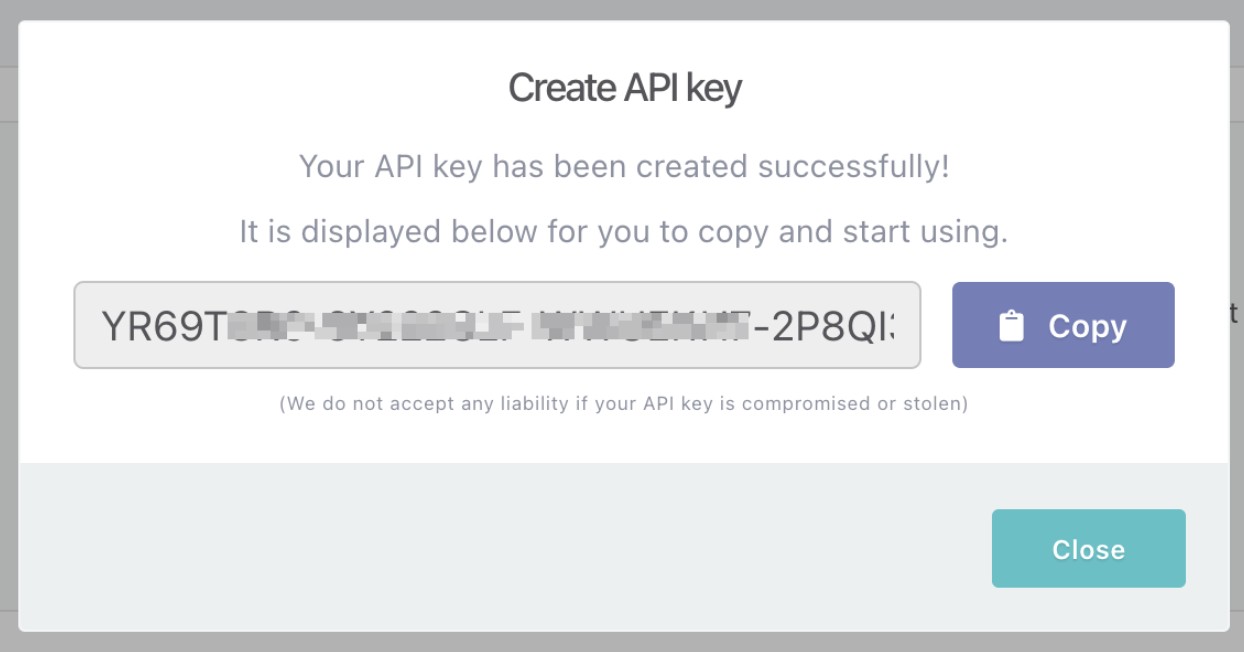
9. In Visiopt, click Save & Generate Webhook URL.
Visiopt will generate a webhook URL and automatically create the webhook in your ThriveCart account.
If no error message is displayed, the webhook was most likely created successfully.
1. In Visiopt hit Save & Generate Webhook URL without entering the API details. Then copy the generated URL.
2. Log in to your ThriveCart account, navigate to Account → Settings → API & Webhooks.
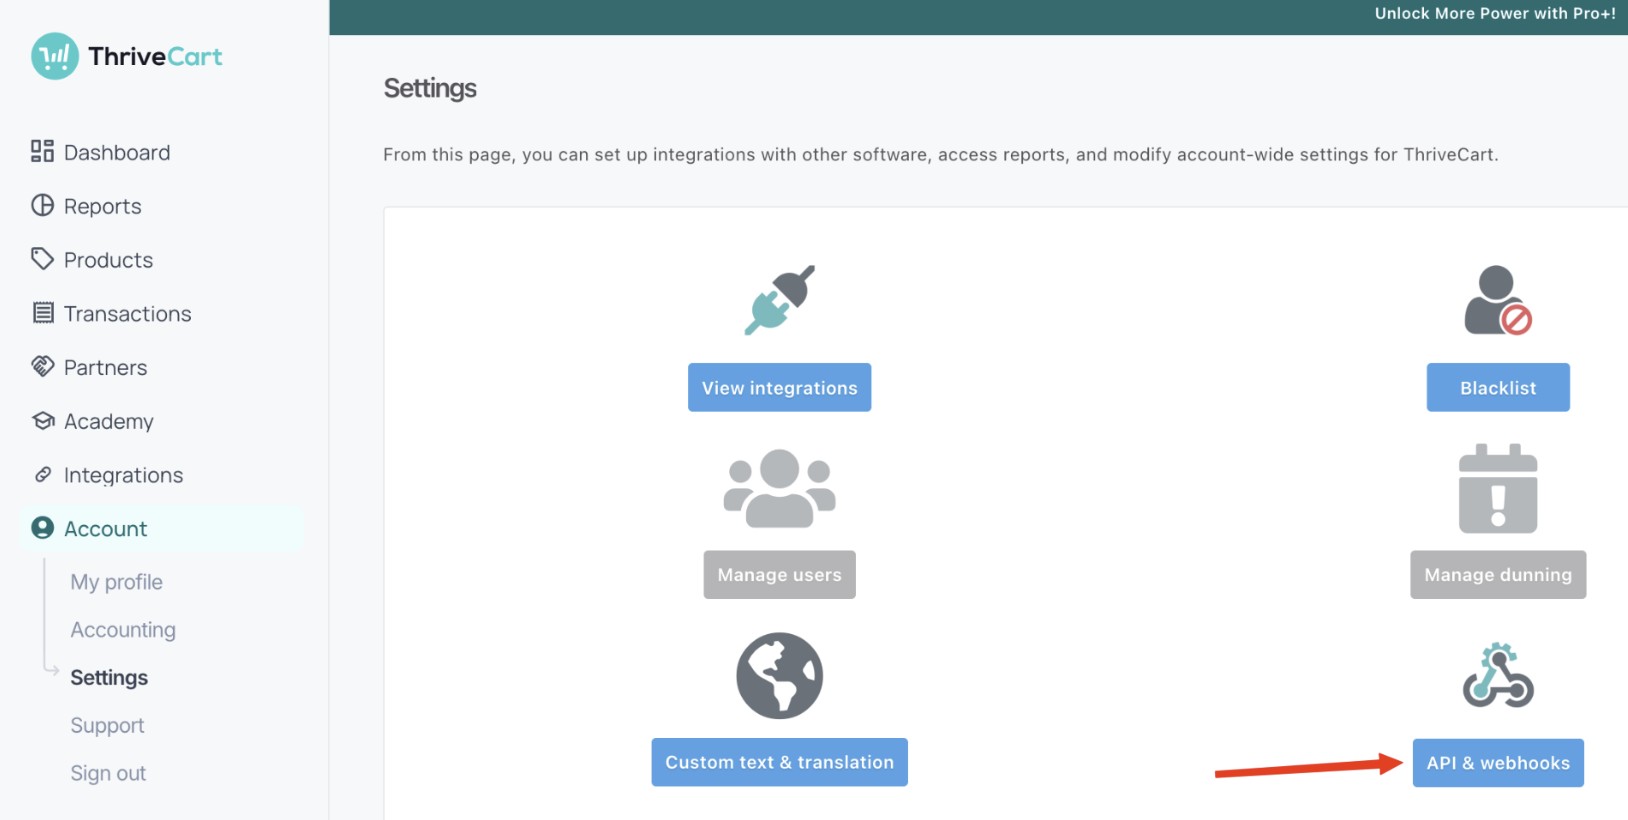
3. Click on the View Settings button next to Webhooks & notifications.
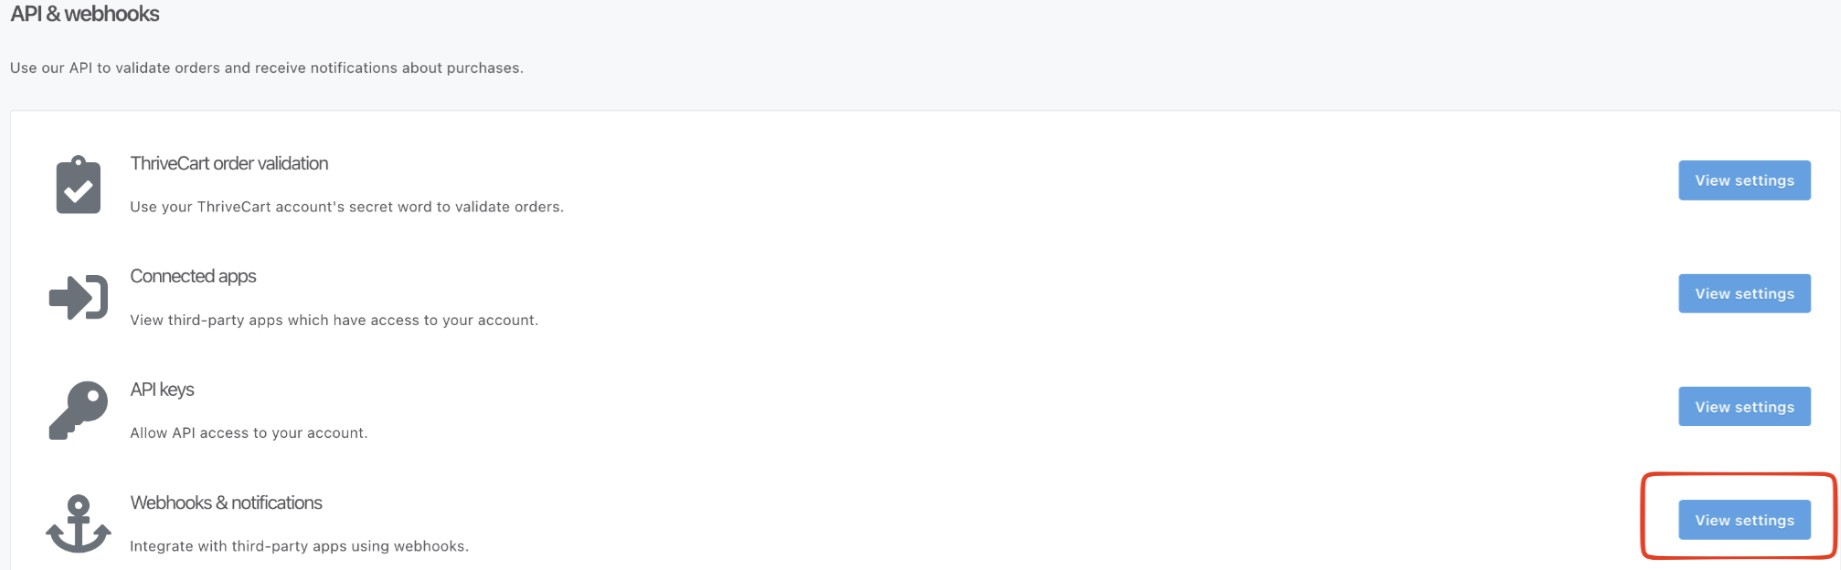
4. Click the Add Webhook button.
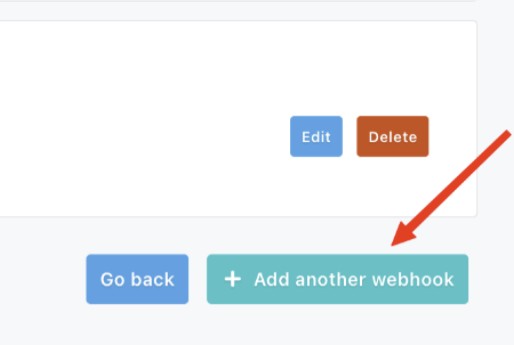
5. Fill in the following details:
1. Webhook Name: Enter any descriptive name
2. Webhook URL: Paste the webhook URL generated by Visiopt
3. Select Receive results as JSON.

Your ThriveCart webhook is now connected to Visiopt and ready to send events
1. Log in to ThriveCart, head over to the "Checkout" tab and then choose the "Tracking tab"
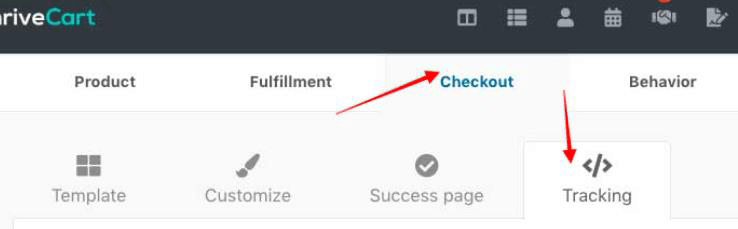
2. Then find the "Checkout page only" field, and paste in the VisSmart script
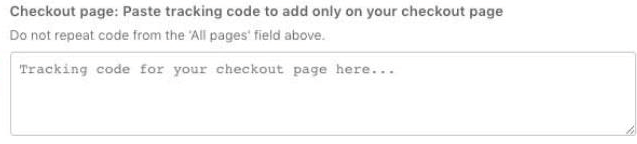
Some carts and processors will send a separate webhook notification for the main sale and each upsell purchased. This will cause multiple conversions to be recorded.
For simple instructions to stop this click HERE.
1. Create a new webhook for Typeform in Visiopt. Go to Settings → Payment Processing & Carts → Typeform.
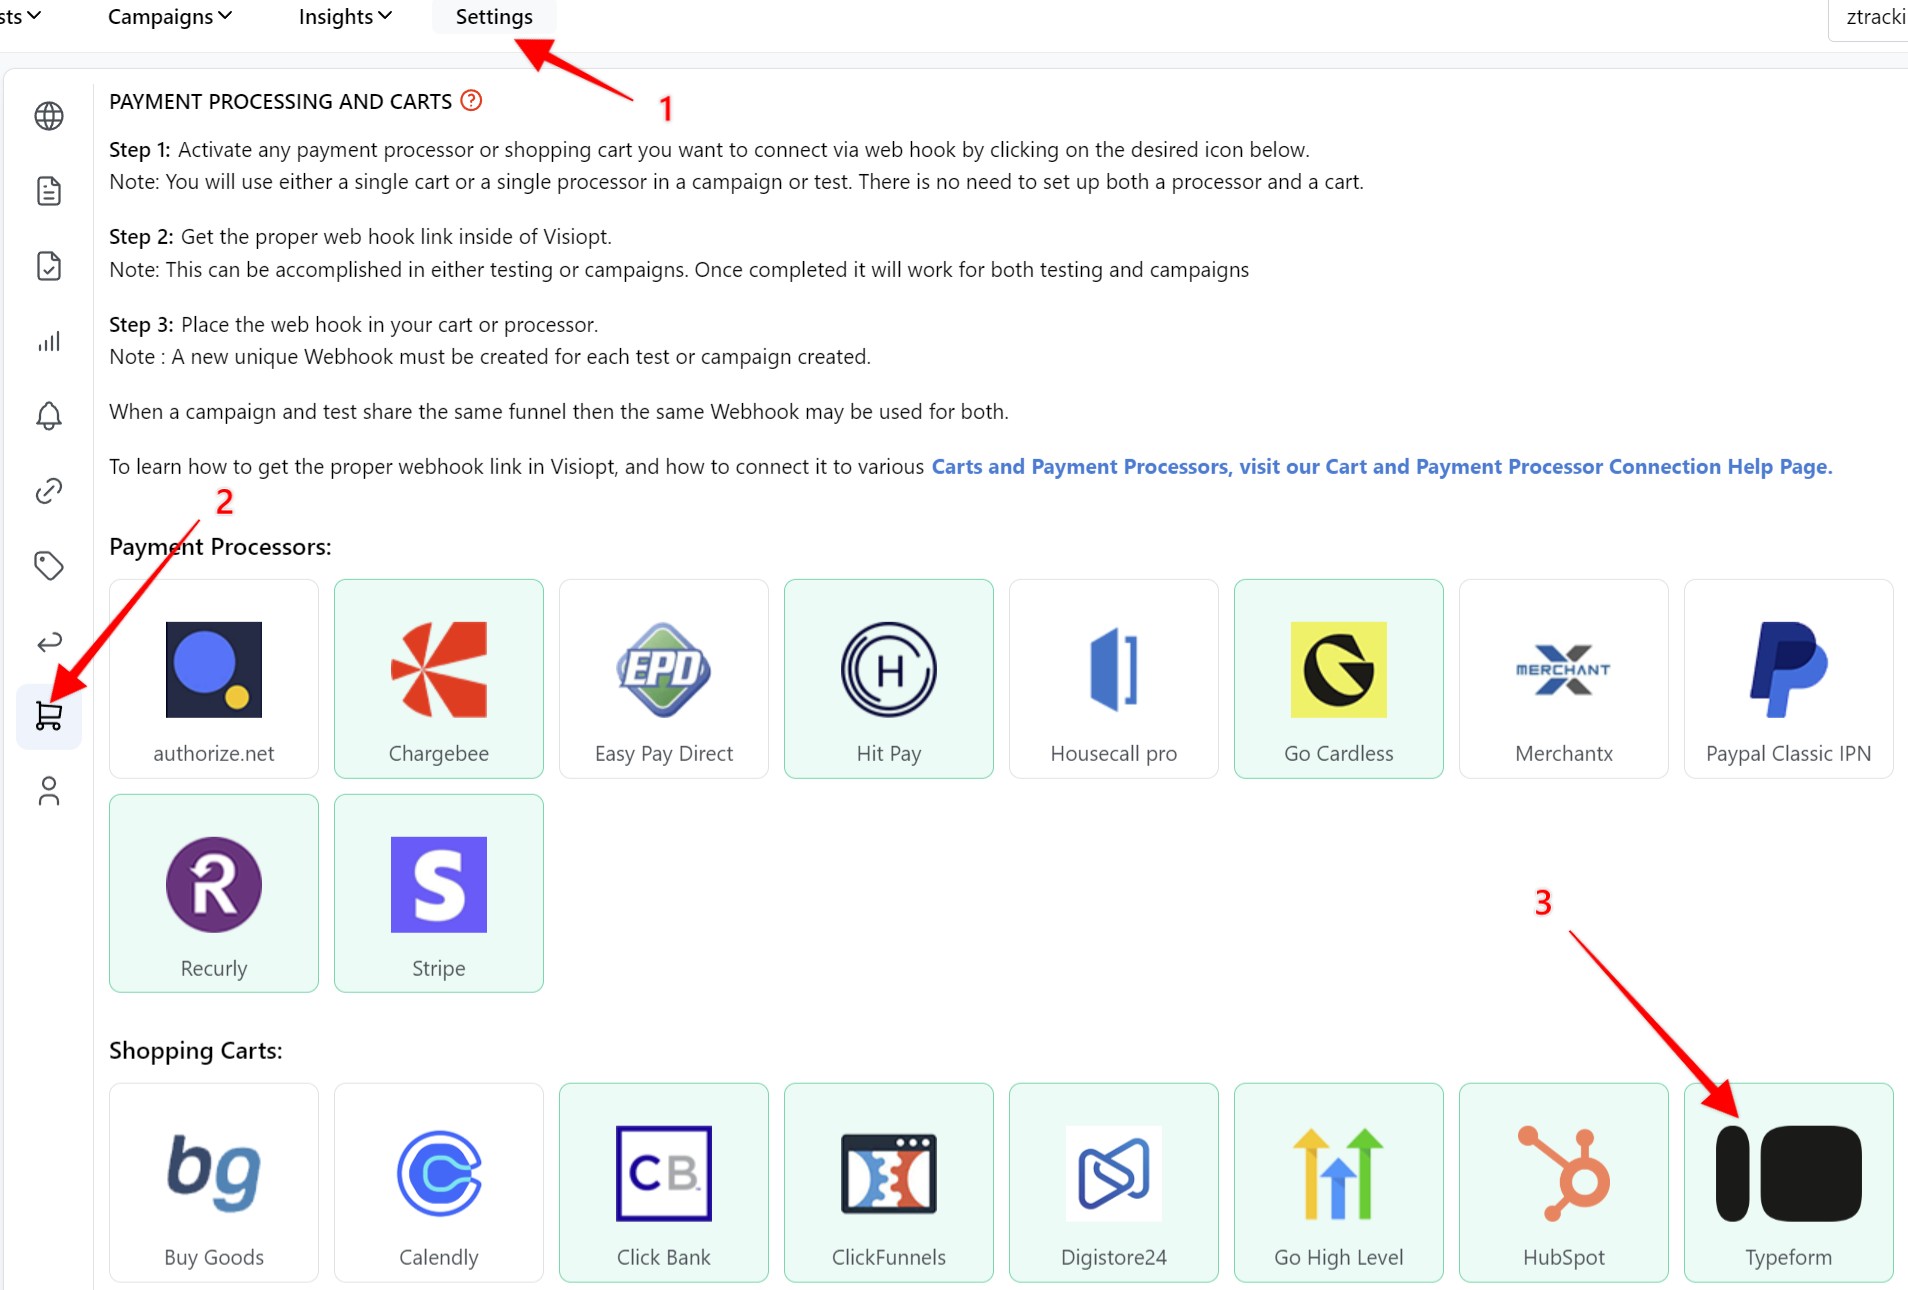
2. Enter a name for your webhook, select the funnel.
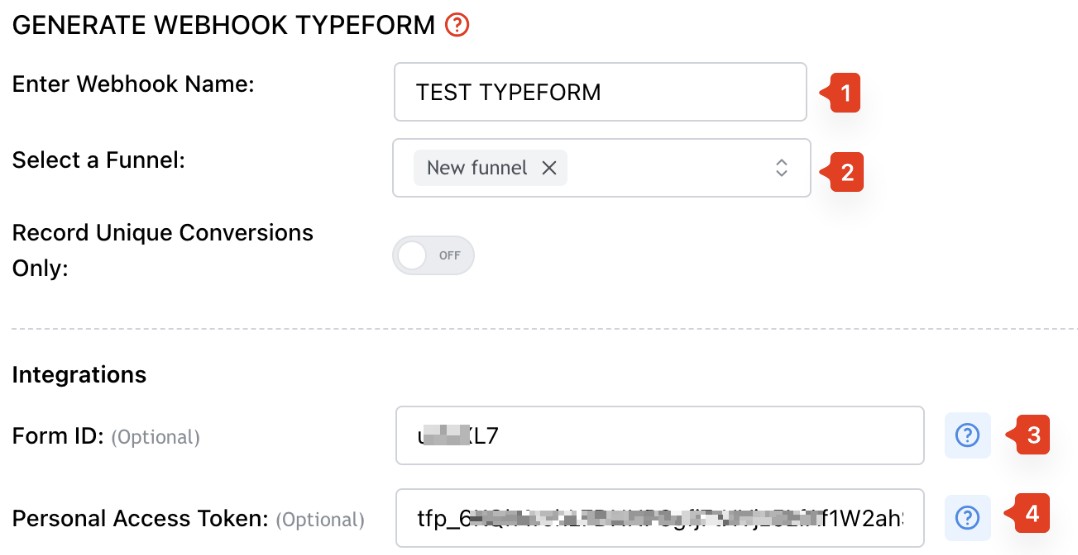
Note: To create the webhook automatically without any manual setup, enter your Typeform integration credentials (Form ID and Personal Access Token) before clicking Save & Generate Webhook URL.
Do not click Save yet. First, obtain your API credentials as described below.
3. Get Your Form ID
The Form ID is the code in your form URL.
For example:
Typeform URL: https://form.typeform.com/to/u6nXL7
Form ID: u6nXL7
Copy your Form ID and paste it into the Form ID field in Visiopt.
4. Log in to your Typeform account. Navigate to Account Settings.
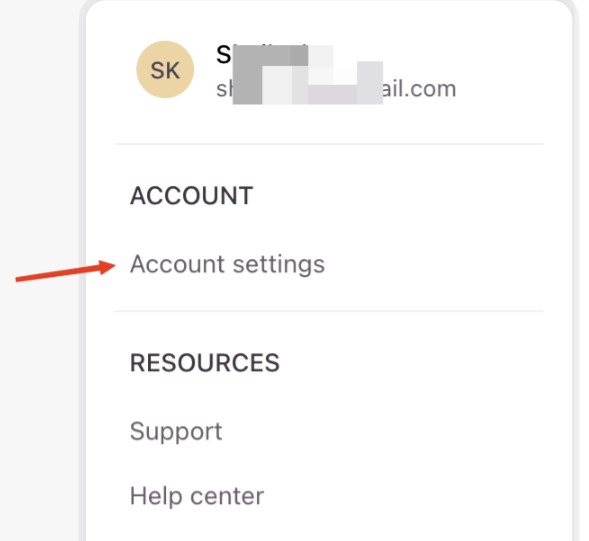
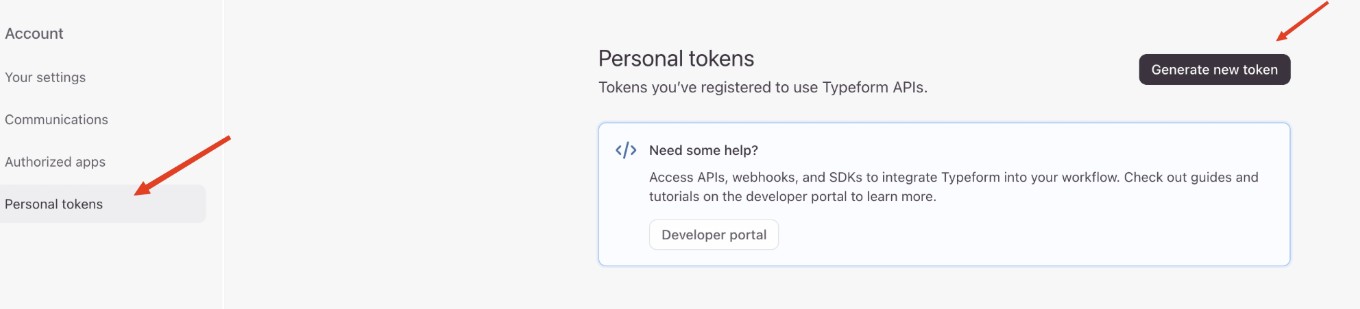
5. Click on Personal Tokens → Generate New Token.
6. Enter token name and select Custom Scope as Scopes.
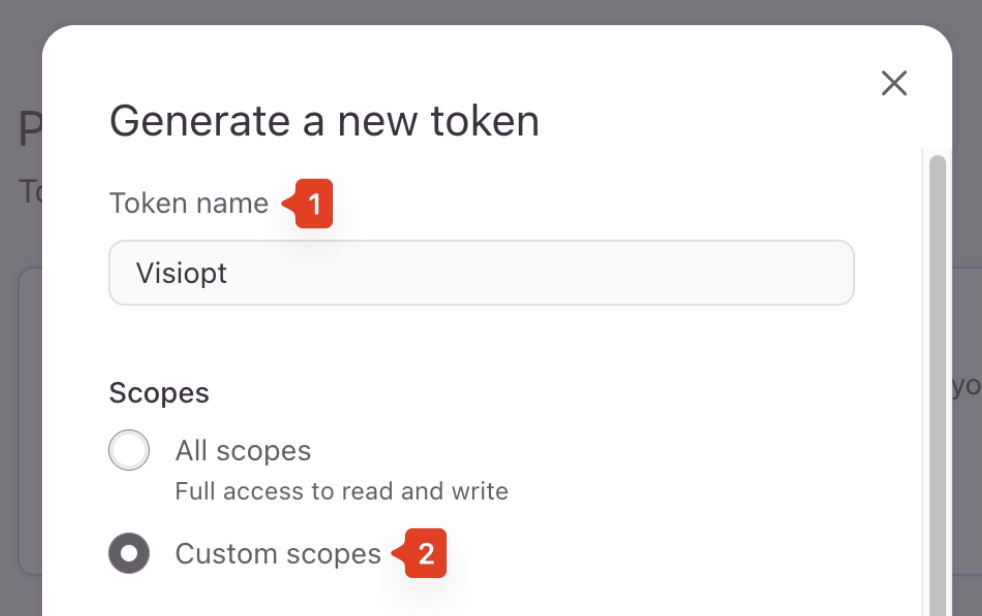
7. In custom scope, select Webhooks Read & Write and click Generate Token.
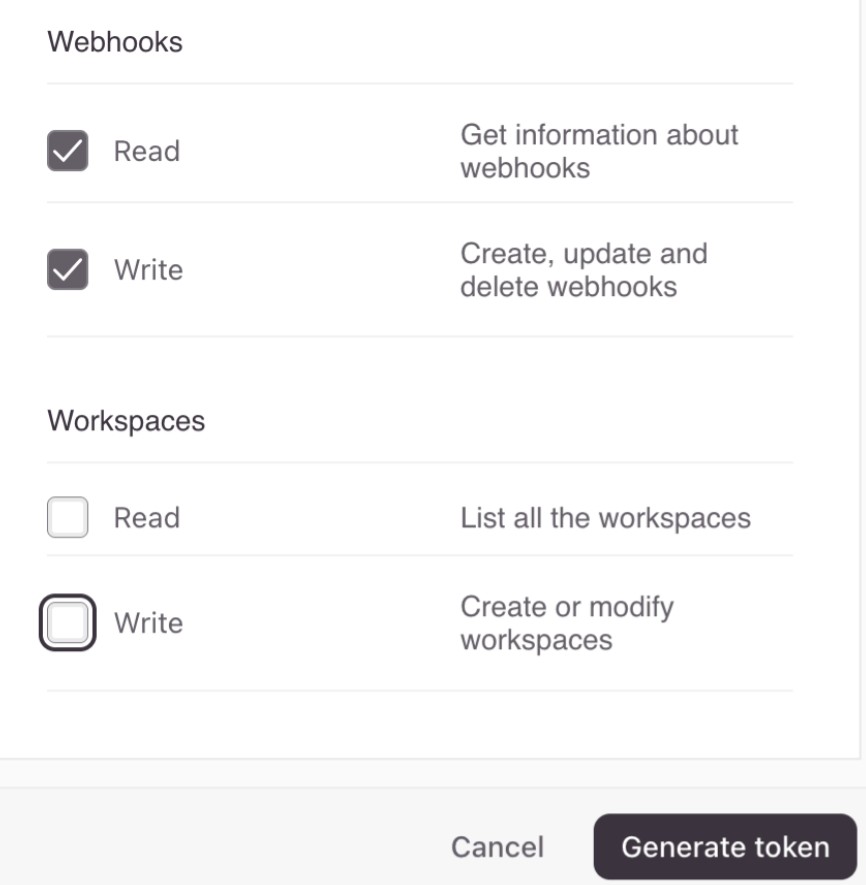
8. Copy the generated Personal Access Token and paste it into the Personal Access Token field in Visiopt.
9. In Visiopt, click Save & Generate Webhook URL. Visiopt will generate a webhook URL and automatically create the webhook in your Typeform account.
Verify the Webhook
To confirm that the webhook was created successfully:
1. Log in to your Typeform account.
2. Navigate to the Form in which the webhook is configured → Connect → Webhooks.
3. Look for the webhook endpoint created by Visiopt.
If you can see the Visiopt webhook URL in the list, your integration is complete and ready to use.
1. In Visiopt hit Save & Generate Webhook URL without entering the API details. Then copy the generated URL.
2. Log in to your Typeform account. Navigate to the Form in which the you want to configure webhook → Webhooks Click Add Webhook.
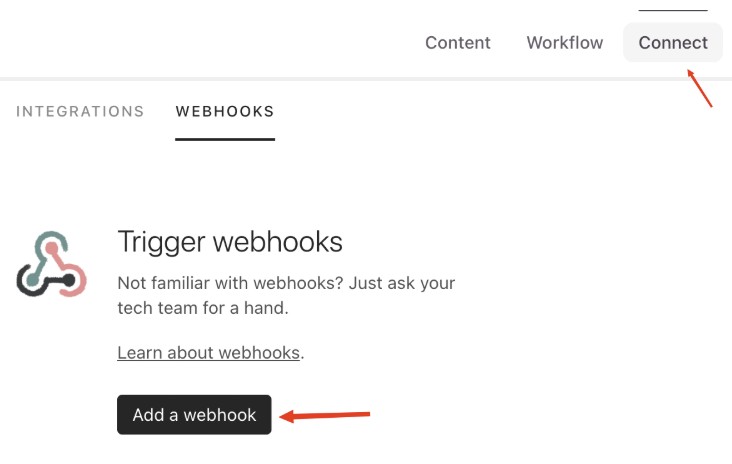
3. Paste the webhook URL generated by Visiopt and click Save Webhook.
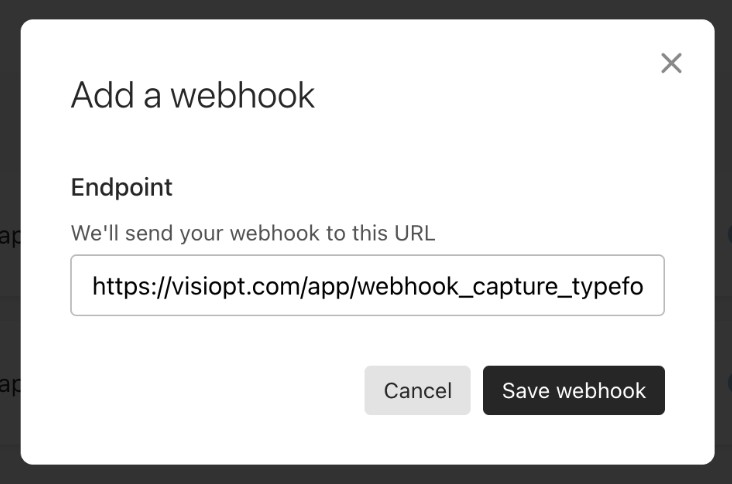
Your Typeform webhook is now connected to Visiopt and ready to send events.
Verify the Webhook
Typeform provides a Test Webhook feature that lets you verify whether your VisiOpt webhook is configured correctly.
1. After creating the webhook, locate the Visiopt webhook in your Typeform account.
2. Click the View deliveries button for that webhook.
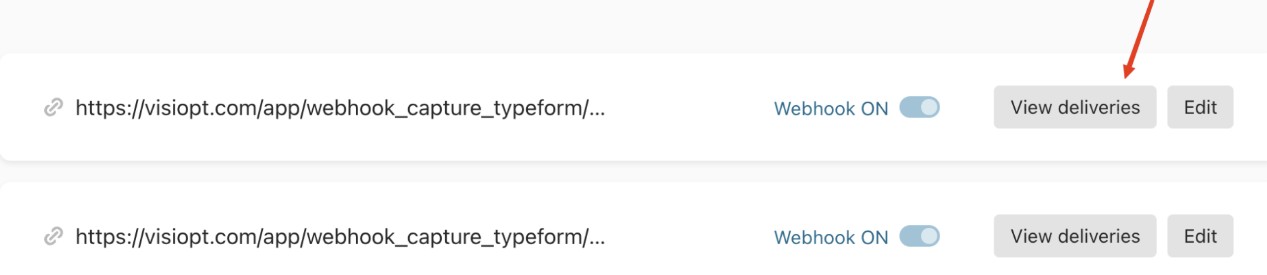
3. Click Send test request to send a test webhook.
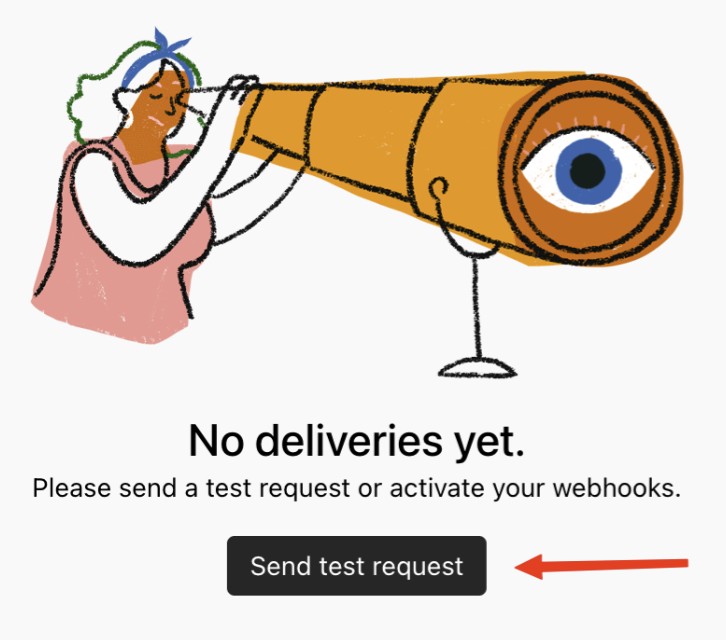
4. Go back to Visiopt. Locate the webhook you just created. Click the Refresh Verification Status icon. If the test webhook was received successfully, the webhook status will change to Verified.

Some carts and processors will send a separate webhook notification for the main sale and each upsell purchased. This will cause multiple conversions to be recorded.
For simple instructions to stop this click HERE.
1. To Create a webhook go to Settings → Payment Processing & Carts → UltraCart.
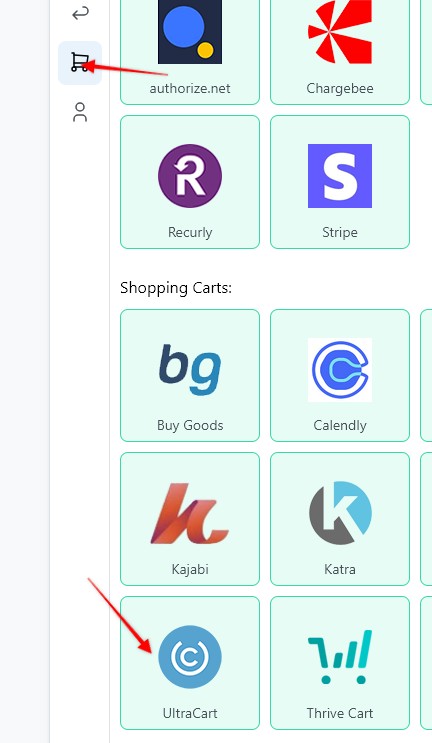
2. Log in to your ThriveCart account, navigate to Account → Settings → API & Webhooks.
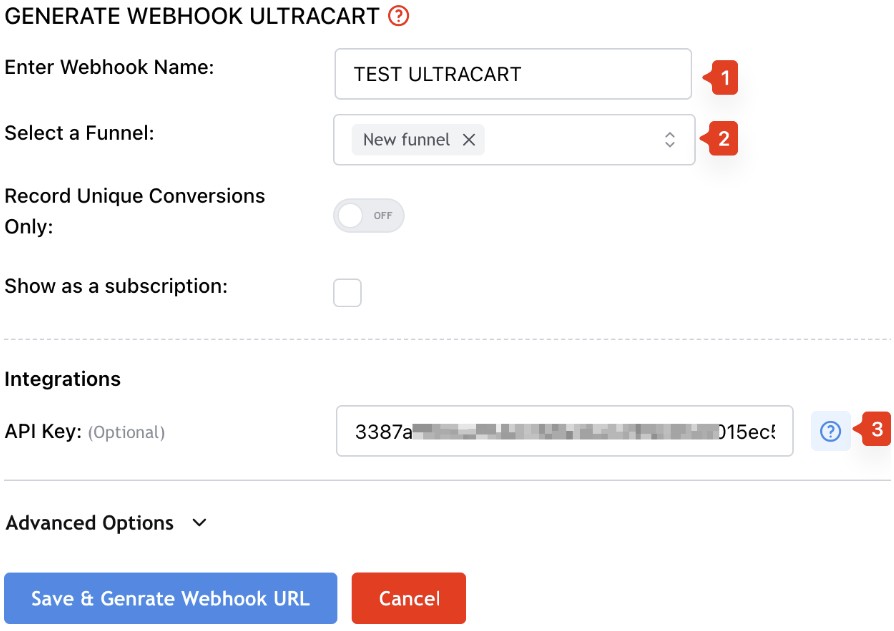
Note: To create the webhook automatically without any manual setup, enter your UltraCart integration credentials (Form ID and Personal Access Token) before clicking Save & Generate Webhook URL.
Do not click Save yet. First, obtain your API credentials as described below.
3. To get your API Key log in to your UltraCart account and navigate to Advanced → Developer Tools → REST APIs.
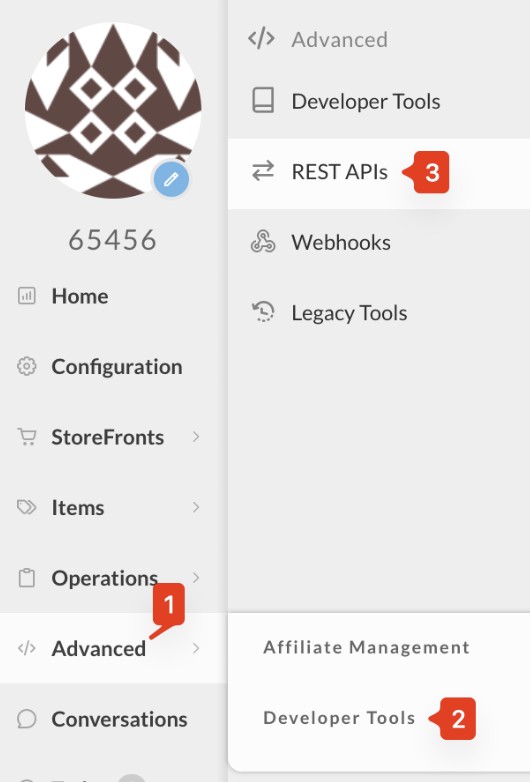
4. Click on Setup API Credentials.
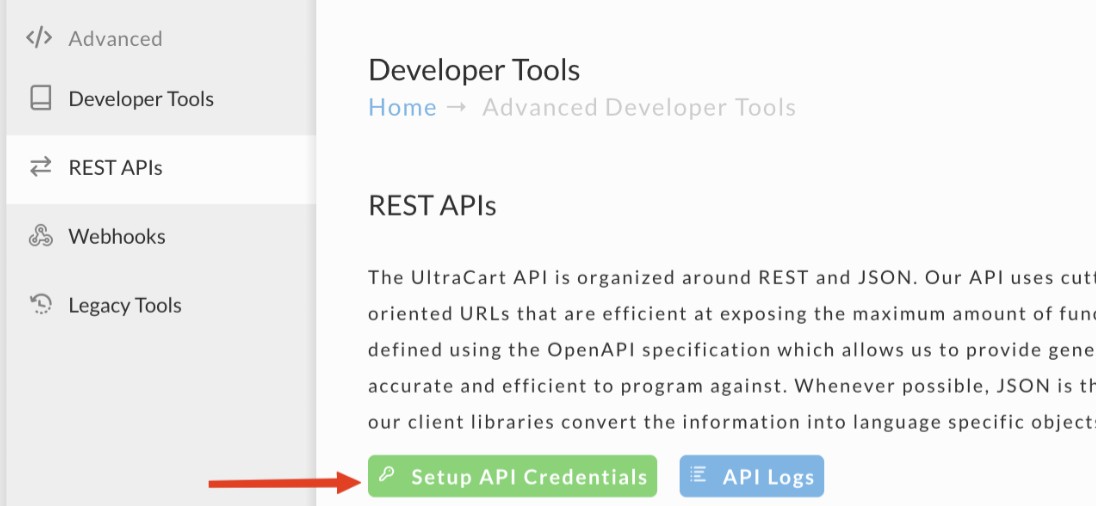
5. To create a new API Key, click on the New application button.

6. Fill in the following details:
A. Application Name
B. Application Type: Select Simple Key
C. Give Webhooks Read & Write Permission Scope.
Hit Save.
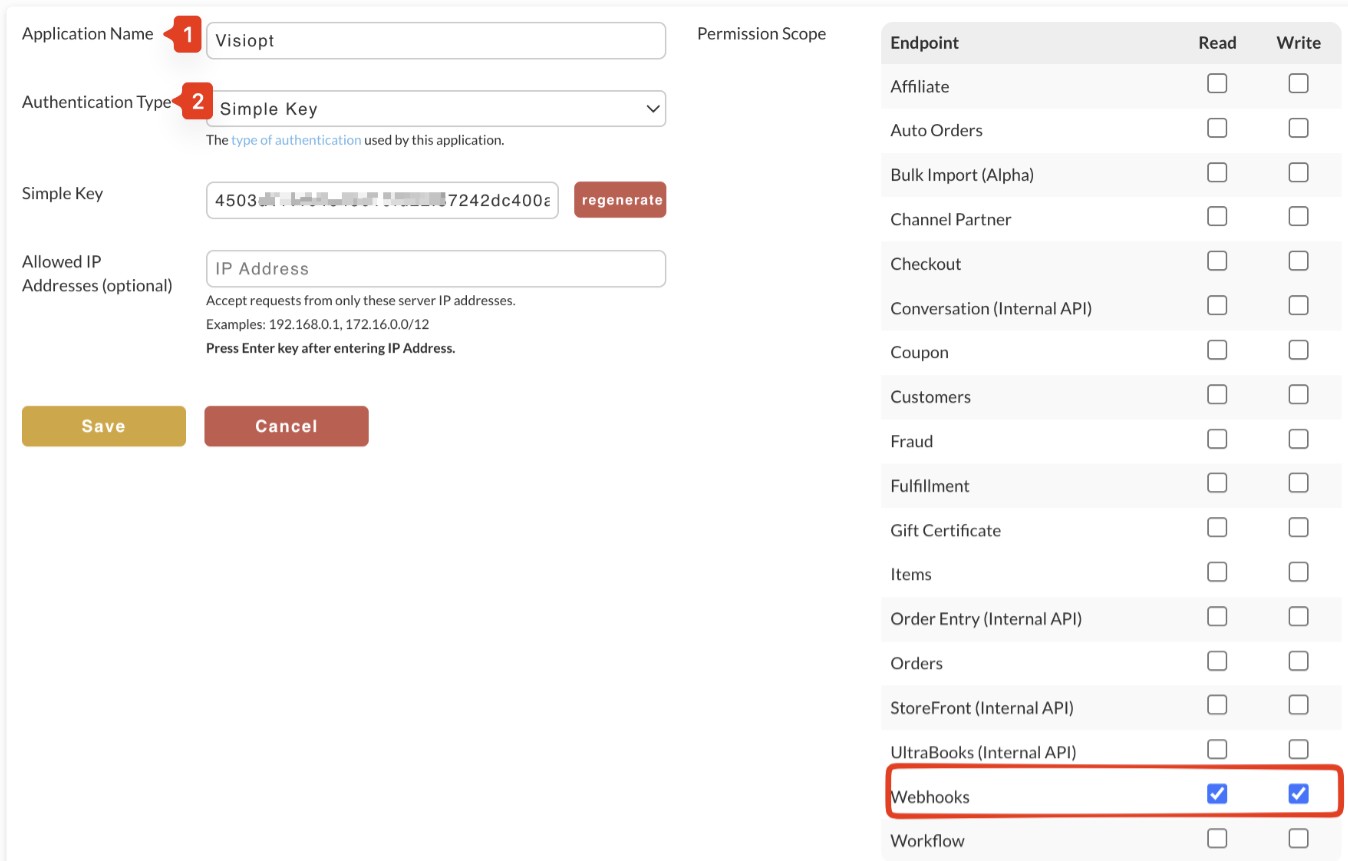
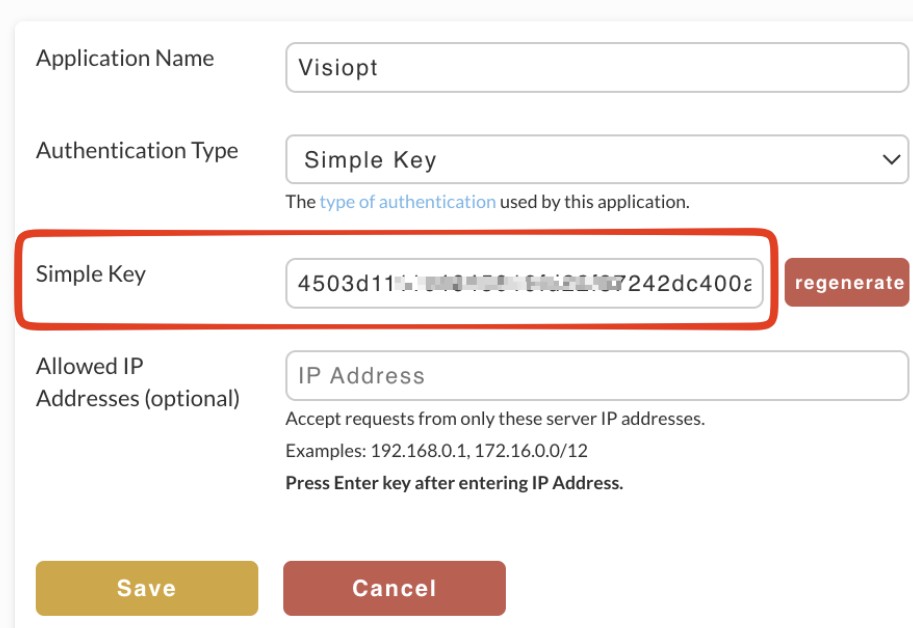
7. It will give you a Simple Key, copy that and paste in visiopt.
8. In Visiopt, click Save & Generate Webhook URL.
Visiopt will generate a webhook URL and automatically create the webhook in your UltraCart account.
If no error message is displayed, the webhook was most likely created successfully.
Verify the Webhook
To confirm that the webhook was created successfully:
1. Log in to your UltraCart account.
2. Navigate to Advanced → Developer Tools → Webhooks → Setup a Webhook.
3. Look for the webhook endpoint created by Visiopt.
If you can see the VisiOpt webhook URL in the list, your integration is complete and ready to use.
1. In Visiopt hit Save & Generate Webhook URL without entering the API details. Then copy the generated URL.
2. Log in to your UltraCart account and navigate to Advanced → Developer Tools → Webhooks → Setup a Webhook
3. Click New Webhook.
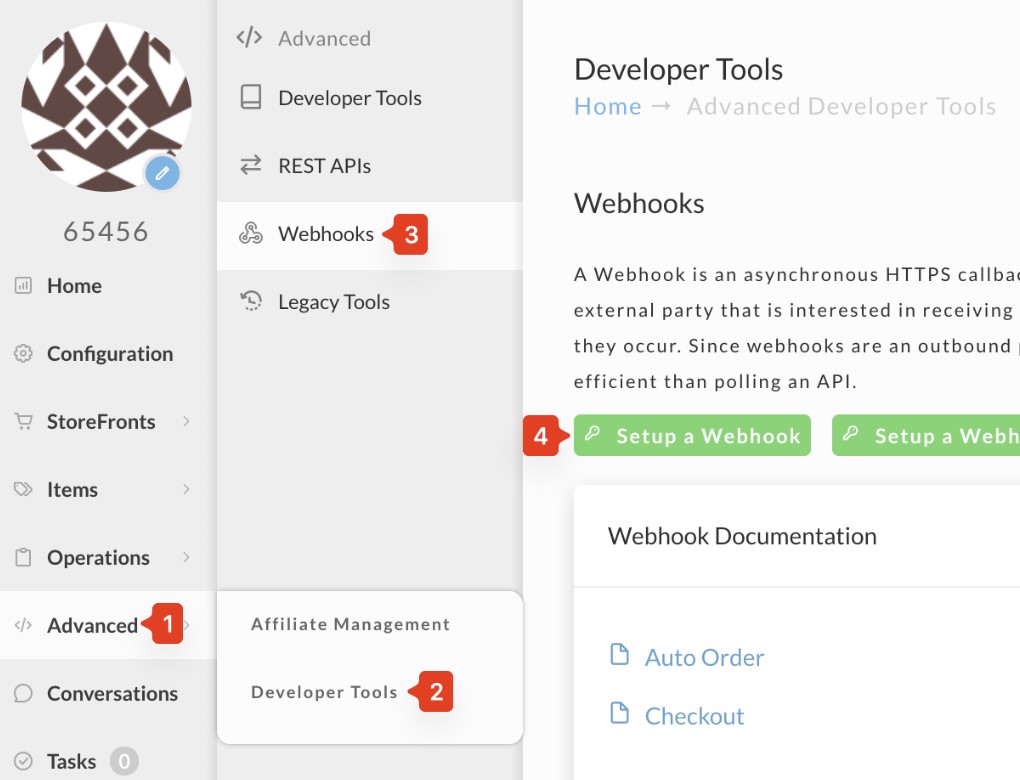
4. Fill in the following details:
- Webhook Name: Enter any descriptive name
- Target URL: Paste the webhook URL generated by VisiOpt
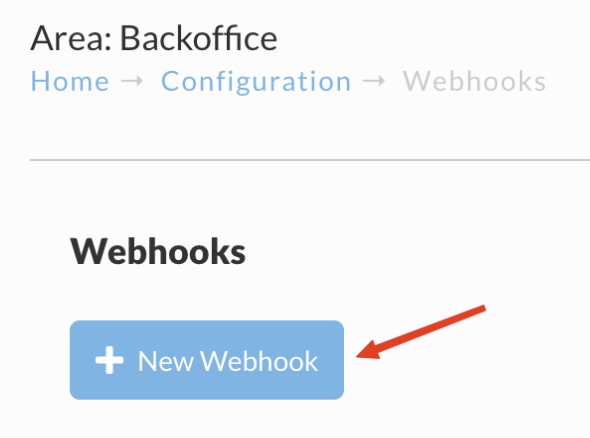
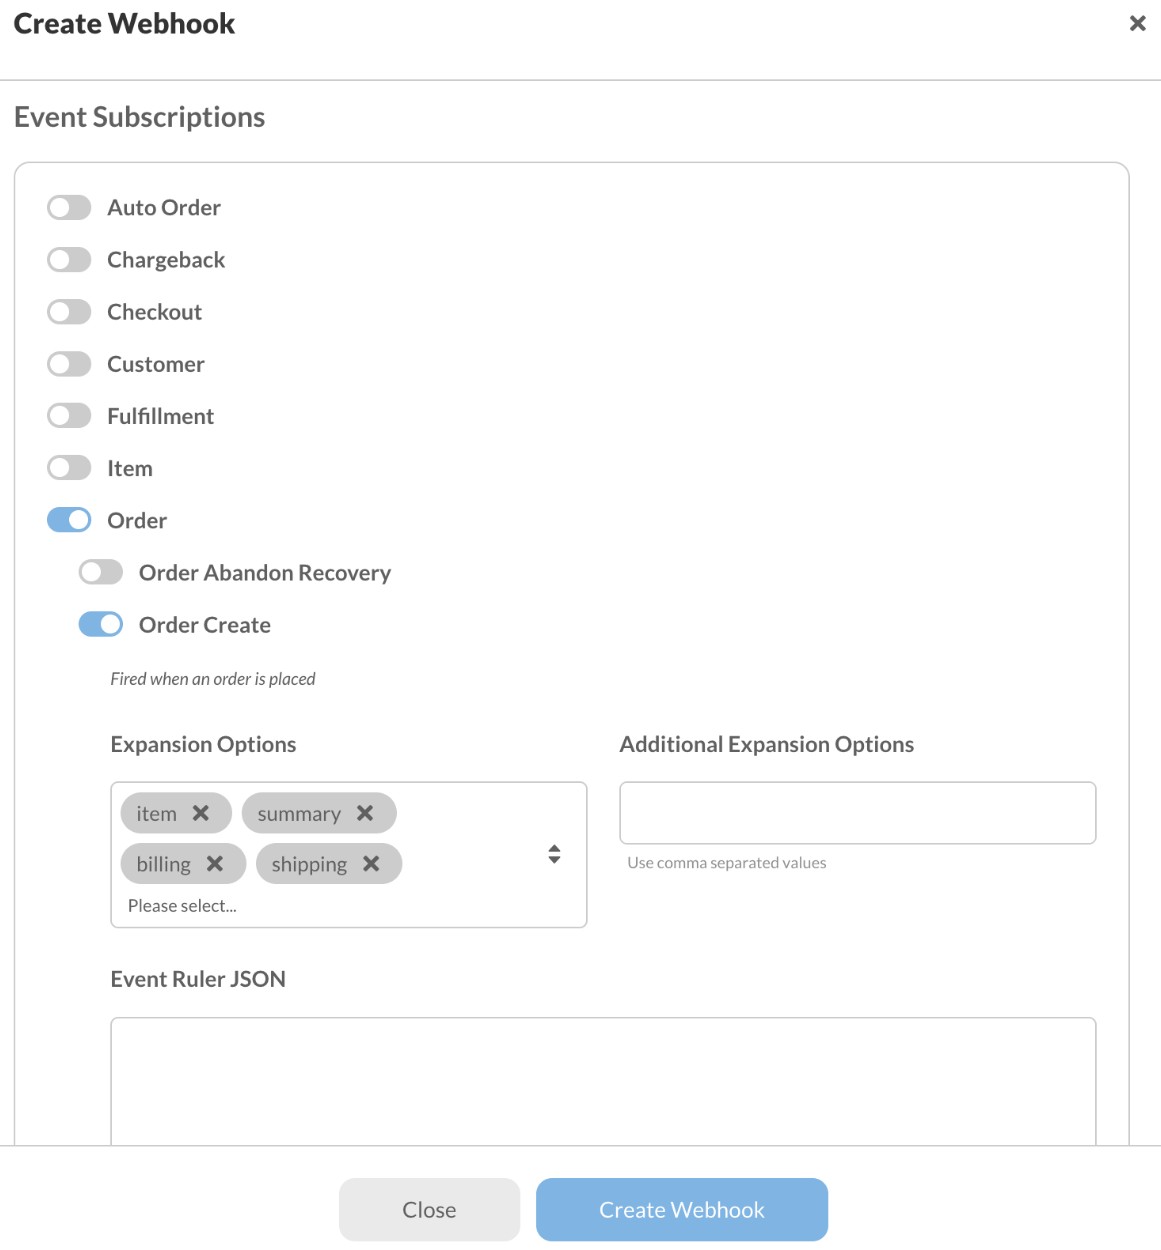
5. Select Order & - Order Create as Event Subscriptions.
- Add item, summary, billing & shipping as expansion options.
- Click Create Webhook.
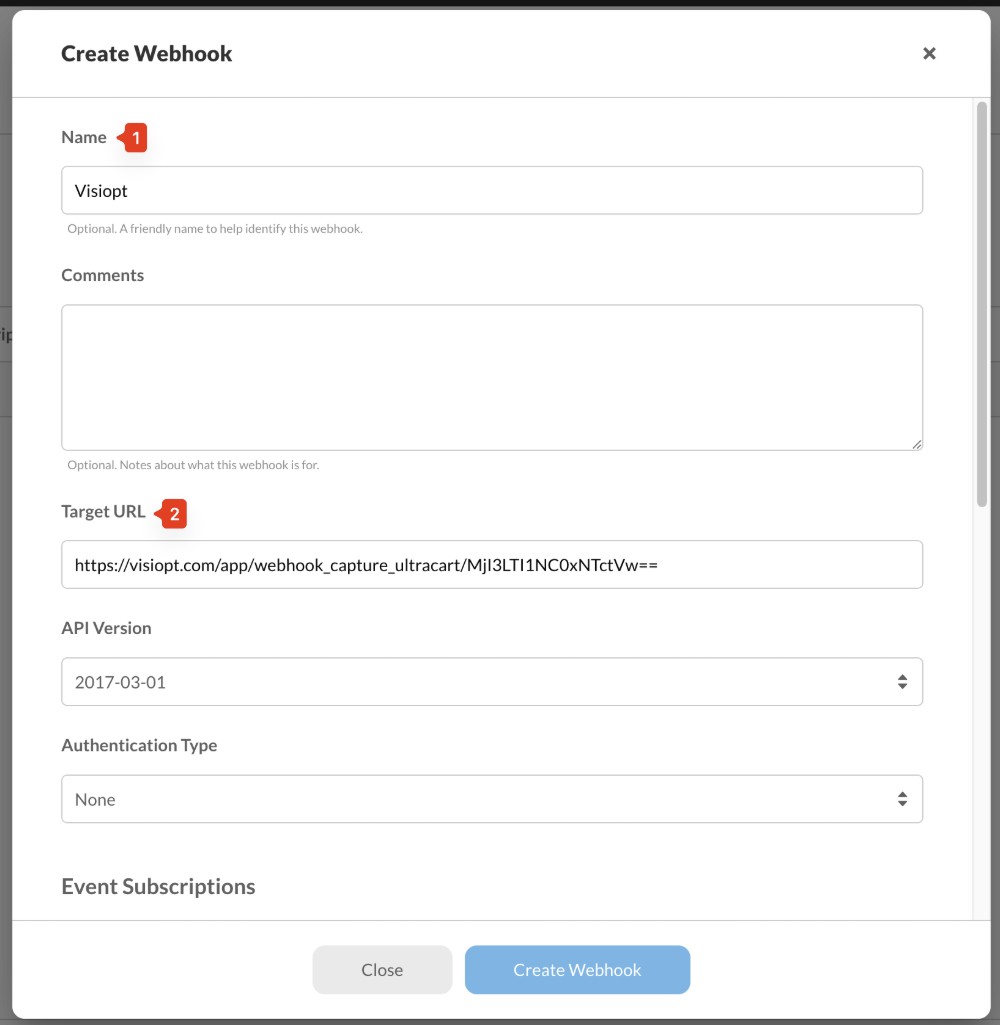
Your UltraCart webhook is now connected to VisiOpt and ready to send events.
Verify the Webhook
UltraCart provides a Test Webhook feature that lets you verify whether your VisiOpt webhook is configured correctly.
After creating the webhook, locate the Visiopt webhook in your UltraCart account.
Click the Test Webhook button for that webhook.
Click Send to send a test webhook.

It should show 200 Status Code.
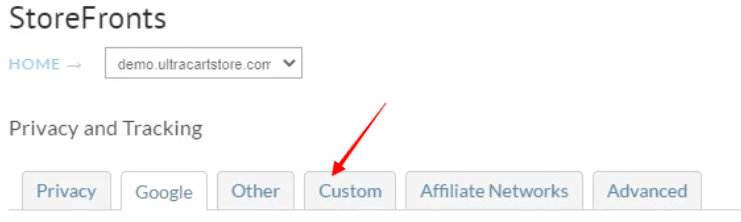
1. Log in, then within Storefronts click on "Conversion Tracking"
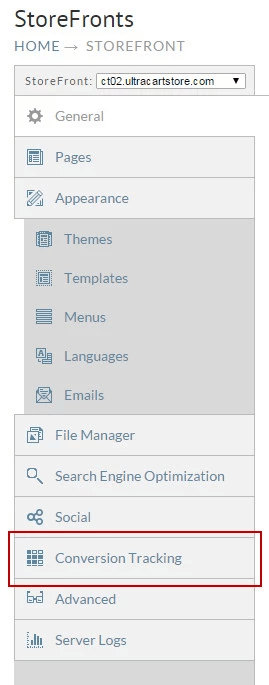
2. Click on the "Custom" tab, you'll find a textbox there, paste in the VisiSmart code
Some carts and processors will send a separate webhook notification for the main sale and each upsell purchased. This will cause multiple conversions to be recorded.
For simple instructions to stop this click HERE.
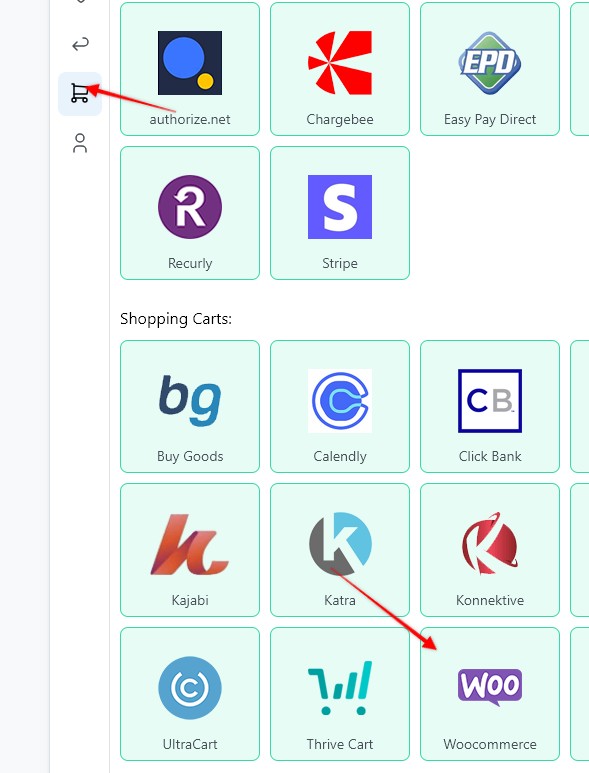
1. To Create a webhook go to Settings → Payment Processing & Carts → WooCommerce.
2. Fill in the following details:
A. Webhook Name
B. Funnel
C. Store URL
D. Consumer Key
E. Consumer Secret
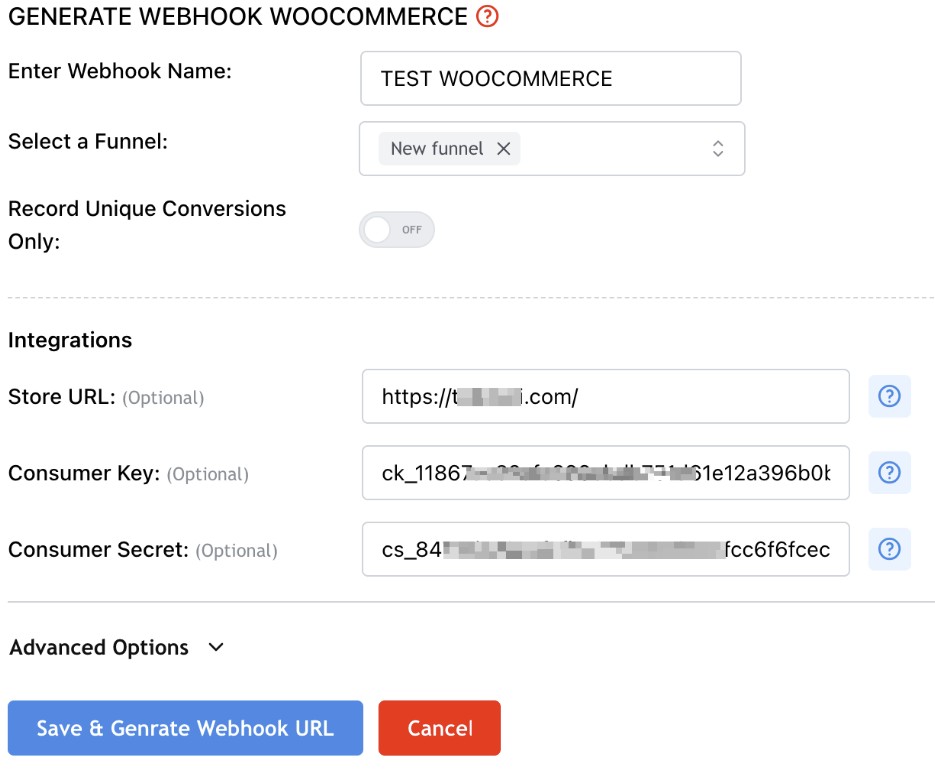
Note: To create the webhook automatically without any manual setup, enter your WooCommerce integration credentials (Store URL, Consumer Key & Consumer Secret) before clicking Save & Generate Webhook URL.
Do not click Save yet. First, obtain your API credentials as described below.
3. Log in to your WooCommerce and navigate to Settings → Advanced → Rest API Keys.
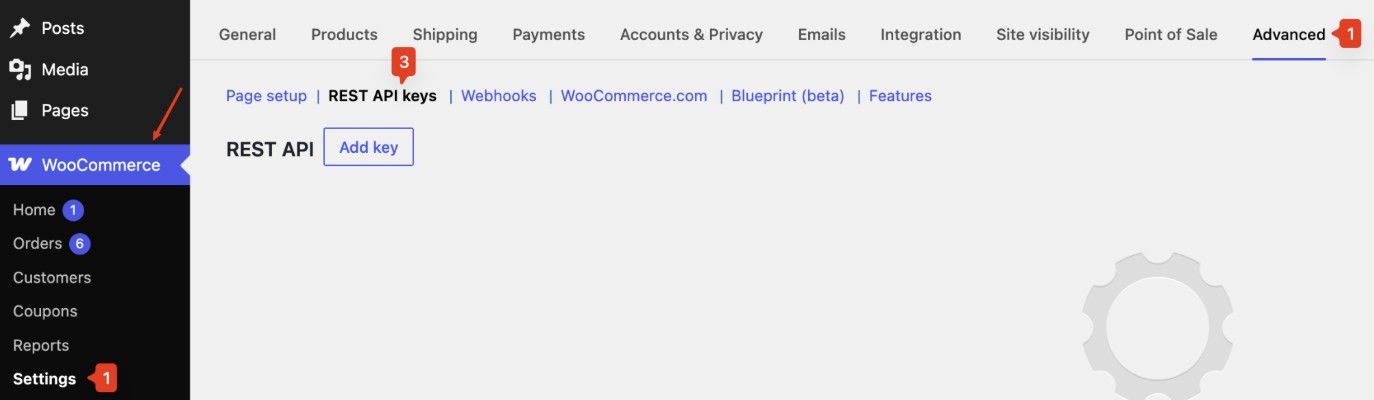
4. Click Create an API Key.
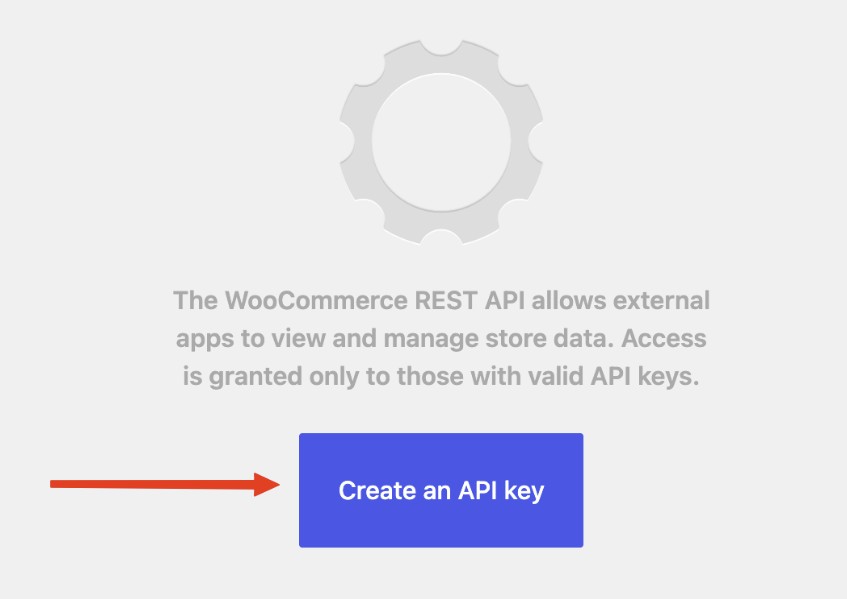
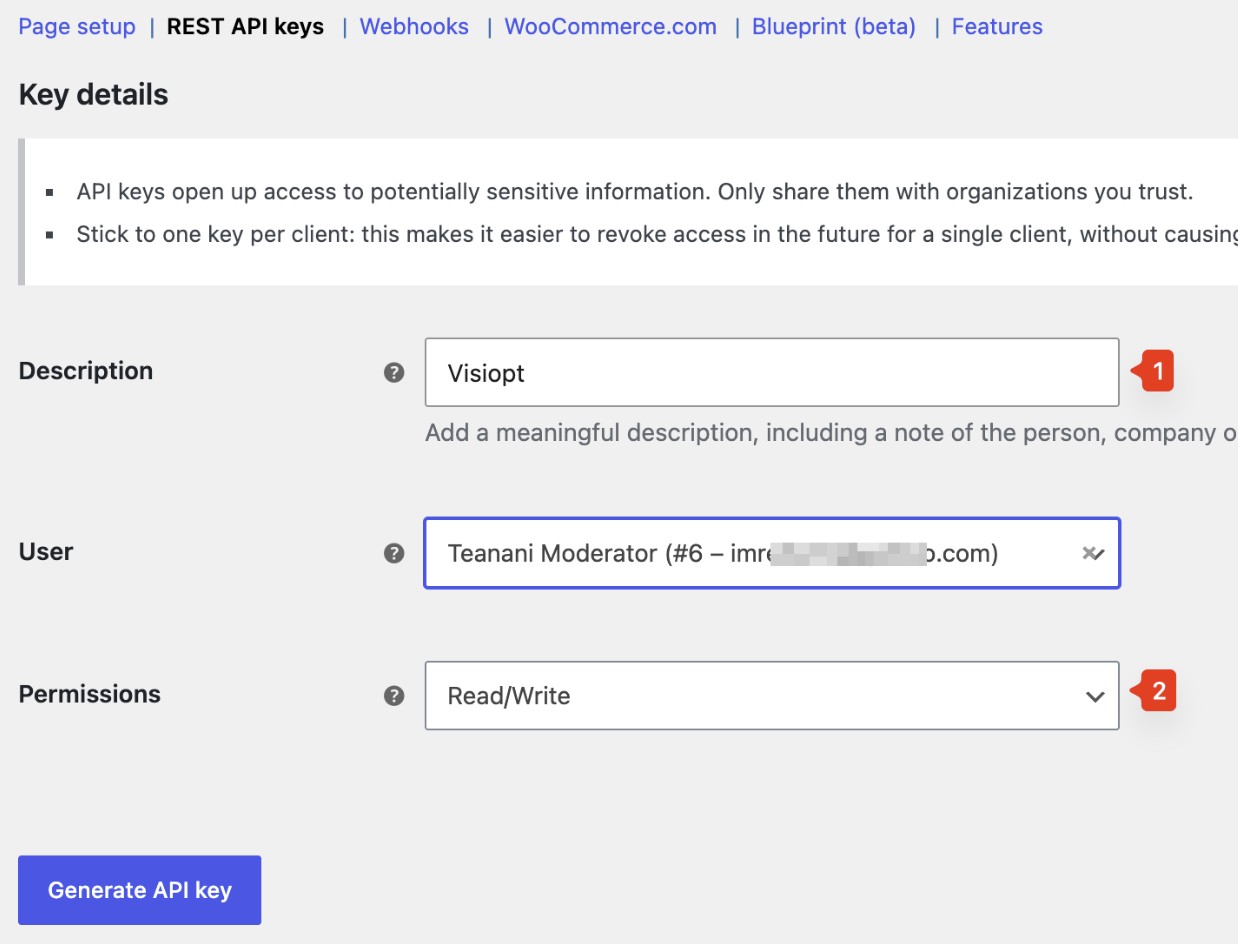
5. Fill in the following details:
A. Enter description
B. Select Read/write as permissions.
C. Click Generate API Key.
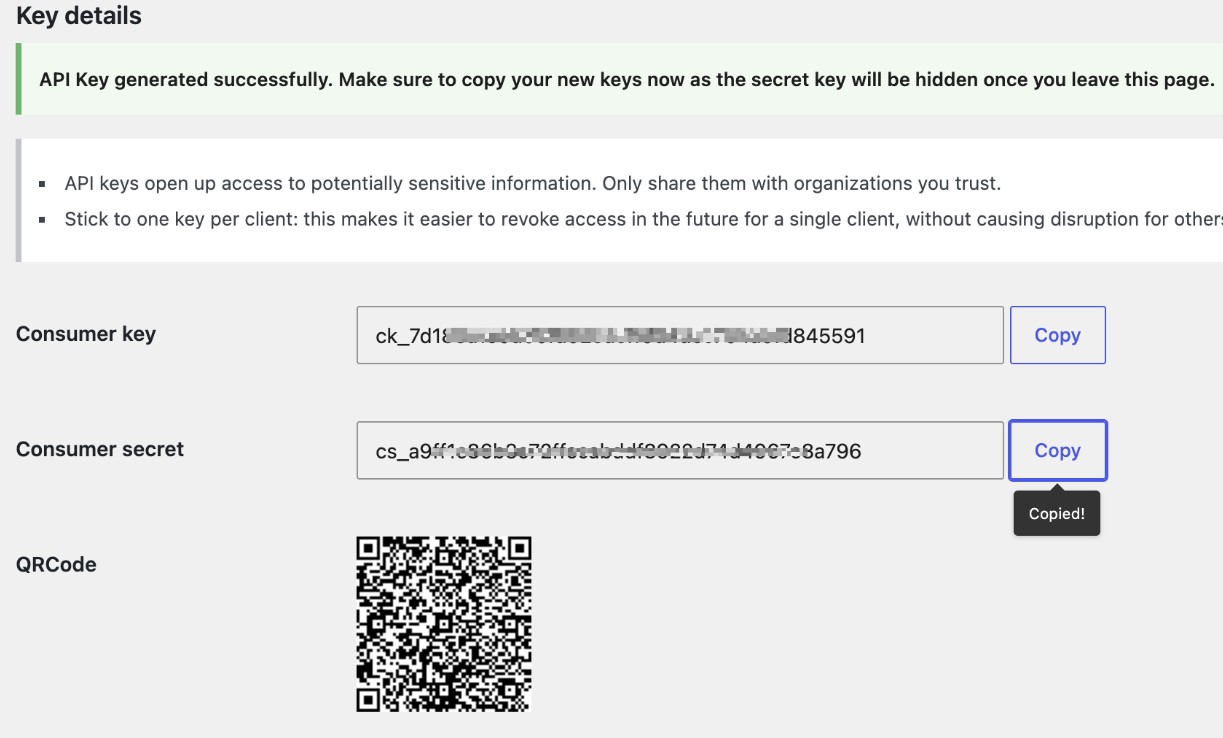
6. This will give you Consumer Key & Consumer Secret. Copy them and paste in Visiopt
7. In Visiopt, click Save & Generate Webhook URL.
Visiopt will generate a webhook URL and automatically create the webhook in your WooCommerce account.
If no error message is displayed, the webhook was most likely created successfully.
Verify the Webhook
To confirm that the webhook was created successfully:
Log in to your WooCommerce account.
Navigate to Settings → Advanced → Webhooks.
Look for the webhook endpoint created by Visiopt.
If you can see the Visiopt webhook URL in the list, your integration is complete and ready to use.
1. In Visiopt hit Save & Generate Webhook URL without entering the API details. Then copy the generated URL.
2. Log in to your WooCommerce account and navigate to Settings → Advanced → Webhooks → Click Add a Webhook
Fill in the following details:
A. Webhook Name: Enter any descriptive name
B. Status: Select Active.
C. Topic: select Order created as topic.
D. Delivery URL: Paste the webhook URL generated by Visiopt
E. Select the latest API Version.
Click Save.
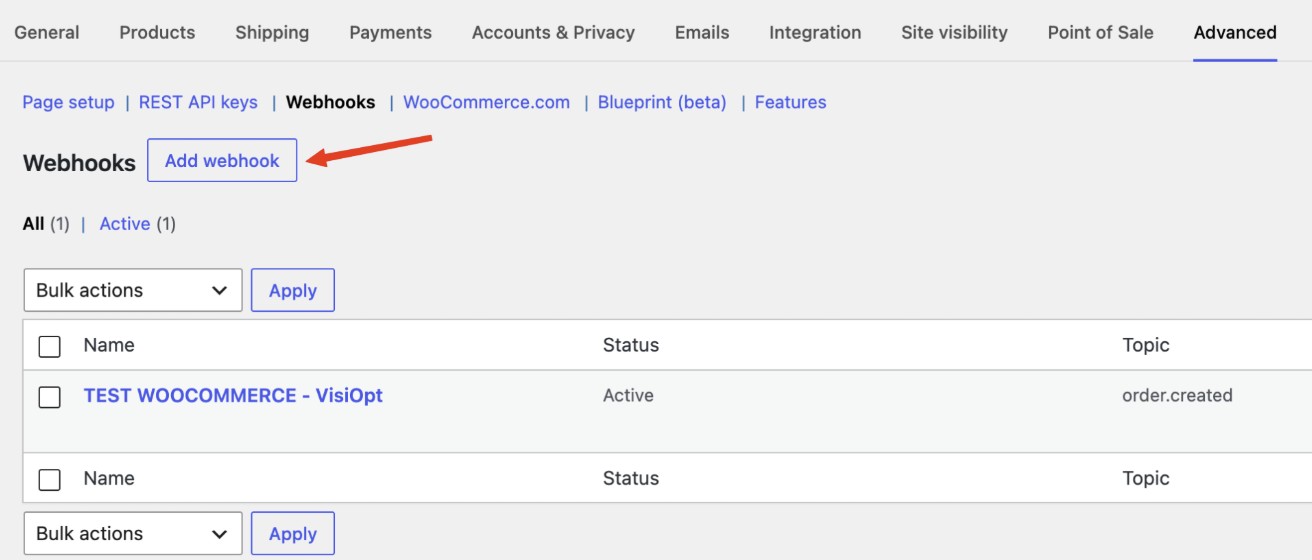
Your WooCommerce webhook is now connected to VisiOpt and ready to send events.
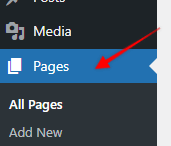
1. Log in to Woocommerce, then in the left sidebar click on the "Pages" link
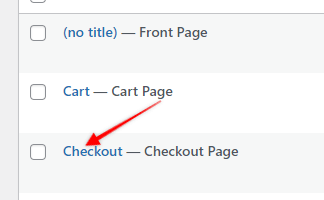
2. Click on your checkout page to edit it
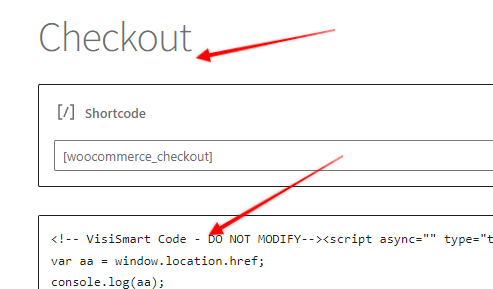
3. Paste in the VisiSmart code
Some carts and processors will send a separate webhook notification for the main sale and each upsell purchased. This will cause multiple conversions to be recorded.
For simple instructions to stop this click HERE.
1. Create a new webhook for Youform in Visiopt. Go to Settings → Payment Processing & Carts → Youform.
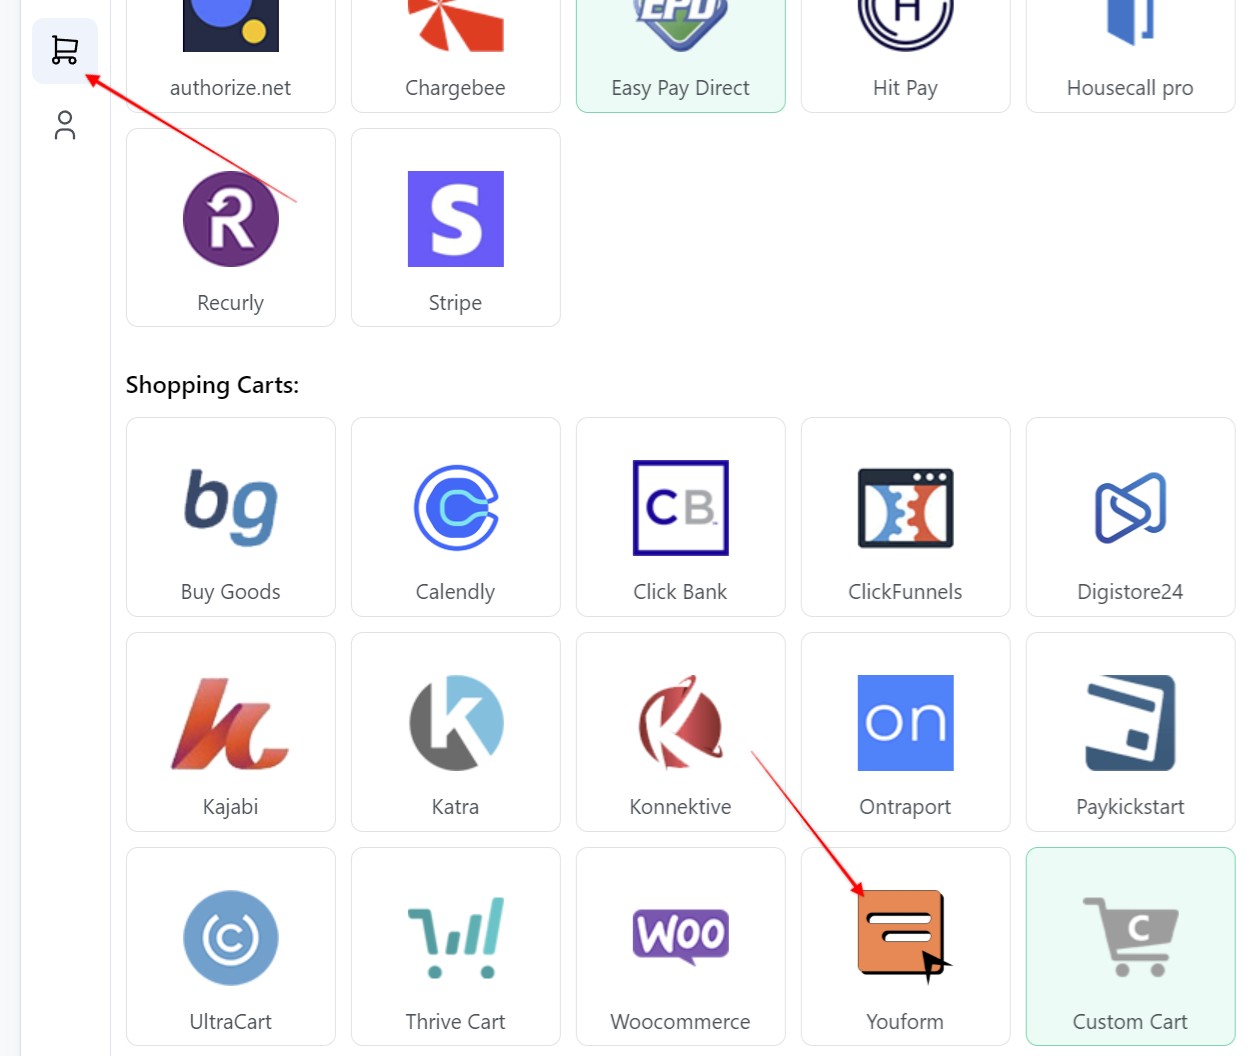
2. Enter a name for your webhook, select the funnel.
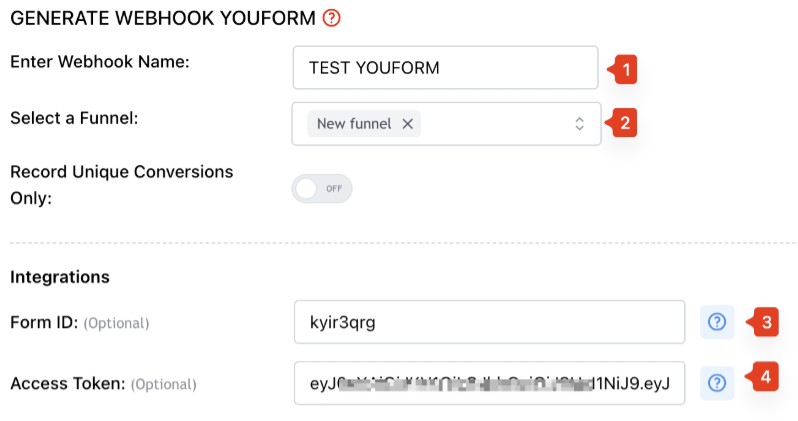
Note: To create the webhook automatically without any manual setup, it is recommended to enter your Youform integration credentials (Form ID and Access Token) in VisiOpt before clicking Save & Generate Webhook URL.
Do not click Save yet. First, obtain your API credentials as described below.
3. Get Your Form ID, it is the last part of the URL.
For example:
Youform URL: https://app.youform.com/forms/kyir3qrg
Form ID: kyir3qrg
Copy your Form ID and paste it into the Form ID field in Visiopt.
4. Log in to your Youform account. Navigate to Account Settings.
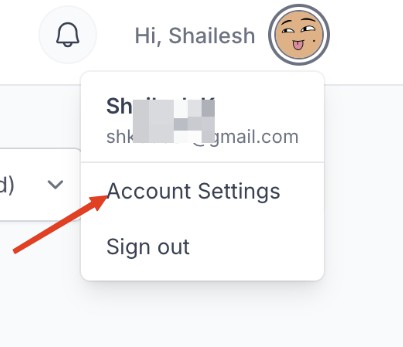
5. Click on API Tokens → Create New Token.

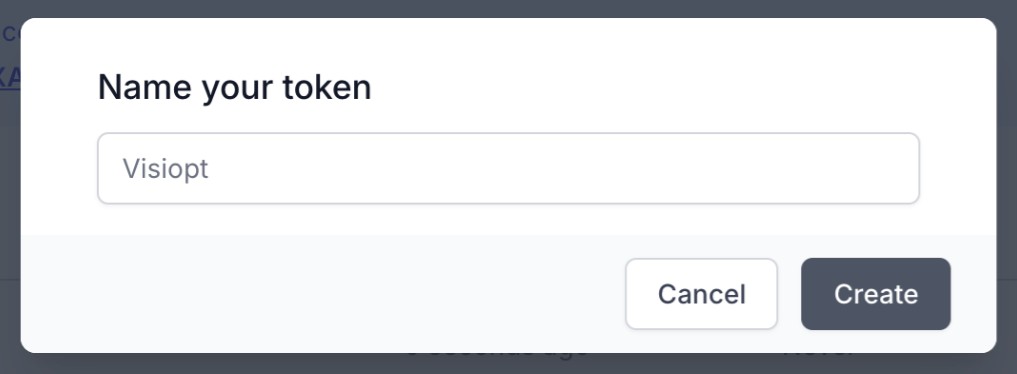
6. Enter the token name and click Create.
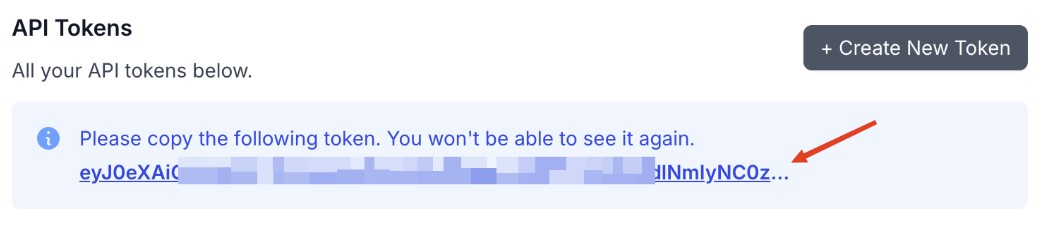
7. Copy the generated Access Token and paste it into the Access Token field in Visiopt.
8. In Visiopt, click Save & Generate Webhook URL. Visiopt will generate a webhook URL and automatically create the webhook in your Youform account.
Verify the Webhook
To confirm that the webhook was created successfully:
1. Log in to your Youform account.
2. Navigate to the Form in which the webhook is configured → Integrate → Webhooks.
3. Look for the webhook endpoint created by Visiopt.
If you can see the Visiopt webhook URL in the list, your integration is complete and ready to use.
1. In Visiopt hit Save & Generate Webhook URL without entering the API details. Then copy the generated URL.
2. Log in to your Youform account. Navigate to the Form in which the you want to configure webhook → Integrate → Webhooks Click Add Webhook.
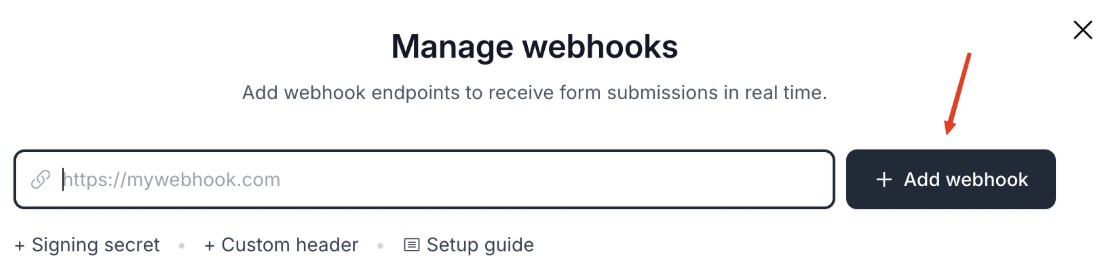
3.Paste the webhook URL generated by Visiopt & Click Add Webhook.
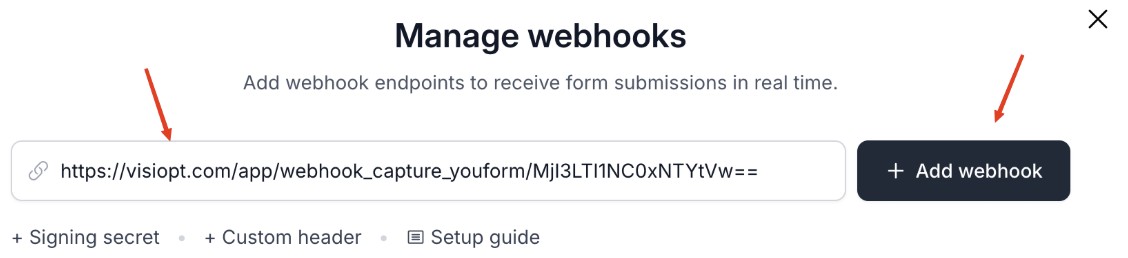
Your Youform webhook is now connected to Visiopt and ready to send events.
Verify the Webhook
Youform provides a Test Webhook feature that lets you verify whether your VisiOpt webhook is configured correctly.
1. After creating the webhook, locate the Visiopt webhook in your Youform account.
2. Click the Send Test Payload icon for that webhook.
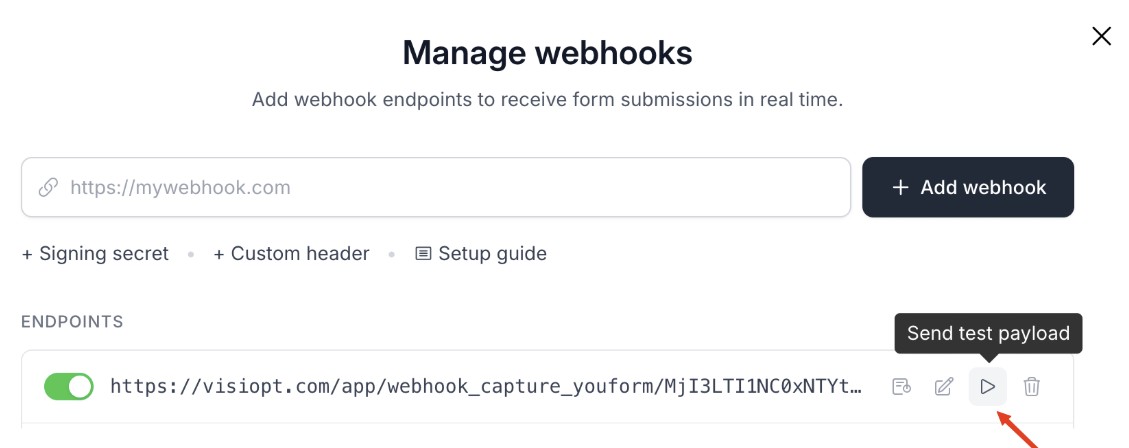
3. It should say that Webhook is Working.
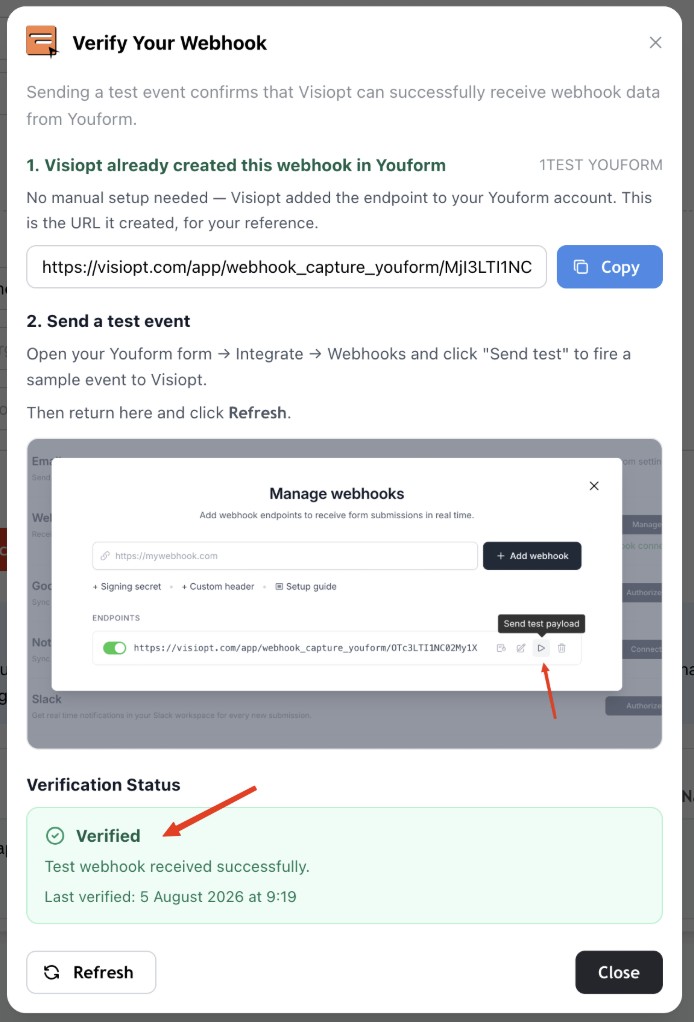
4. Go back to Visiopt. Locate the webhook you just created. Click the Refresh Verification Status icon. If the test webhook was received successfully, the webhook status will change to Verified.
Some carts and processors will send a separate webhook notification for the main sale and each upsell purchased. This will cause multiple conversions to be recorded.
For simple instructions to stop this click HERE.
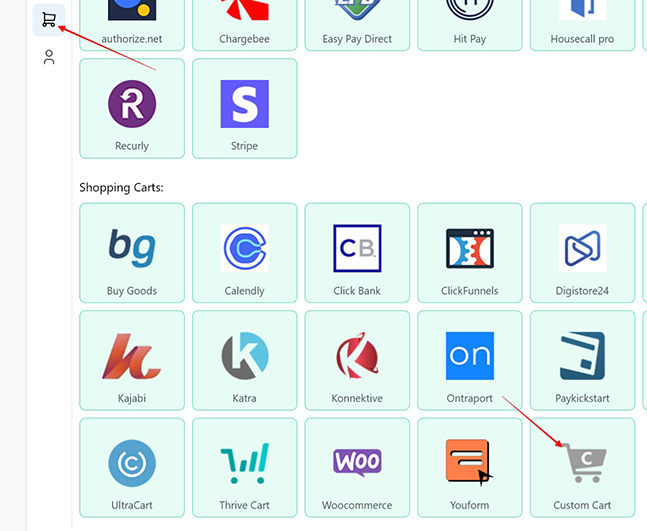
1. Go to the Settings page > then select Payments processing & carts > select the Custom Cart option
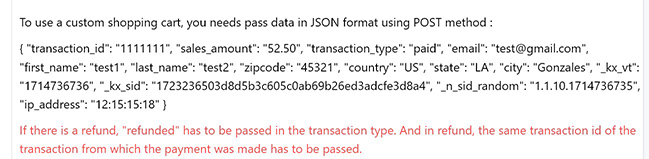
2. There you will see the sample format for JSON data. Those are needed to pass the URL of a webhook using POST method.
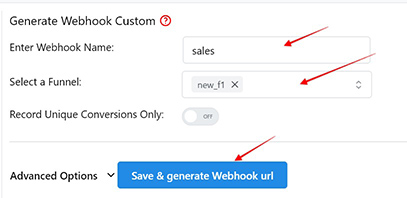
2. Enter a Webhook name, select the Funnel to associate the webhook with, hit Save and Generate Webhook URL
3. Copy the webhook URL
4. Pass the data in this format in the webhook URL
| Field | Description |
|---|---|
| transaction_id | This Field is Required |
| sales_amount | This Field is Required |
| This Field is Required | |
| first_name | This Field is Required |
| last_name | This Field is Required |
| zipcode | This Field is Required |
| country | This Field is Required |
| state | This Field is Required |
| city | This Field is Required |
Some carts and processors will send a separate webhook notification for the main sale and each upsell purchased. This will cause multiple conversions to be recorded.
For simple instructions to stop this click HERE.
STEP 1
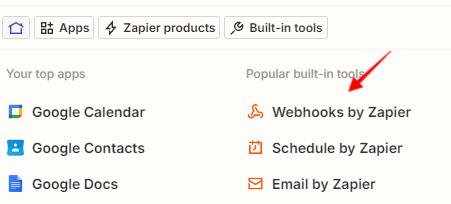
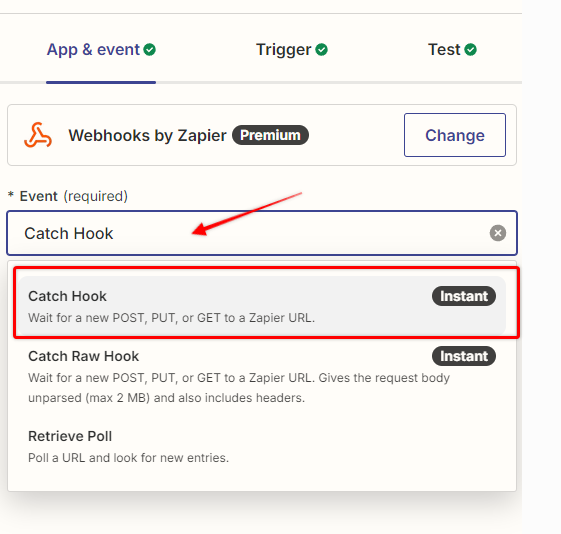
1. As an App select "Webhooks by Zapier":
2. As an Event select "Catch Hook":
STEP 2
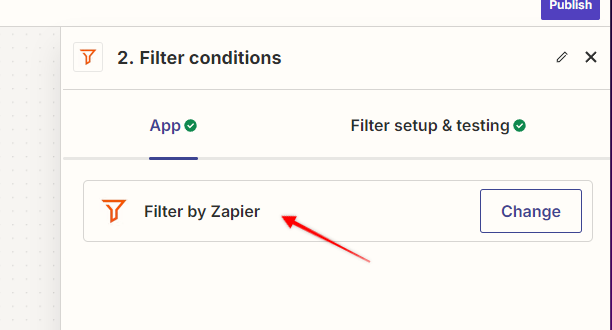
3. This step is ONLY used if you want to filter out sales greater than a certain amount (if you don't want to do this, then skip this step):
As an App select "Filter by Zapier":
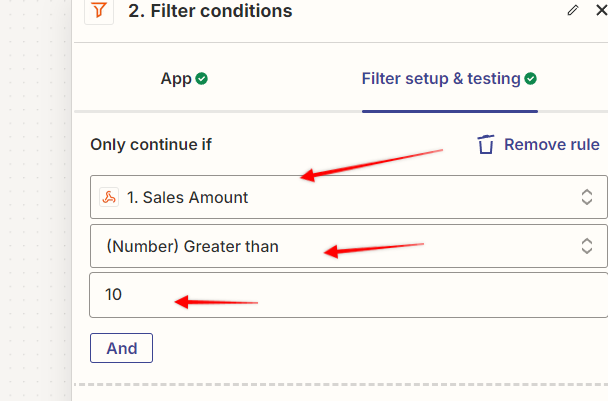
4. In the Filter setup & testing section, Select "sales amount" as the filter, then "(Number) Greater than", and finally enter the amount, in our case it is 10:
STEP 3
5. Head over to Visiopt. Go to the Settings page > Payment processing and carts > Custom.
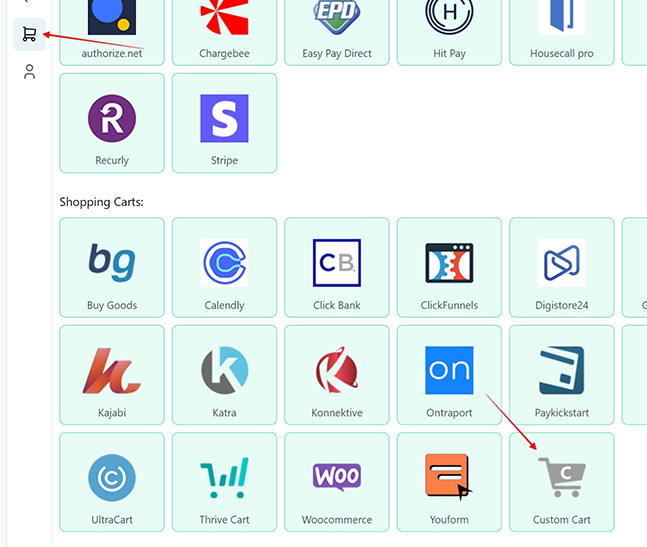
6. Enter a name for your webhook, select the funnel and click "Save & generate webhook URL". When done, copy the generated URL.
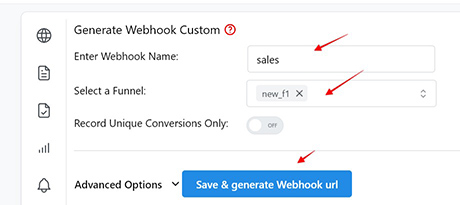
7. Copy the webhook URL
STEP 4
8. As an App select "Webhooks by Zapier":
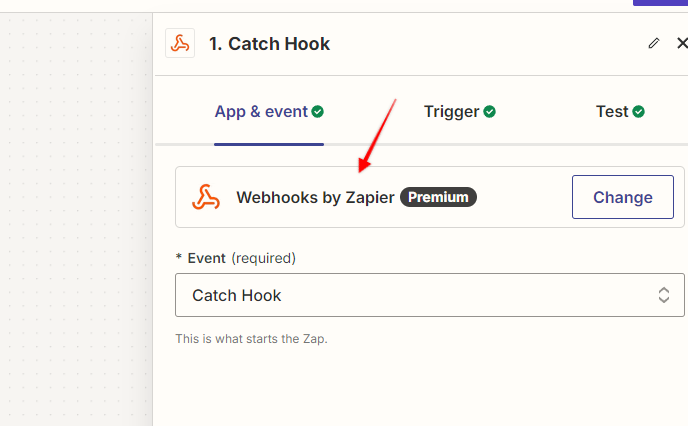
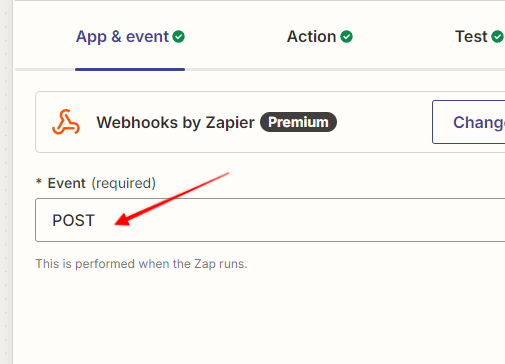
As an Event select "POST":
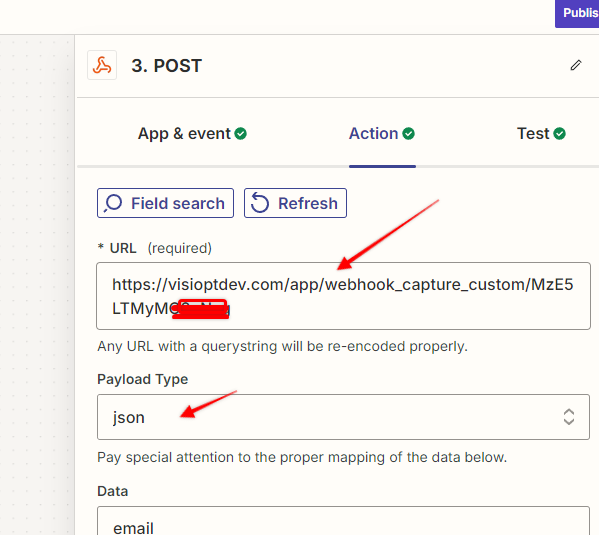
In the Action section, you have to paste the webhook URL you previously set up in Visiopt, as the Payload Type select "json":
Now we will add 3 REQUIRED data fields:
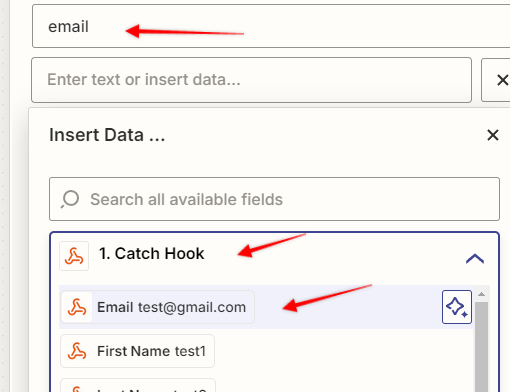
First one is Email, enter the name "email", then from the Catch Hook section select the Email:
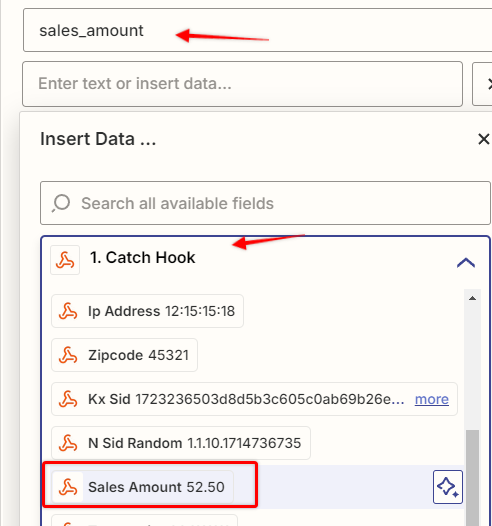
Second one is Sales amount, enter the name "sales_amount", then from the Catch Hook section select the Sales Amount:
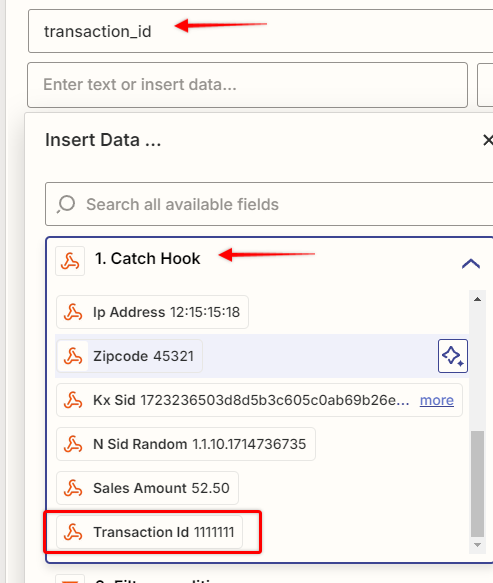
Third one is Transaction ID, enter the name "transaction_id", then from the Catch Hook section select the Transaction Id:
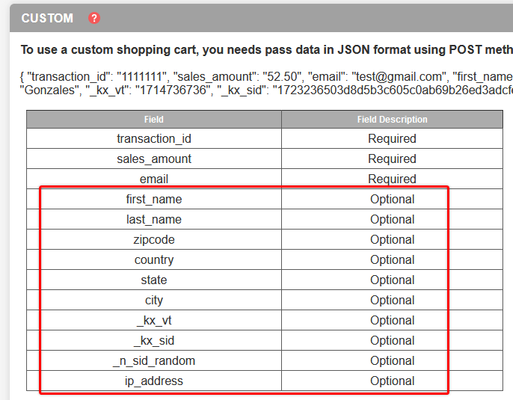
The above three data fields are required, but besides them, you can add more from the available fields found in Visiopt.
When done, save your Zap and you should be good to go!
Some carts and processors will send a separate webhook notification for the main sale and each upsell purchased. This will cause multiple conversions to be recorded.
For simple instructions to stop this click HERE.
WooCommerce allows setting up global webhooks, but it doesn’t support product-specific webhooks by default. To track products individually, you need to use a plugin called FunnelKit. Here’s how you can set it up.
STEP 1 - Install the FunnelKit Plugin:
After installing the plugin, navigate to the "Automation" tab:
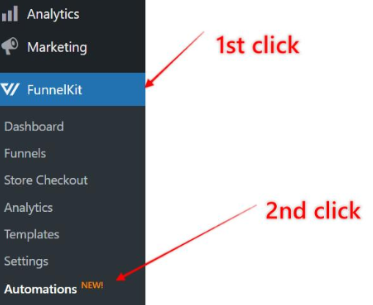
STEP 2 - Create a New Automation:
Click on the "Create Automation" button:

Click here to proceed with the setup:
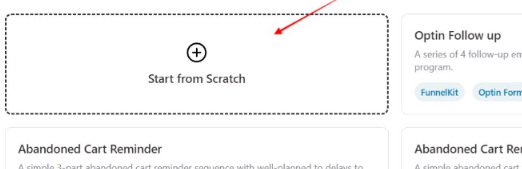
STEP 3 - Name Your Automation:
Enter a name for your automation and click the "Create" button:
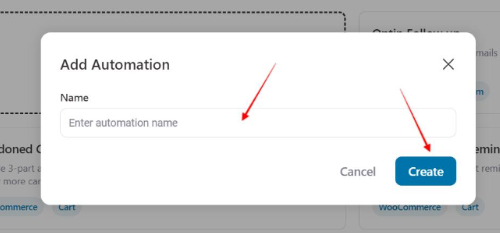
STEP 4 - Configure WooCommerce Trigger:
Click here to continue:
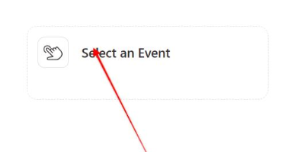
In the "WooCommerce" tab, select "Order Created" and then click "Done":
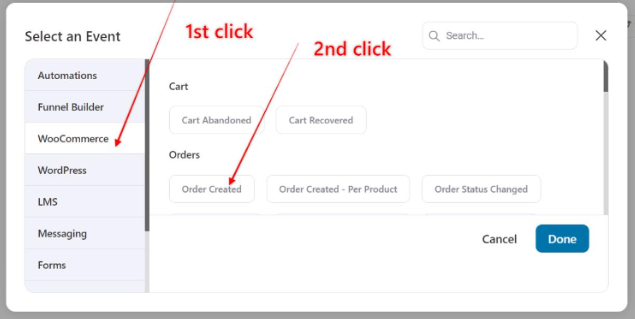
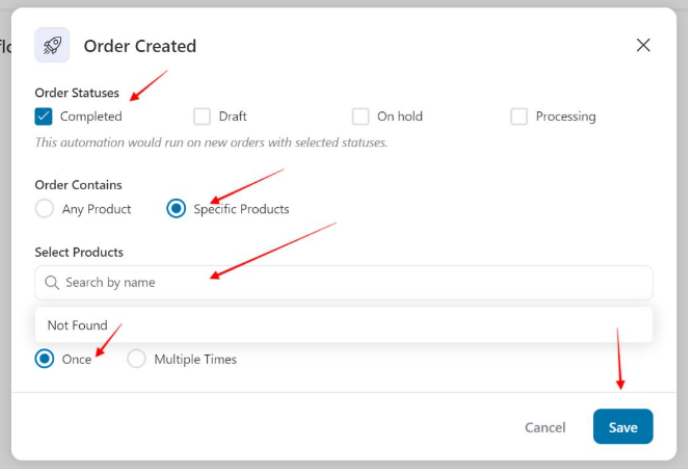
STEP 5 - Fill in the Details:
Fill out the form as shown in the screenshot, select the product you want to track, and click "Save":
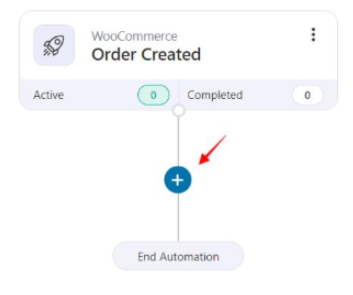
STEP 6 - Add an Action:
Click the "+" button:
Then, choose the "Action" option:
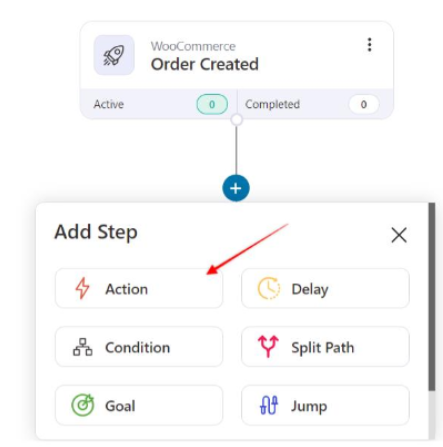
Proceed by clicking here as shown in the screenshot:
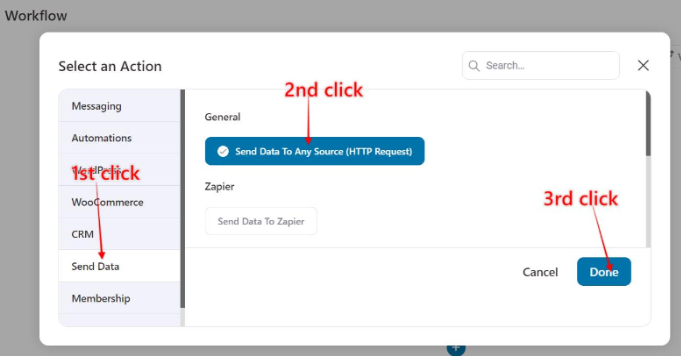
STEP 7 - Generate Custom Webhook URL:
Head over to Visiopt. Go to the Settings page > Payment processing and carts > Custom.
Enter a name for your webhook, select the funnel and click "Save & generate webhook URL". When done, copy the generated URL.
7. Copy the webhook URL
STEP 8 - Add Custom Webhook URL:
When we use this plugin we have to use a custom shopping cart.
Add the custom webhook URL and select POST method and map the data as shown, and include any necessary headers. Finally, click "Save."
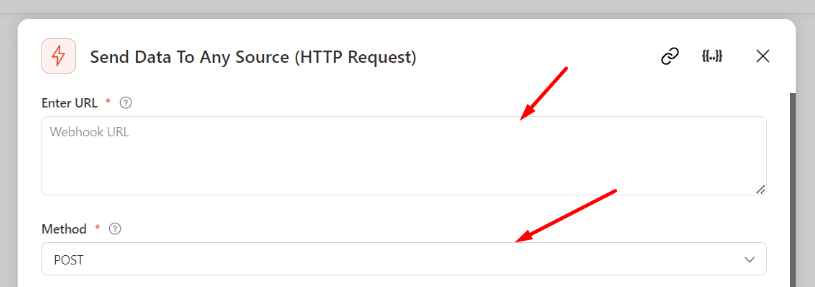
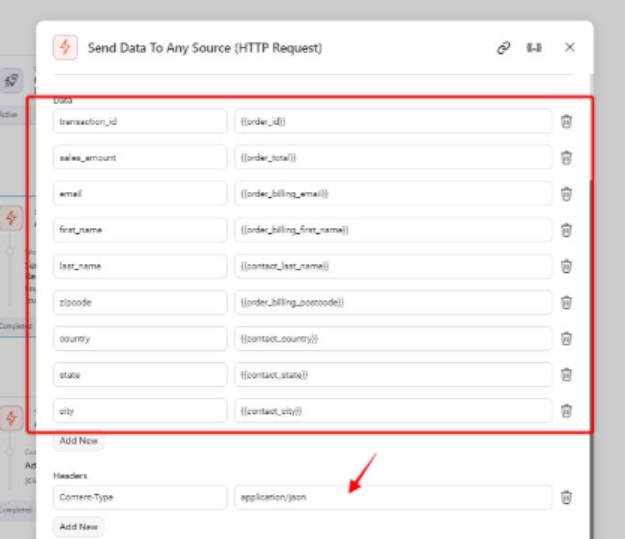
You can copy the data from here.
|
|
|
|
|
|
| transaction_id | {{order_id}} |
| {{order_billing_email}} | |
| sales_amount | {{order_total}} |
| first_name | {{order_billing_first_name}} |
| last_name | {{order_billing_last_name}} |
| zipcode | {{order_billing_postcode}} |
| country | {{order_billing_country}} |
| state | {{order_billing_state}} |
| city | {{order_billing_city}} |
|
|
|
| Content-Type | application/json |
Some carts and processors will send a separate webhook notification for the main sale and each upsell purchased. This will cause multiple conversions to be recorded.
For simple instructions to stop this click HERE.